Getting Started with the Digilent Toolbox Add-on for MATLAB®

Description
The Digilent Test & Measurement Toolbox allows users to acquire and analyze data in MATLAB®. Featuring analog data streaming, digital I/O control, and configurable power supplies, users can easily collect and send data from Digilent Test and Measurement devices, either directly or with the newly added non-blocking functions with no software limitation on the sampling rate. Users familiar with the old Data Acquisition Toolbox Support Package for Digilent Devices can follow the Transition Your Code from Session to DataAcquisition Interface, in MathWorks® Help Center, to easily convert their code to be used with the new Digilent Toolbox.
Introduction
The following guide presents how to install and use the Digilent Toolbox add-on for MATLAB®, on a Windows operating system. Users developing with the latest versions of MATLAB® and Digilent’s WaveForms now have access to more devices and capabilities.
System Requirements
Hardware
Software
- MATLAB® (compatible with R2021b and newer)
- Digilent Toolbox - this will be installed as part of this guide
Note: WaveForms v3.21.32 (or newer) is required for the Analog Discovery Pro (ADP2230) and newer devices. The WaveForms set up process is found in the WaveForms Getting Started Guide. By installing the current release of WaveForms, the WaveForms SDK will be installed, which is needed by the Data Acquisition Toolbox to properly work with Digilent devices.
Setup and Use Instructions
Hardware Setup
Plug in the Test and Measurement device to the computer via an USB cable. An Analog Discovery 3 (AD3) device is used by this guide for demonstration purposes.
If your device requires external power, plug in its power supply to an outlet, then plug the power supply's end into the selected Test and Measurement device. If equipped, flip the device’s power switch to the on position. The green “power good” indicator LED on the device will turn on.
Software Setup
With the WaveForms application already installed and an AD3 device connected to a target Windows system, launch WaveForms. Verify the AD3 is listed in WaveForms’ Device Manager as ‘Discovery3’ and then exit WaveForms.
Launch MATLAB® R2021b or newer. Once in MATLAB®, select the HOME tab. Click on the Add-Ons menu option and select Manage Add-Ons.
- What to do if the legacy support package for Digilent Analog Discovery Hardware is installed?
-
In the Add-On Manager, if the original ‘Data Acquisition Toolbox Support Package for Digilent Analog Discovery Hardware’ item is installed, then it will need to be uninstalled prior to installing the new Digilent Toolbox. Select the ‘Data Acquisition Toolbox Support Package for Digilent Analog Discovery Hardware’ and then click on the vertical ellipsis to the far right. Select ‘Uninstall’.
Click OK in the popup message window. The message informs the user that the ‘Digilent Toolbox’ was not developed by MathWorks®, but by Digilent and is supported by Digilent.
A successful installation will show Installed on the add-on icon. Click the Manage button to return to the Add-On Manager window.
Back in the MATLAB® workspace, the directory field shows the path for the newly installed Digilent Toolbox files.
``(C:\users\{user}\AppData\Roaming\MathWorks\MATLAB Add-Ons\Collections\Digilent Toolbox)``
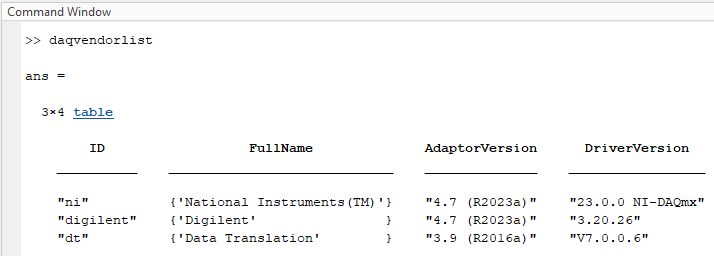
Next, in the Command Window, enter ‘daqvendorlist’ to view the supported vendors. The new Digilent Toolbox will indicate a driver version of 3.20.1 or newer.
If the original ‘Data Acquisition Toolbox Support Package for Digilent Analog Discovery Hardware’ was not removed, then the ‘digilent’ vendor would appear as ‘Not Operational’, since it would have required an older driver version of WaveForms.
The left-side window pane in MATLAB® shows a list of provided examples. A custom MATLAB® example file for the AD3 can be downloaded and extracted from all_systems_ad3.zip. Open the custom example in the MATLAB® Editor. The deviceID for the Analog Discovery 3, in this example, is noted as ‘AD3_0’. The deviceID can be determined by the MATLAB® function daqlist. This script was written to use an AD3 device and was wired as instructed by the commented top lines of the script, in order to generate the two ramps shown in Figure 1 of the screen capture. Two oscilloscope channels, one arbitrary waveform generator (AWG), one programmable power supply channel, and all the digital channels, on the AD3 device, were used in this example.
Also included with the Digilent Toolbox files is a getting started file, GettingStarted.mlx, with snippets of function calls, and three specific examples for transitioning from the legacy Data Acquisition Toolbox Support Package for Digilent Analog Discovery Hardware to the new Digilent toolbox. Those three examples are GSAcquiringData.mlx, GSGeneratingData.mlx, and GSAcquiringAndGenerateData.mlx.
Final Notes
The Digilent Toolbox is also available on the Digilent – MATLAB repository on GitHub.
For more information on your Digilent Test and Measurement device, check out its Resource Center, which can be found through the Test and Measurement page of this site.
For technical support, please visit the Test and Measurement section of the Digilent Forums.


