How to Update or Recover Linux Mode on the Analog Discovery Pro (ADP3450/ADP3250)
Overview
This guide walks through the process of updating or recovering the Analog Discovery Pro's Linux image, which is used when the device is run in Linux Mode. Updating your image ensures that you have access to the latest preinstalled packages, drivers, and software that Digilent ships within the image. You might need to recover the image in the event that something goes awry in Linux Mode. Be aware that this process overwrites the current Linux image and that customizations you may have made will be lost - back up your work!
Note: This process does not update the Standard mode firmware and does not affect the device calibration. Check out How to Update Standard Mode Firmware.
Inventory
- A computer with WaveForms installed, version 3.16.3 or later
- Your Analog Discovery Pro (ADP3450/ADP3250)
- The latest Linux image (v11) for the Analog Discovery Pro 3000 Series is available for download from the My Products section of the site:
- A USB flash drive formatted with a FAT/FAT32 filesystem
Guide
You can check to see if your device already has the latest Linux image after booting into Linux. Run the following command in the serial terminal and compare it to the latest version listed in the Inventory section.
cat /build_version
If your version is out of date, Digilent recommends updating it before doing anything else in Linux Mode, as the process of updating the image will erase work you might have saved in previous sessions.
If you are not on the latest version, or simply want to refresh to a known state, extract the files from the Linux image ZIP download, linked in the Inventory section, above. Copy the usb-image.ub, emmc.img, and deploy.env files to the root directory of the FAT/FAT32 USB drive.
Make sure that the Analog Discovery Pro is plugged in, powered on, and connected to a host computer via a USB cable. Connect a serial terminal program, such as PuTTY or Tera Term, to the serial port associated with the Analog Discovery Pro at 115200 baud, 8 bits, 1 stop bit, and no parity.
Note: Connecting the device to a serial terminal prior to booting into Linux Mode ensures that you won't miss any of the messages printed on boot, including the login prompt.
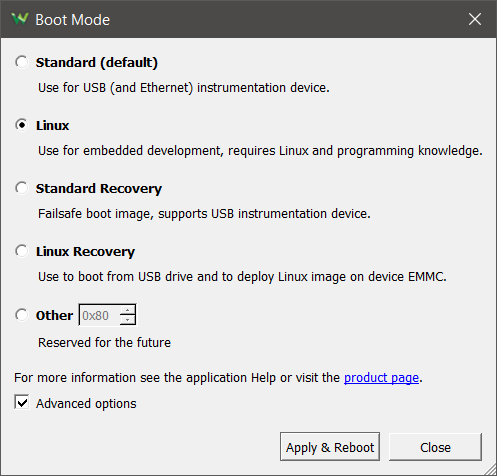
In the WaveForms' Device Manager with the Analog Discovery Pro connected to a host computer, click on the Boot button and select the Linux Recovery option. Click Apply & Reboot to continue.
A popup will then appear specifying that without the USB and the appropriate files, a serial console connection is needed to exit the boot mode. Click Continue to proceed.
Returning to the serial terminal, once Linux has booted on the device, enter the login and password below:
| login: | root |
|---|---|
| password: | root |
Run the deploy-to-emmc command and wait for it to finish. This command writes the Linux image into the device's non-volatile memory, and will take some time (60+ seconds). When complete, it will return to a command prompt.
Note: This will erase all data from the device eMMC flash!
In the WaveForms application, click on the Boot button and select the Linux option. Click Apply & Reboot to continue.
Other Resources
Check the Analog Discovery Pro (ADP3450/ADP3250) Resource Center for more guides on using your device.
For technical support, please visit the Test and Measurement section of the Digilent Forums.
Note: Experienced users may realize that they could load their own images onto the device. While Digilent will not prevent users from doing this, we can only offer our own provided image as a way to correct any mistakes or problems that arise from custom images.


