Arty Z7-20 DMM Shield Webserver Demo User Guide
Digilent provides a Webserver demo for DMM Shield Zynq library for Digilent's Arty Z7-20 FPGA system board, to be used with the Xilinx SDK development tool.
It accesses the DMM Shield hardware in order to implement some basic DMM Shield functionality.
It uses DMM Shield library, see DMMShield Zynq Library.
The demo is based on Xilinx Webserver demo (included in Xilinx LightWeight IP Application Examples, page 6), which demonstrates the use of Xilinx LWIP networking stack. The Xilinx demo was modified to implement DMMShield functionality / requests.
The demo uses a Xilinx Memory File System (xilmfs), which stores the main page, together with page additional files (java script file, used images, css style file). The functionality implemented in the main page / javascript file only uses HTML / AJAX.
Overview
Description
The Arty Z7-20 DMM Shield Webserver demo is demonstrating the basic functionality of the DMM Shield connected to Arty Z7-20 as a system board.
The project implements a basic client - server architecture:
- the webserver exposes an Application web page at a specific IP address, implementing the needed functionality.
- every time the user opens the web page using any browser the page is delivered to the user browser.
- when web page controls (combos, radio buttons) are modified, the Javascript code related to the application web page generates HTTP Requests to the Webserver.
- the webserver sends the HTTP Response back to the the application web page, as a text message.
- the Javascript code related to the application web page interprets the response text and refreshes only the affected areas of the webpage, in order to display the needed information.
- the application web page, together with associated files, are stored in a Xilinx memory file system
Features Used
| Not Used | Used | |
|---|---|---|
| 2 user switches | X | |
| 2 user LEDs | X | |
| 2 user RGB LEDs | X | |
| 4 user push buttons | X | |
| USB-UART Bridge | X | |
| Micro SD card connector | X | |
| HDMI Sink and HDMI Source | X | |
| PWM mono audio out w/ 3.5mm jack | X | |
| 10/100/1000 Ethernet PHY | X | |
| 512MiB 1050Mb/s DDR3 Memory | X | |
| Quad-SPI Flash | X | |
| Two Pmod ports | X | |
| chipKIT connector | X | |
| USB HID Host | X |
Prerequisites
Hardware
- Arty Z7-20 board
- Micro-USB cable
- DMM Shield
- Ethernet cable
- Banana Cables
- 5k Ohm Resistor
Software
- Vivado Design Suite & Xilinx SDK 2016.4
- Version 2016.4 must be used to generate the project
- Digilent Board Support Files for Vivado
- Follow the Vivado Board Files for Digilent 7-Series FPGA Boards guide on how to install Board Support Files for Vivado.
Downloads
Download and Launch the Arty Z7-20 DMM Shield Webserver Demo
1) Follow the Using Digilent Github Demo Projects Tutorial.
2) If you choose to use the project whithout building the hardware platform in Vivado (SDK Hardware Handoff metod in the above mentioned tutorial), you will notice that sdk folder lacks the hardware platform folder (design_1_wrapper_hw_platform_0).
In order to build this, before importing the projects in SDK (step 4), follow this procedure: In SDK, select File/New/Others/Xilinx/Hardware Platform Specification, then browse for design_1_wrapper.hdf in hw_handoff folder, then select Finish.
3) Follow the steps from Memory File System related actions chapter.
4) Plug the DMM Shield in the Chipkit connector of the Arty Z7-20 board
5) Plug a banana cable into Voltage/Ohm banana connector of the DMM Shield. Do the same for the COM connector.
6) Connect the end of the cables to a through-hole resistor of a desired value. Ex 5k Ohm
7) Turn on your board and open a serial terminal (such as TeraTerm) on your computer to receive status messages. Setup the serial port to connect to the appropriate port for your board, with a baud rate of 115200, 8 data bits, no parity bit and 1 stop bit.
8) Run the webaserver application (DMMShieldWebServer) from SDK. Take from the terminal the webserver's IP address and open it in a web browser. For example: http://10.113.0.74/
9) In the web page change scale according to the desired measurement, and notice the measured value. See Application web page for more details.
Note: This is a simple example of measuring a resistance. The demo will work with every scale of resistances/voltage/current/diode/continuity/ in the correct configuration.
Hardware Structure
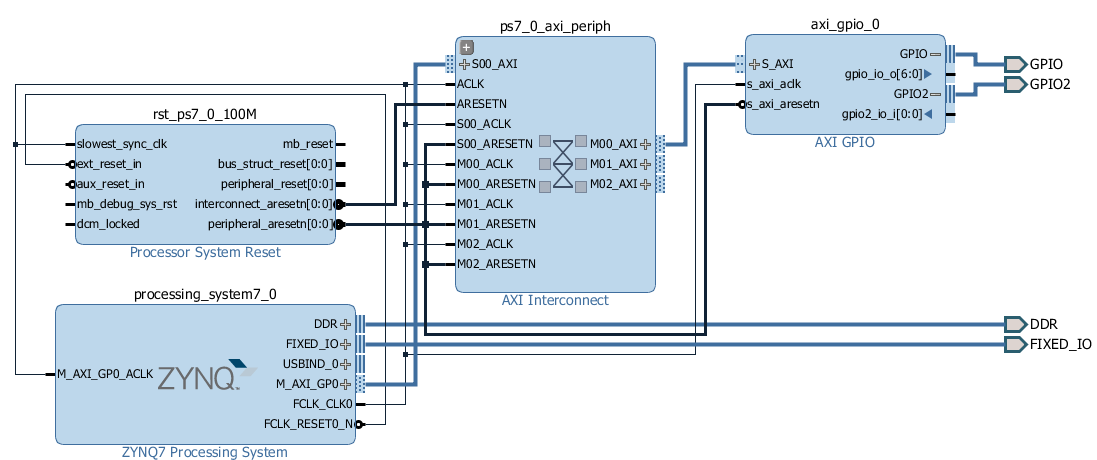
The Vivado hardware configuration implemented for this demo has the following features:
- basic Zynq configuration, having ENET_0 and UART_PS0 checked
- AXI_GPIO core having 2 GPIO channels: GPIO0 for the 6 output IO signals (CS_Eprom, CS_DMM, SPI_CLK, DI, RLU, RLD, RLI) and GPIO2 for the input signal DO. These GPIO pins are used for the communication between Arty Z7-20 board and DMM Shield.
DMMShield Webserver structure
The application has the following elements:
Client side:
Server side:
The client side elements are stored in the Arty Z7-20 board memory in a Memory File System.
Application web page
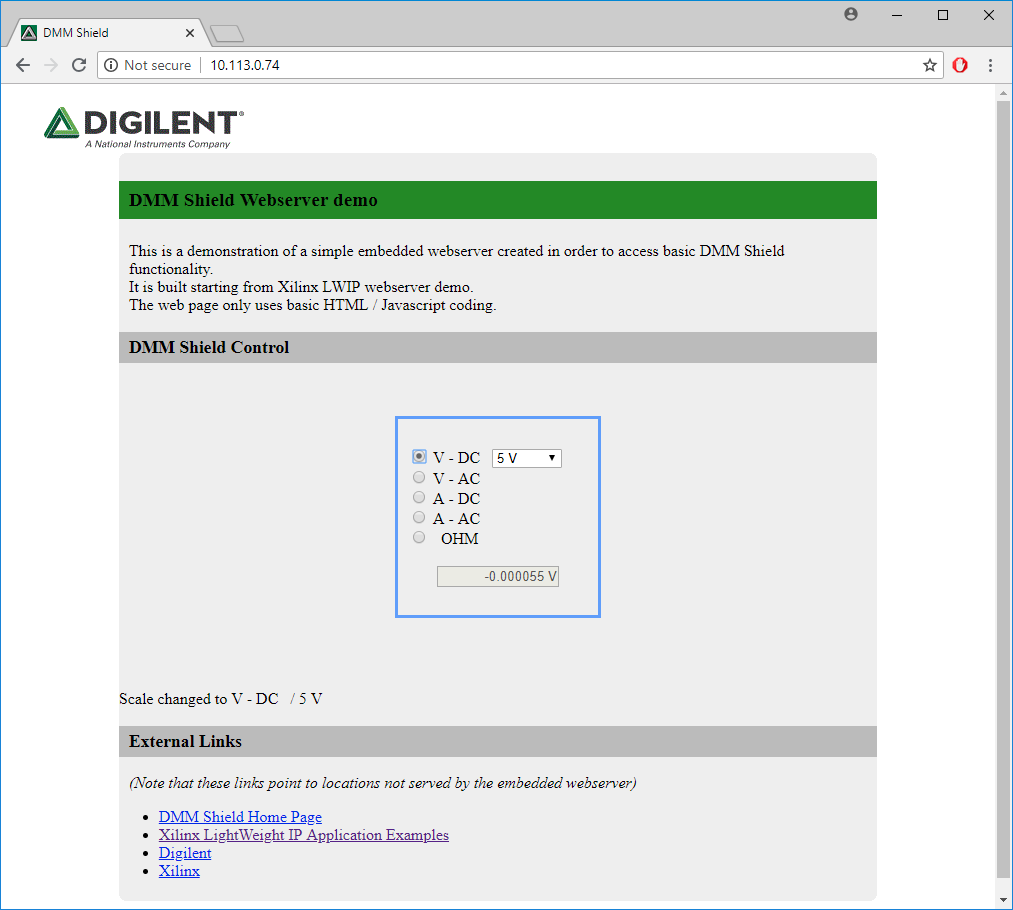
This is a normal html web page exposed by the webserver in order to implement the user interface.
It is called index.html and is located in the root of the Xilinx memory file system.
The following image shows the application web page.
 Basically, it has the following functions:
- Select the scale class using radio buttons.
- Select the scale using the scale combos (specific to each scale class).
- It loads the Javascript code related to the application web page.
- It displays some status information (scale change, scale change by other instances, or error messages)
Javascript code related to the application web page
The javascript code related to the Application web page is located in the js folder of the Xilinx memory file system and is grouped in the main.js file. Basically, it has the following functions:
- when the Application web page is loaded, variables are initialized and event functions are assigned to change in radio buttons and combos page controls. Data request is enabled.
- when radio buttons are clicked, the webserver.scaleType_changed function is called which ensures that only the scale combo corresponding to the selected radio button is displayed.
- when scales are selected using the scale combos, the scale_changed function is called which generates a “/cmd/sclxhr” HTTP Request, including current scale on two characters. It sets the webserver.scale_callback callback function and disables data request.
- when HTTP Response arrives for “/cmd/sclxhr” HTTP Request, the webserver.scale_callback function is called which enables the data request. If error occurs, 'ERROR“ is displayed in the measured value field and the error message is shown in the status area of the application web page.
- when data request is enabled, every one second the webserver.val_request function is called. It generates a ”/cmd/valxhr“ HTTP request. It sets the webserver.val_callback callback function.
- when HTTP Response arrives for ”/cmd/valxhr“ HTTP Request, the webserver.val_callback function is called. It extracts the DMMShield current scale (first two characters) and the measured value (remaining characters) from the response text. The measured value is displayed in the measured value field. If the DMMShield current scale is different than the page selected scale (meaning that the page was changed by a different web page), it calls webserver.positionRadiosCombos function which updates the radio buttons / scale combos to reflect this new scale. If error occurs, 'ERROR” is displayed in the measured value field and the error message is shown in the status area of the application web page.
Webserver
This implements the Server side of the application. It is a Vivado SDK application written in C, running on Arty Z7-20 board, that basically provides Application web page and listens for requests arrived from it. As mentioned, the Xilinx LWIP webserver demo was used as a staring point.
When application initializes, it communicates in the serial terminal (115200 baud) the IP address that will be used in order to open the application web page.
Board IP: 10.113.0.74
Netmask : 255.255.252.0
Gateway : 10.113.0.1
The webserver hadles the following HTTP POST requests:
- “/cmd/sclxhr”.
This is the POST request sent by the Application web page to the webserver in order to change the current DMMShield scale, as a result of a scale being selected in the application web page. When this request is recognized, the following two characters are interpreted as the scale index.
Then, the webserver calls DMM_SetScale library function in order to set the desired scale.
The HTTP Response text is shown in the following table:
| “<scale ID on 2 characters>“ | no errors |
| ”<error message>“ | errors occurred when setting the scale |
- ”/cmd/valxhr”.
This is the POST request sent by the Application web page repeatedly to the webserver, in order to get the DMMShield measured value / current state.
When this request is recognized, if the DMMShield has a selected scale, the webserver calls DMM_DGetValue library function in order to obtain the measured value then it calls library function DMM_FormatValue to format the value.
The HTTP Response text is shown in the following table:
| “<current DMMShield scale ID on 2 characters><formatted value, with 6 decimal points and unit>“ | A scale was selected for DMMShield, no errors |
| ”<error message>“ | A scale was selected for DMMShield, errors occurred when retrieving measured value |
| ”-1” | No scale was selected for DMMShield |
Memory file system
This project uses the Xilinx memory file system in order to provide storage for the Application web page and its related files: images, style and javascrip file.
The memory file system has the following content:
| Location (Folder) | Content (File) | Description |
|---|---|---|
| Root | index.html | Application web page |
| Root\js | main.js | Javascript code related to the application web page |
| Root\css | main.css | CSS style document |
| Root\images | Digilent-Logo.gif | The Digilent logo placed within the application web page |
| favicon.ico | The Digilent logo used as web page shortcut icon | |
| Root\index_files | colorschememapping.xml | Files related to index.html web page |
| editdata.mso | ||
| filelist.xml | ||
| themedata.thmx |
The Memory File System related actions chapter explains how the memory file system is used in the SDK project.
Memory File System related actions
The memfs located under DMMShieldWebServer folder of SDK projects contains the files to be placed in memory file system. There are two steps in using the memory file system:
Generate the memory system file
The purpose of this step is to generate one memory system file out of the content needed to be placed in the memory file system.
Run Xilinx Software Command Line Tool utility, which provides a command prompter. Run the following two commands:
1) Change directory to the root of location of memfs folder content.
For example: cd Y:/Software/Work/Webserver/DMMShield/DMMShield.sdk/DMMShieldWebServer/memfs/
2) Run the mfsgen command, including all the files / folders to be included.
mfsgen -cvbf ../image.mfs 2048 css images index_files js generate-mfs index.html
Note that this step is also explained in the Xilinx documentation Xilinx LightWeight IP Application Examples, page 28.
Download the memory file system file in the board memory
Although Xilinx proposes (Xilinx LightWeight IP Application Examples, page 28) the use of dow command in order to download the memory file system, we used a different approach: instruct Vivado SDK to download the memory file system file every time the configuration is run.
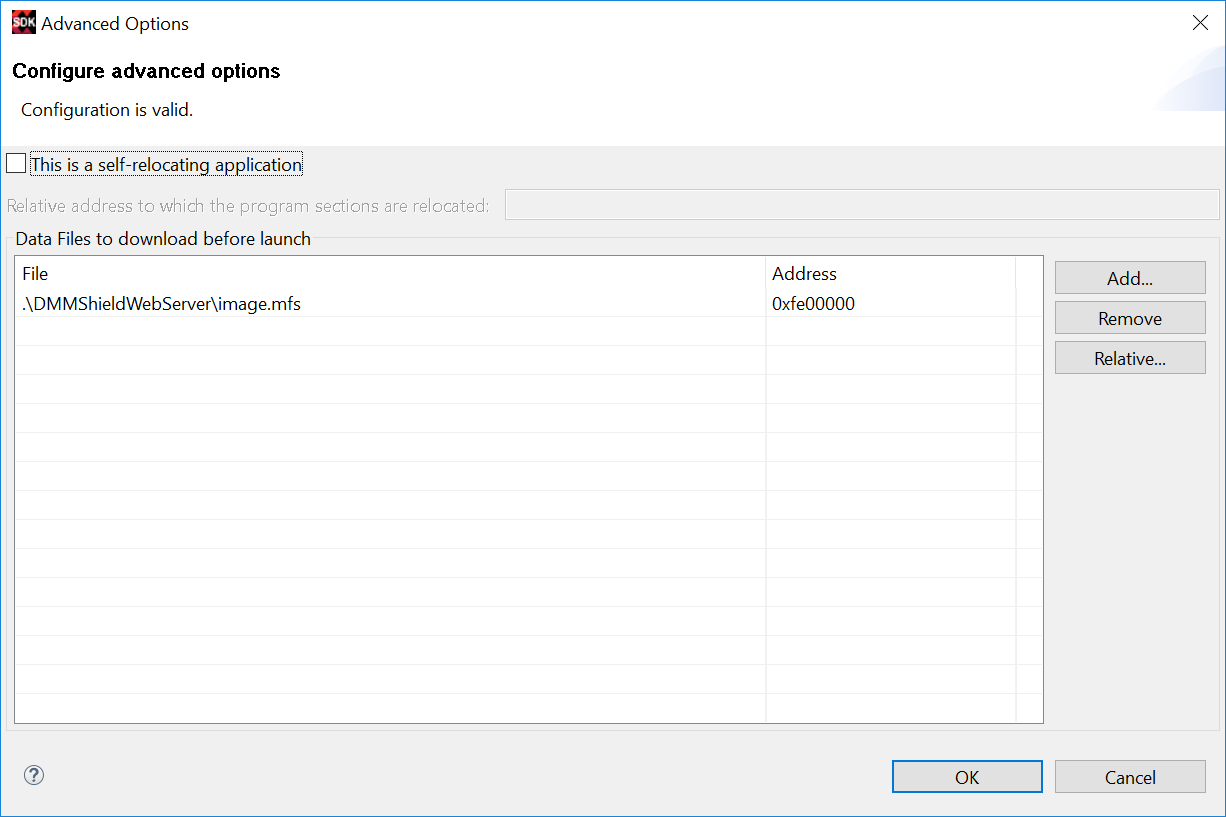
In Vivado SDK, edit the desired debug (or running configuration) like this:
- select Run / “Debug Configurations” menu (or Run / “Run Configurations”), then select the desired configuration that will be downloaded on the board.
- click on Application tab, then press Edit… button.
- Add image.mfs file at address 0xFE00000, as shown in the following image:
DMMShield Webserver functionality
The project implements a basic client - server architecture:
- the webserver stores a main web page at a specific IP address, implementing the needed functionality.
- every time the user opens the web page using any browser the page is delivered to the user browser.
- when web page controls (combos, radio buttons) are modified, the javascript code behind the webpage generates HTML requests to the web server.
- the webserver sends the response back to the the javascript code behind the webpage, as a text message.
- the javascript code behind the webpage refreshes only the affected areas of the webpage, in order to display the needed information.


