Getting Started - Angular 2 and TypeScript
This tutorial describes the process of creating custom web applications with the Digilent Instrumentation Protocol using Angular 2 and TypeScript.
- Make sure you have Node, npm, and the Ionic CLI installed. You will also need a code editor. Visual Studio Code is a good editor for Angular2 applications.
- Go to a directory and start a new ionic project.
ionic start my-openscope tutorial
- Enter the project directory.
cd my-openscope
- Install the Digilent Instrument Procol and the Digilent Chart from npm.
npm install --save dip-angular2
npm install --save digilent-chart-angular2
- Open src/app/app.module.ts, import DeviceManagerService and DigilentChart, and add them to providers and declarations respectively.
import { BrowserModule } from '@angular/platform-browser';
import { NgModule, ErrorHandler } from '@angular/core';
import { IonicApp, IonicModule, IonicErrorHandler } from 'ionic-angular';
import { MyApp } from './app.component';

import { HelloIonicPage } from '../pages/hello-ionic/hello-ionic';
import { ItemDetailsPage } from '../pages/item-details/item-details';
import { ListPage } from '../pages/list/list';

import { StatusBar } from '@ionic-native/status-bar';
import { SplashScreen } from '@ionic-native/splash-screen';

import { DeviceManagerService } from 'dip-angular2/services';
import { DigilentChartModule } from 'digilent-chart-angular2/modules';

@NgModule({
  declarations: [
    MyApp,
    HelloIonicPage,
    ItemDetailsPage,
    ListPage
  ],
  imports: [
    BrowserModule,
    IonicModule.forRoot(MyApp),
    DigilentChartModule
  ],
  bootstrap: [IonicApp],
  entryComponents: [
    MyApp,
    HelloIonicPage,
    ItemDetailsPage,
    ListPage
  ],
  providers: [
    StatusBar,
    SplashScreen,
    {provide: ErrorHandler, useClass: IonicErrorHandler},
    DeviceManagerService
  ]
})
export class AppModule {}
- Open src/pages/hello-ionic/hello-ionic.ts. Import and inject the DeviceManagerService.
import { Component } from '@angular/core';
import { DeviceManagerService } from 'dip-angular2/services';
@Component({
    selector: 'page-hello-ionic',
    templateUrl: 'hello-ionic.html'
})
export class HelloIonicPage {
    constructor(public deviceManagerService: DeviceManagerService) {

    }
}
- Add a public property named “deviceUri” of type string. Add a method named connectToDevice() that calls connect on the device manager service and subscribes to the observable.
@Component({
    selector: 'page-hello-ionic',
    templateUrl: 'hello-ionic.html'
})
export class HelloIonicPage {
    public deviceUri: string;
    constructor(public deviceManagerService: DeviceManagerService) {

    }
    connectToDevice() {
        this.deviceManagerService.connect(this.deviceUri).subscribe(
            (data) => {
                console.log(data);
            },
            (err) => {
                console.log(err);
            },
            () => { }
        );
    }
}
- Open src/pages/hello-ionic/hello-ionic.html and delete all of the elements inside of the <ion-content> tag. Create an ion-item with a stacked label and an input that is two-way bound to deviceUri. Create a button bound to the click event that calls connectToDevice()
<ion-header>
    <ion-navbar>
        <button ion-button menuToggle>
            <ion-icon name="menu"></ion-icon>
        </button>
        <ion-title>Hello Ionic</ion-title>
    </ion-navbar>
</ion-header>

<ion-content padding>
    <ion-item>
        <ion-label stacked>Device Address</ion-label>
        <ion-input [(ngModel)]="deviceUri">
        </ion-input>
    </ion-item>
    <button ion-button (click)="connectToDevice()">
        Connect To Device
    </button>
</ion-content>
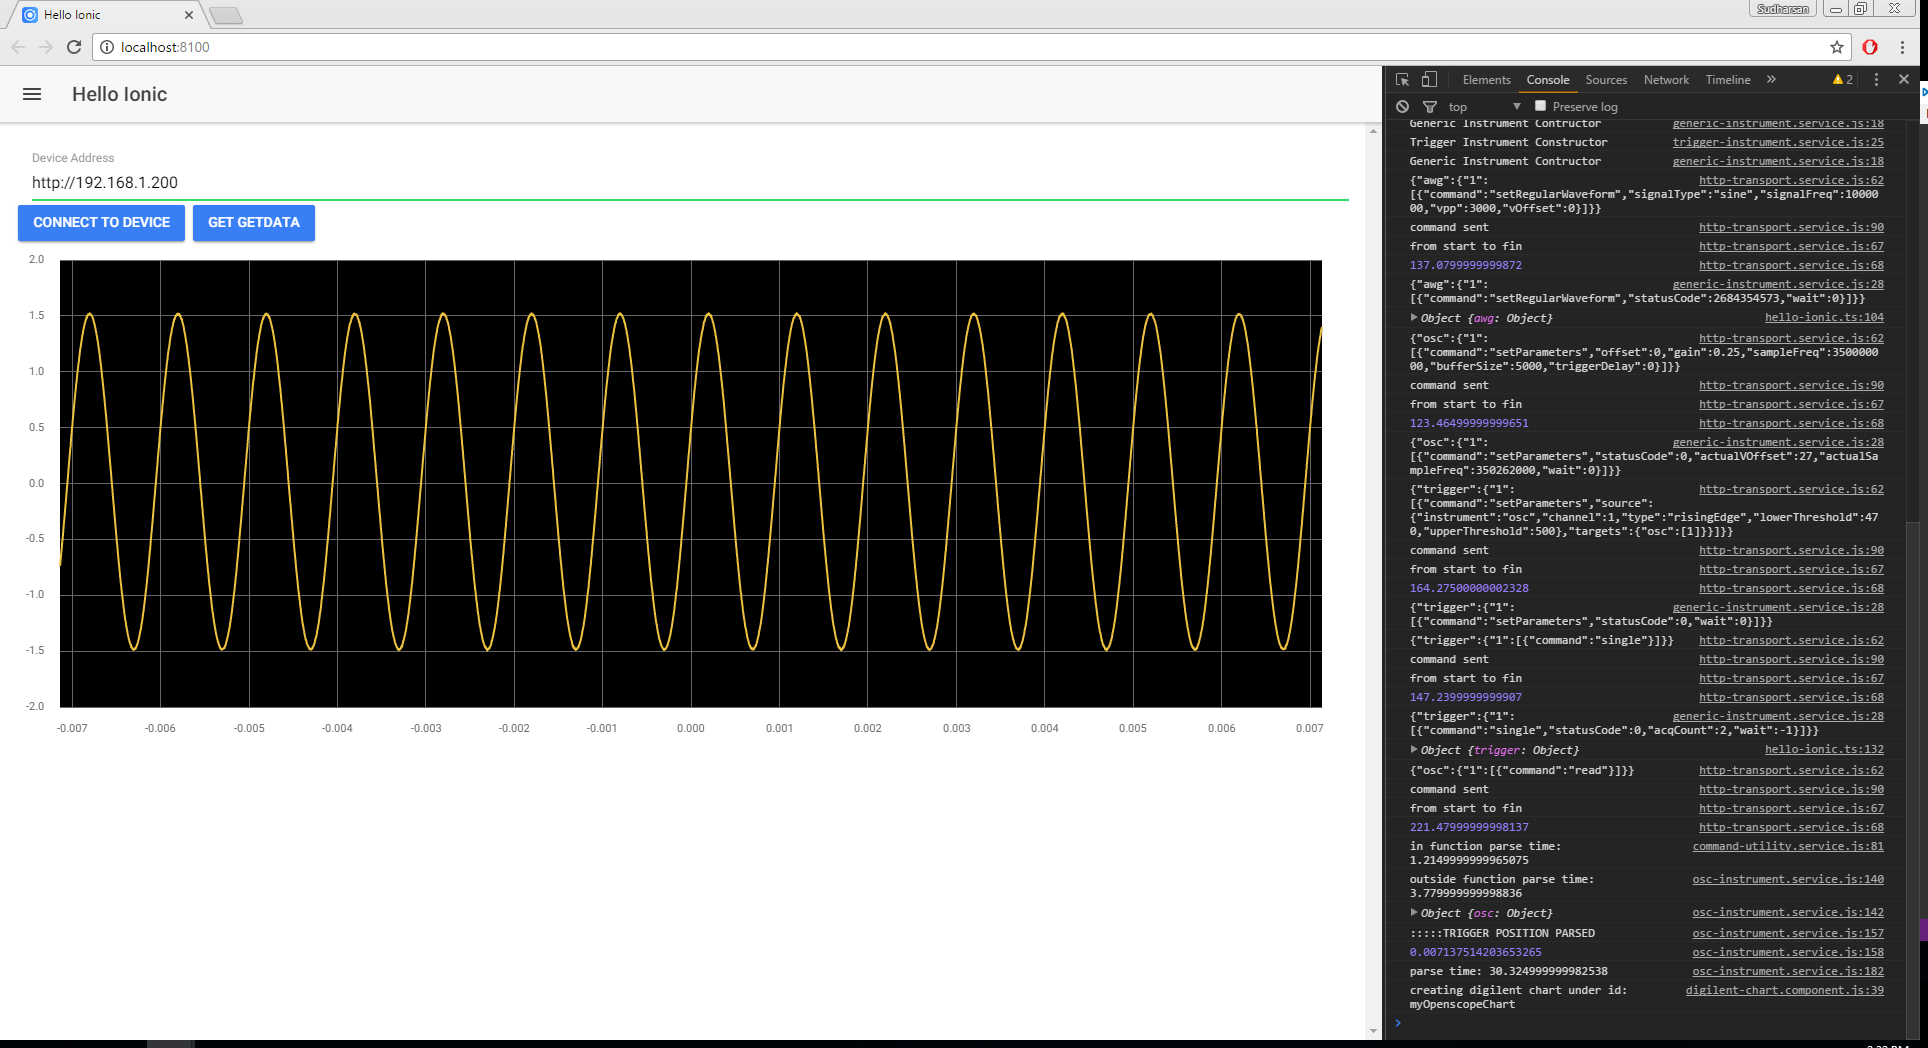
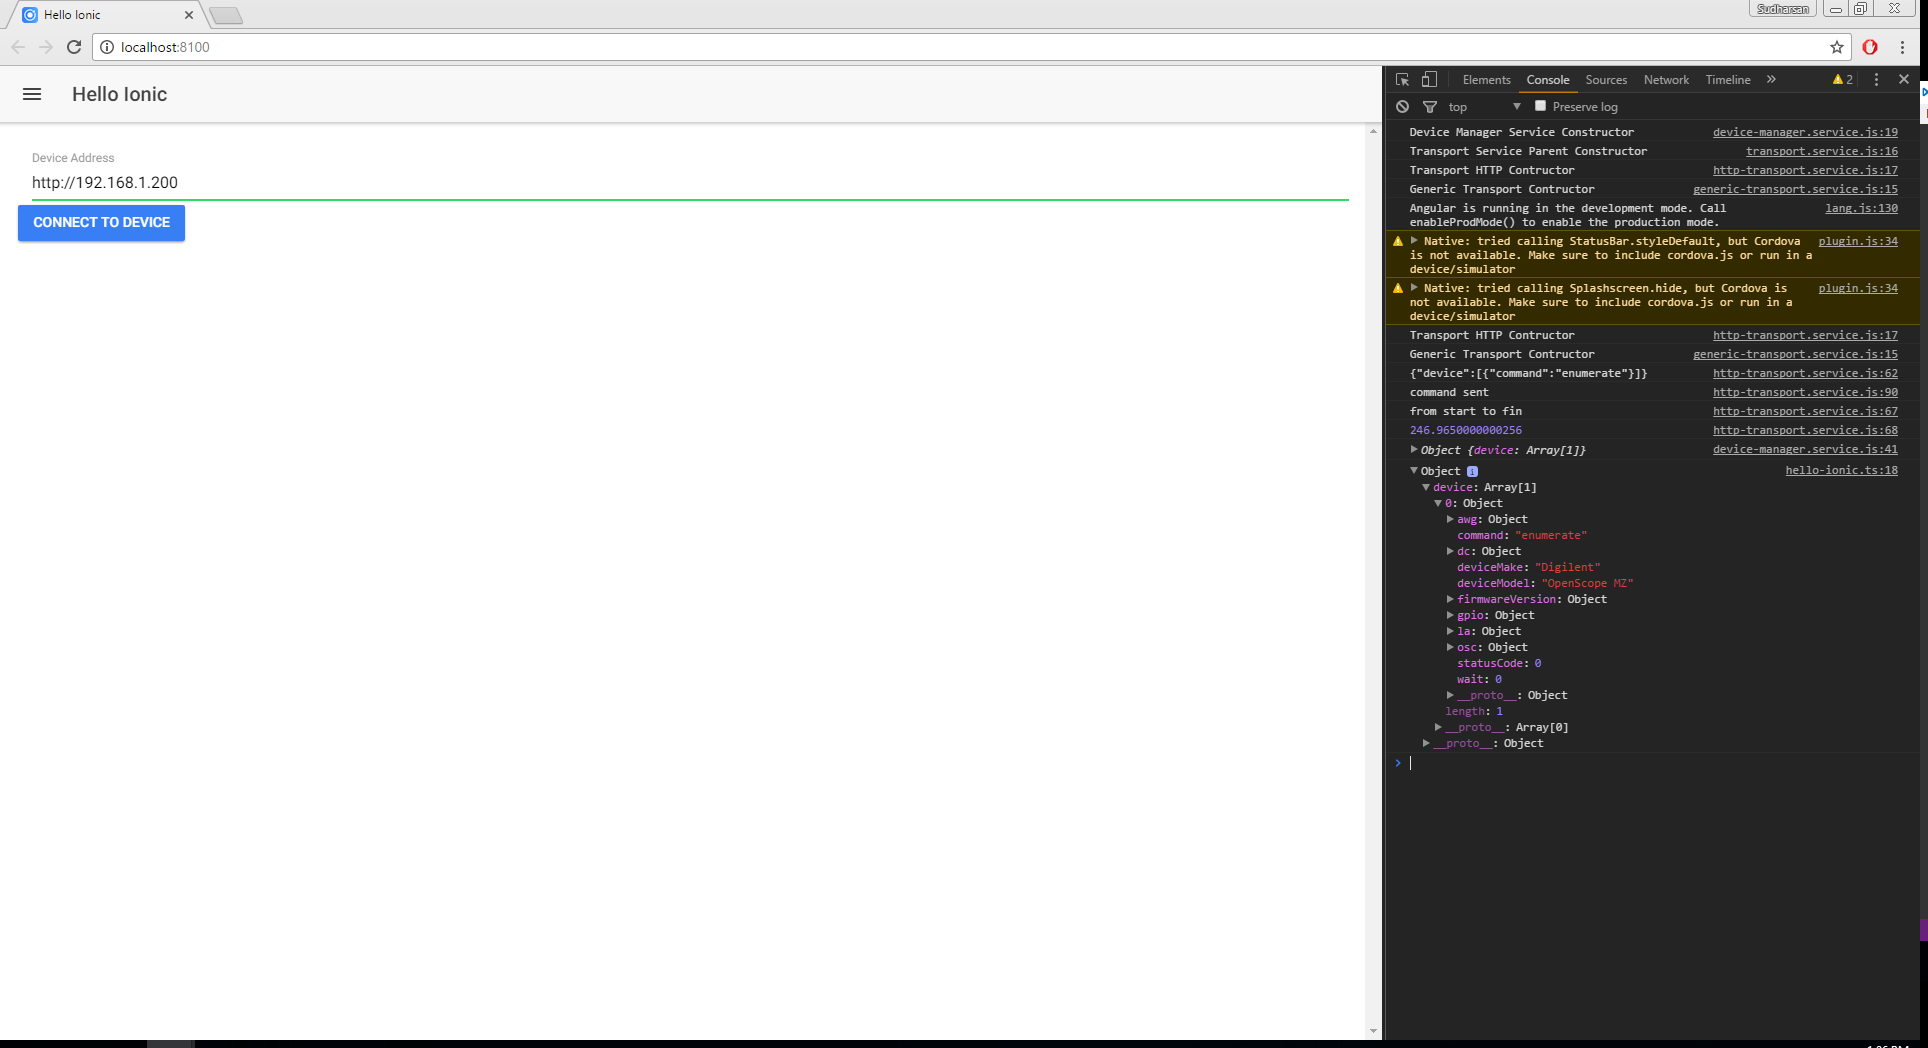
- Make sure the OpenScope is connected to Wifi and enter its IP Address in the input box i.e. “http://192.168.1.8”. Open the console and click the Connect To Device button. Some debug info will be printed in the console. A successful enumeration is pictured below.
- Next, import DeviceService from 'dip-angular2/services' and create a property called myDevice of type DeviceService.
import { DeviceManagerService, DeviceService } from 'dip-angular2/services';
...
public myDevice: DeviceService;
...
- Add a turnOnAwg function that will tell the OpenScope to create a 1 kHz 3 Vpp sine wave and run it. Note that the .flatMap function is used to chain asynchronous calls to the OpenScope.
...
turnOnAwg() {
        this.myDevice.instruments.awg.setRegularWaveform([1], [{
            signalType: 'sine',
            signalFreq: 1000,
            vOffset: 0,
            vpp: 3
        }])
        .flatMap((data) => {
            console.log(data);
            return this.myDevice.instruments.awg.run([1]);
        })
        .subscribe(
            (data) => {
                console.log(data);
            },
            (err) => {
                console.log(err);
            },
            () => { }
        );
    }
...
- Update the connect method to have the device manager service create a device from the enumeration response and set myDevice to the newly added device.
...
connectToDevice() {
        this.deviceManagerService.connect(this.deviceUri).subscribe(
            (data) => {
                console.log(data);
                this.deviceManagerService.addDeviceFromDescriptor(this.deviceUri, data);
                this.myDevice = this.deviceManagerService.devices[this.deviceManagerService.activeDeviceIndex];
                this.turnOnAwg();
            },
            (err) => {
                console.log(err);
            },
            () => { }
        );
    }
...
- Create a chartId property of type string and set it equal to 'myOpenscopeChart'. Create a chartOptions property and setup the desired chart options according to the flot documentation.
...
public chartId: string = 'myOpenscopeChart';
public chartOptions: any = {
    series: {
        lines: {
            show: true
        }
    },
    legend: {
        show: false
    },
    canvas: true,
    grid: {
        hoverable: true,
        clickable: true,
        autoHighlight: false,
        borderWidth: 0,
        backgroundColor: 'black',
        labelMargin: 15,
        margin: {
            top: 15,
            left: 10,
            right: 27,
            bottom: 10
        }
    },
    axisLabels: {
        show: true
    },
    tooltip: {
        show: true,
        cssClass: 'flotTip'
    },
    zoomPan: {
        enabled: true,
        secsPerDivisionValues: [0.0001, 0.0002, 0.0005, 0.001, 0.002, 0.005, 0.01, 0.02, 0.05, 0.1, 0.2, 0.5, 1]
    },
    cursorMoveOnPan: true,
    yaxis: {
        position: 'left',
        axisLabel: '',
        axisLabelColour: '#666666',
        axisLabelUseCanvas: true,
        show: true,
        tickColor: '#666666',
        font: {
            color: '#666666'
        }
    },
    xaxis: {
        tickColor: '#666666',
        font: {
            color: '#666666'
        }
    }
};
...
- Create a chartLoad() method.
...
chartLoad() {
    console.log('chart loaded!');
}
...
- Create a div with style set to: “height: 500px; width: 100%; font-size: 14px;”. Inside of the div tag, create a digilent chart and connect all of the inputs and outputs to our properties and methods. Create a template reference variable for the digilent chart called myChart.
...
<div style="height: 500px; width: 100%;font-size: 14px;">
    <digilent-chart #myChart [flotOptions]="chartOptions" [chartId]="chartId" (chartLoad)="chartLoad()"></digilent-chart>
</div>
...
- Import ViewChild from @angular/core and import DigilentChart from 'digilent-chart-angular2/components. Create a ViewChild for the digilent chart using the template reference variable myChart and assign it type DigilentChart.
import { Component, ViewChild } from '@angular/core';
import { DeviceManagerService, DeviceService } from 'dip-angular2/services';
import { DigilentChart } from 'digilent-chart-angular2/modules';
...
@ViewChild('myChart') myChart: DigilentChart;
...
- Add a getData method that will set up the oscilloscope parameters, trigger parameters, and call trigger single. Add a openscopeRead method that calls read on the openscope continuously until a successful buffer is returned.
...
getData() {
        this.myDevice.instruments.osc.setParameters([1], [0], [0.25], [350000], [5000], [0])
            .flatMap(() => {
                return this.myDevice.instruments.trigger.setParameters([1], [{
                    instrument: 'osc',
                    channel: 1,
                    type: 'risingEdge',
                    lowerThreshold: 470,
                    upperThreshold: 500
                }], [{
                    osc: [1]
                }]);
             })
             .flatMap(() => {
                 return this.myDevice.instruments.trigger.single([1]);
             })
            .subscribe(
                (data) => {
                    console.log(data);
                 },
                (err) => {
                    console.log(err);
                },
                () => {
                    this.openscopeRead();
                }
            );
    }

    openscopeRead() {
        this.myDevice.instruments.osc.read([1]).subscribe(
            (data) => {
                this.myChart.setData([{
                    data: this.myDevice.instruments.osc.dataBuffer[this.myDevice.instruments.osc.dataBufferReadIndex][0].data,
                    yaxis: 1,
                    lines: {
                        show: true
                    },
                    points: {
                        show: false
                    }
                }], true);
            },
            (err) => {
                setTimeout(() => {
                    this.openscopeRead();
                }, 100);
            },
            () => { }
        );
    }
...
- In src/pages/hello-ionic/hello-ionic.html, create a button and bind to the click event such that getData() is called. One way bind to the disabled property of the button using myDevice such that it is disabled until myDevice is defined.
...
<button ion-button [disabled]="!myDevice" (click)="getData()">
    Get Data
</button>
...
- Make sure the Wavegen on the OpenScope is connected to oscilloscope channel 1 (the solid orange wire connected to the solid yellow wire). This allows us to perform a loop-back by outputting a signal from the wavegen and reading it in with oscilloscope channel 1.

