Digilent FPGA Demo Git Repositories
This document describes the git workflow for repositories on Digilent's Github containing demo projects for FPGA boards, and includes both structural descriptions of these repositories, as well as instructions on using these demo projects with git, and on loading and rebuilding these projects within the appropriate tools.
Table of Contents
Types of Demos
Several different types of demos are version controlled in the structure described in this document. Each type of demo consists of one or more components, each of which is a design created within a single tool. In this case, many of these tools are applications created by Xilinx for the purposes of creating design for Xilinx FPGAs. This document covers hardware, operating system, and software components, which are developed within Vivado, Petalinux, and Vitis, respectively.
Hardware-Only demos are designed within Vivado, and are programmed to a board through Vivado's hardware manager. They implement some functionality within FPGA fabric, and do not use software running in a processor in any way.
Baremetal Software demos use a hardware platform designed within Vivado, which include a processor. Software applications created within Vitis are then run on this platform, typically using AXI interfaces to communicate with hardware implemented in the FPGA fabric, often creating a bridge between the processor and some peripheral on the board.
Petalinux Software demos run a software design within a Linux image that has been placed on the board. Vivado is used to create a hardware platform, as with baremetal demos, and this hardware platform is then used in Petalinux to configure a Linux OS to map the different peripherals that are present to different drivers. Vitis is used to create a software application that uses these drivers to do something with those peripherals.
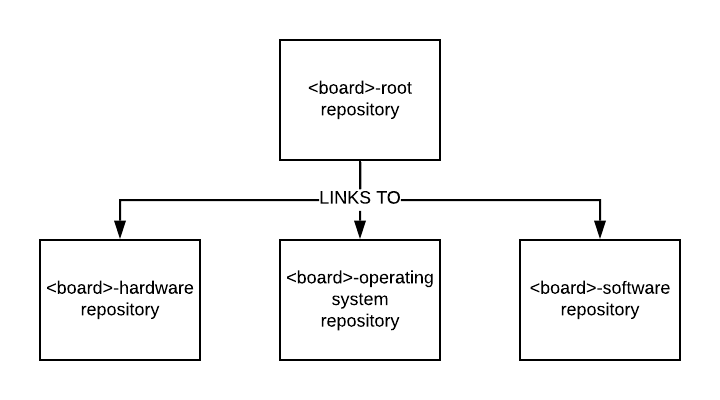
To separate the histories of the development of each component of a demo, each component, using a single tool, has been placed in a separate repository on Github, which are linked together through a single repository that includes all of the demos for a board. The structures of each of these repositories, as well as how to use them, is described below.
Direct instructions on using these repositories with git can be found by skipping ahead to the Using a Demo's Git Sources section of this document.
Repository Structure
Each Digilent FPGA development board has an associated repository on Github, which contains all of the demos that target that board. This section describes the structure of these repositories.
Submodule Structure
All Digilent-created hardware projects (hw), Petalinux projects (os), and software workspaces (sw) for FPGA demos are version controlled in corresponding repositories. A root repository is used to link them together. Each non-root repository (referred to as a component submodule) corresponds to the use of a single tool, hardware projects are used with Vivado, Petalinux projects are used with Petalinux, and software workspaces are used within Vitis.
Note: Software workspaces depend on Vivado projects, and on Petalinux projects, where an OS component is present. Petalinux projects depend on Vivado projects. Changes to a dependency are likely to require changes to the dependent project or workspace.
Some boards may not have any demos using some tools. For example, the Cmod S7 does not have any demos using Petalinux. In these cases, the corresponding component submodules may or may not be present in the root repository. The existence of an empty component submodule does not mean that Digilent has near-term plans to create demos for the corresponding tool.
Even if a demo does not require sources for a particular tool, the component submodule will still be present in the root repository, to make switching between branches of the root repository easier.
Branch Structure
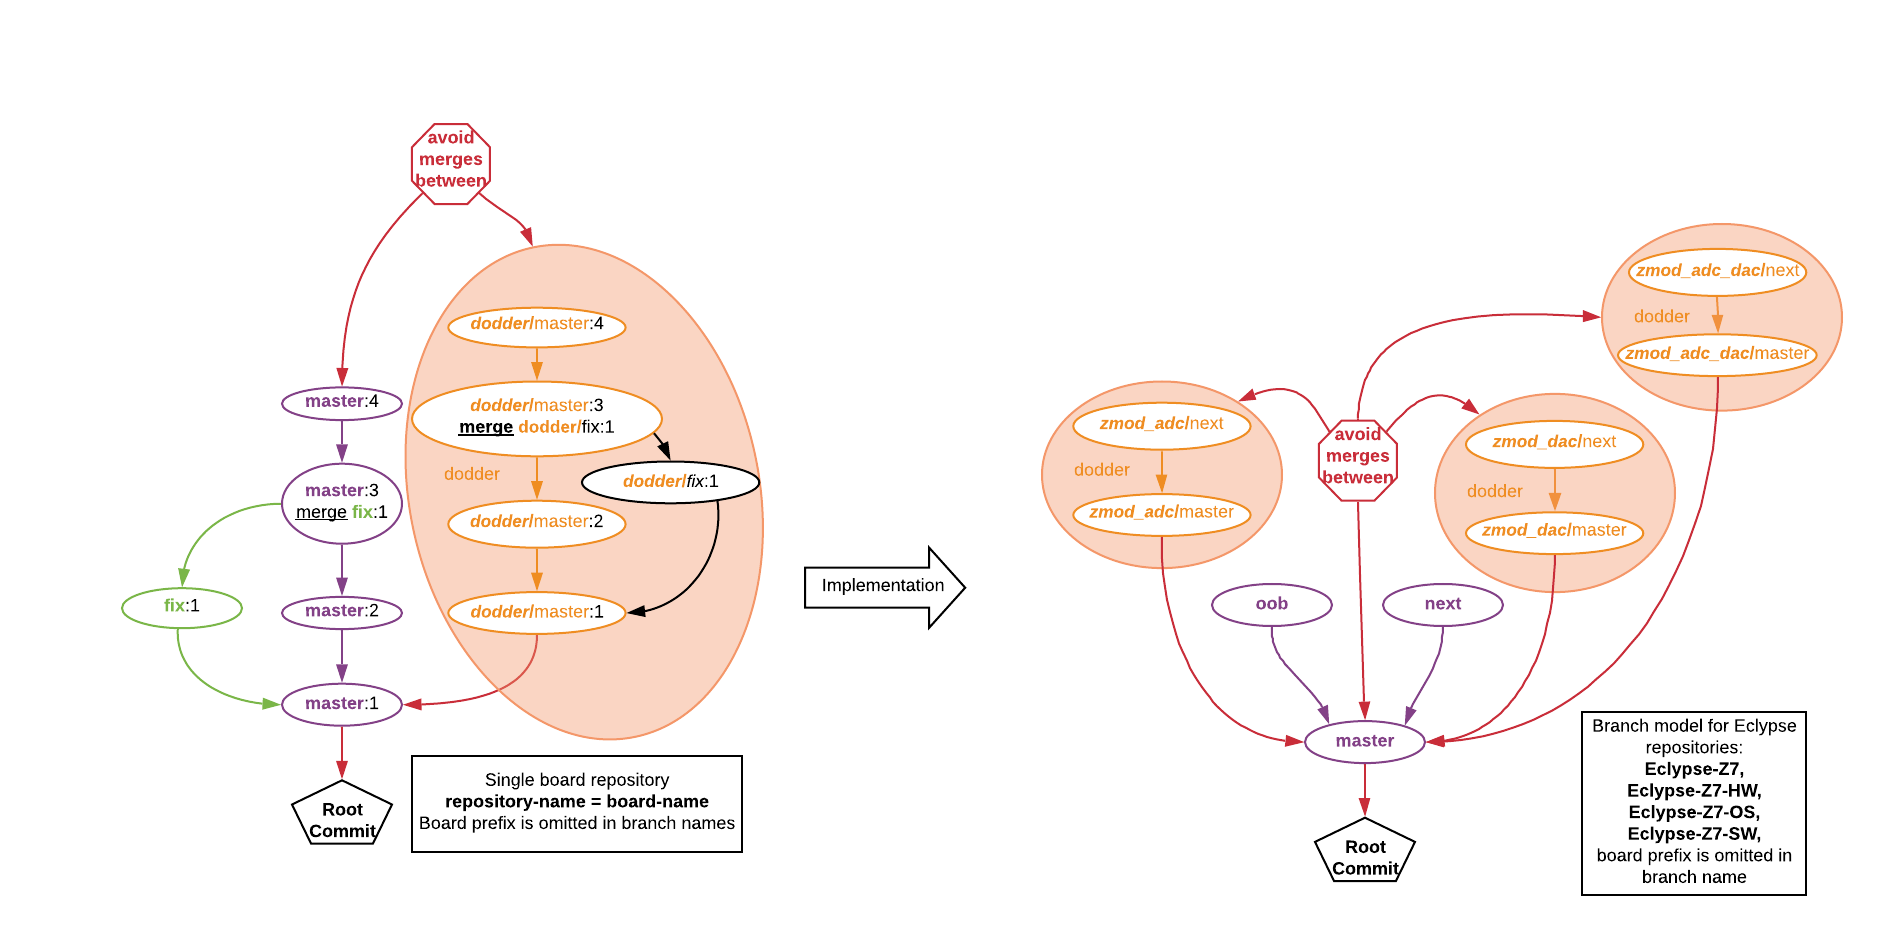
Both topic and root repositories have branches for board variants and branches for dodders. Some boards have multiple variants, each with a different pin-compatible FPGA loaded onto them. Each dodder branch corresponds to a single demo.
Each board branch can have sub branches: {variant}/master,{variant}/next,variant/{topic} ,variant/{dodder}/
If the repository manages only one variant of a board, the {variant} prefix may be omitted. This is not the case for dodder branches: {dodder}/master, {dodder}/{topic}
Dodder master branches are considered stable, and checking out a dodder master branch head (or tagged commit on a master branch) will result in obtaining valid sources.
The name dodder was chosen because of the similarity to the real dodder (cuscuta) vine which depends on a host tree or plant, yet grows apart from the host. In the same way, “dodders” in git are branches designed to hold the development process for an example project or a demo project that depends on board branches, where the resulting changes are never merged back.
A dodder is recognizable by the fact that it branches from {board}/master and has its own master branch.
The same branch model is used in each root repository and component submodule. While a component submodule is still present in demos that do not use it, as previously described, a corresponding dodder branch within that component will not be present. Unused submodules are held at the component submodule's root commit, with no sources.
Using a Demo's Git Sources
Cloning the Root Repository
By cloning a root repository recursively: github.com/Digilent/{Root} each of the board's component submodules is also cloned, as below. Root repositories are named for the board they support, and the names are hyphen-separated (for example, the root repository for the Zybo Z7 can be found at github.com/Digilent/Zybo-Z7).
While the repositories containing component submodules can be cloned individually, it is recommended to get access to them through the root repository, to allow for easy switching between branches in multiple components at once. This also gives information on whether sources in multiple components are compatible, as indicated by commit hashes of submodules pulled into the root repo.
Each of the component submodules can have additional submodule repositories, used to bring in dependencies common to multiple repositories, such as scripts for version control, software libraries, and hardware IPs. As such, use of a –depth argument is not recommended.
Note: If you already know the demo branch you wish to check out when cloning the demo, the '-b {branch}' argument can be used during cloning.
Important! Any git commands used to operate on a repository must be run within the repository, after cding into it.
Recommended Git Commands for Cloning Root Repositories
https
git clone --recursive https://github.com/Digilent/{Root}
ssh
git clone --recursive [email protected]:Digilent/Eclypse-Z7.git
Navigating the Repository
If the –recursive flag was not specified while cloning, the submodules must be manually initialized and updated, as below.
git submodule update --init --recursive
Note: As in cloning, the –recursive flag is necessary in order to automatically initialize and update nested submodules.
A list of all demos in the root repository, including the names of the corresponding branches, is included in the root repository's master branch README. Additionally, a list of all branches in a repository (including working and next branches) can be obtained through the use of the command below:
git branch -a
If the root repository was not cloned with a branch argument, or to switch between branches later, use the following commands within the root repository to check out a demo, and update the submodules to the correct commits:
git checkout {demo branch}
git submodule update --init --recursive
Each demo is documented in the wiki page linked to by the README in the corresponding root repository branch.
Important! Digilent's FPGA demos require support only a specific version of each of the tools used. These versions are specified by release tags placed on the heads of respective master branches, and are the same across each of the tools used. For example, a Petalinux software demo where the last commit on master is tagged with the suffix “2020.1” can only be used with Vivado 2020.1, Petalinux 2020.1, and Vitis 2020.1. Previous commits supporting other versions can be found in the repository's git history (or linked from its README, if those demos originally existed in other repositories).
Note: As Petalinux is only supported in select versions of Ubuntu, Digilent recommends work done with demos using an OS component occur within a supported Linux environment. Windows users may opt for either a dual-boot setup or a virtual machine.
Vivado (HW) Projects
Note: As the hardware handoff file is version controlled, the Vivado project does not need to be used to rebuild dependent Petalinux projects and Vitis workspaces.
The “hw” folder of the cloned root repository contains the sources of the Vivado project used to build the hardware design for the demo.
Important! Digilent's Vivado projects require a Vivado install with the board files for Digilent boards. If either of these requirements is not met, first run through the Installing Vivado, Vitis, and Digilent Board Files guide.
The Vivado project must be recreated from its source before use. To create the project, first launch the supported version of Vivado1). Open Vivado's TCL console, and enter the command below. This will recreate and open the Vivado project.
set argv ""; source {local root repo}/hw/scripts/digilent_vivado_checkout.tcl
Further documentation of the scripts used to check Vivado projects into and out of version control can be found in the digilent-vivado-scripts README. A version of this README corresponding to the version used in the demo can be found in the local root repository's hw/scripts folder.
Once the project is open, the design can be explored and modified, a bitstream can be built, and if SW or OS components are used, a new XSA file can be exported from Vivado. The project is placed in the local hardware repository's proj folder. When closed, it can later be reopened by selecting Open Project on Vivado's welcome screen and navigating to the XPR file contained in the proj folder.
If either a SW or OS component, or both, is used by the demo, changes to the hardware design require that a new hardware definition is exported from Vivado, for use by Petalinux and Vitis. After generating a bitstream, a hardware handoff file (HDF) can be exported from Vivado through the File → Export → Export Hardware dialog in Vivado. The hardware definition file (HDF) should be placed in the local hardware repository's “hw_handoff” folder, and should contain a bitstream.
If no SW or OS component is used by the demo, the project can now be programmed onto a board through the use of Vivado's Hardware Manager. See the demo's wiki page, linked from the root repository's README, for more information.
If committing to the repository, the checkin script provided in the repository's hw/scripts fodler can be used to aid in the process. This script does not guarantee that all source files be checked in, and attention and testing should be paid when using it, to ensure that others using your fork of the repository get the same project that you have.
Petalinux (OS) Projects
Important! Digilent's Petalinux projects require a compatible Petalinux install. If this requirement is not met, see Chapter 2 of Xilinx Petalinux 2020.1 Reference Guide (UG1144) for more information on how to install Petalinux. Older versions of this document can be found on Xilinx's website.
Important! Many demos containing a software component do not require Petalinux. If you are using one of these, skip ahead to Vitis (SW) Workspaces.
Digilent's Petalinux projects contain all necessary files in order to begin using Petalinux “out of the box” upon cloning a repository.
If the hardware platform has been modified in Vivado, it can be switched out by running the following command from within the Petalinux project (the “os” folder):
petalinux-config --get-hw-description={path to folder containing the new XSA}
Changes to the Petalinux project may need to be made, depending on the changes to the hardware design. Detailing these changes is outside of the scope of this document. That said, some changes to the hardware will require changes to the device-tree in {local root repo}/os/project-spec/meta-user/recipes-bsp/device-tree/files/system-user.dtsi. Further information can be found in Xilinx UG1144, linked above.
The Petalinux project must then be rebuilt and repackaged:
petalinux-build
petalinux-package --boot --fsbl {path/to/fsbl} --fpga {path/to/bitstream} --uboot
Vitis (SW) Workspaces
Important! Digilent's Vitis workspaces require a compatible Vitis install. If this requirement is not met, first run through the Installing Vivado, Vitis, and Digilent Board Files guide.
The Vitis workspace must be recreated from its source before use. To populate workspace, first launch the supported version of Vitis1). Use of the local repository's sw/ws folder for the Vitis workspace is recommended, and should be selected as Vitis launches.
Open Vitis's XSCT console (through the Xilinx → XSCT Console menu option), and enter the command below. This will recreate the hardware platform, configure its domains, and recreate each application and system project, within the current workspace.
source {local root repo}/sw/src/checkout.tcl
An alternate command, below, can be used as long as the provided sw/ws folder is used as the software workspace. This can be used to avoid the requirement to type out a full path to the checkout script manually, as the XSCT console does not feature path autocompletion.
source [getws]/../src/checkout.tcl
Further information on the scripts used for version control of Vitis workspaces can be found in the scripts themselves, and in the digilent-vitis-scripts README.
If a new XSA file has been exported from Vivado, it can be used to update the hardware specification for the hardware platform by following instructions in the dropdown below:
- Update an Existing Vitis Platform's Hardware Specification
-
If a hardware design is changed after having created a Vitis application project, several steps must be taken in order to update the Vitis workspace with a newly exported XSA file. The XSA file contains all of the information relevant to Vitis about the hardware platform, and changing a platform project's specification based on this file will automatically load in any changes. This includes adding new drivers for new IP that have been installed and changing the files that define the addresses and other details of any installed IP that may have been renamed or had their addresses changed.
These steps assume that you have already regenerated the bitstream and reexported hardware in the same way that would be done prior to creating a new Vitis workspace.
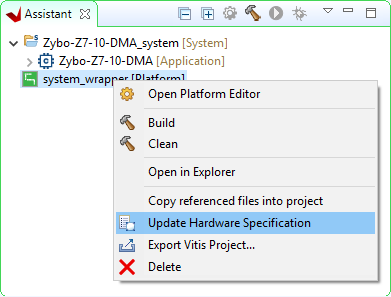
Within Vitis' Assistant pane, find the platform project that you wish to update with the new hardware. This project will typically have a name that ends with “_wrapper”, and is marked with the text “[Platform]”.
Right click on this project and select Update Hardware Specification.
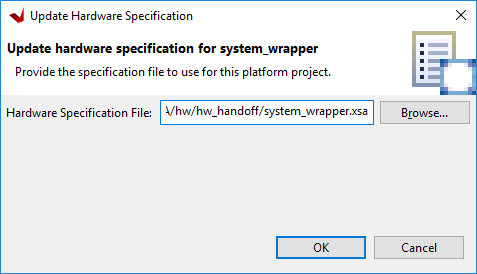
In the dialog that pops up, click Browse, and navigate to the location of the XSA file that you want the platform to target. Click Open to select this file.
Double check that the Hardware Specification File path matches that of the XSA file you want to use, then click OK to start the automatic process of updating the platform.
When complete, a dialog will pop up to state that the platform project has been updated. Click OK to acknowledge this.
At this point, changes to the hardware specification have been loaded into the hardware platform. The bitstream will have been updated, if it was loaded into the XSA file. The set of drivers and the xparameters file will have changed to match what is in the modified design. Changes to the software application may be required before the application can be built and programmed onto the board, however, detailing what may need to be done is outside of the scope of this guide.
Note: Digilent recommends the use of a single workspace per software repository, and provides the root repository's sw/ws folder for this purpose.
Two cleanup scripts are provided within the workspace folder, to aid in removing an existing workspace prior to checking out a new one. The cmd script is supported in Windows, while the sh script is supported in Linux. These files SHOULD NOT be moved, as they recursively delete all files within the directory they are placed within, and may damage a computers filesystem if used improperly.
If committing to the repository, Digilent's version control scheme for Vitis workspaces requires that TCL scripts corresponding to the different pieces of a software workspace be manually edited if configuration options need to be changed. If additional sources are to be added to an application, they should be copied into the application's src/{app}/src folder. As an additional requirement, any changes to the XSA file must be committed separately from any other changes to the repository, and the commit message must reference the commit hash in which the XSA file was updated in the HW repository.
Use of a released sysroot archive is not documented here.
/2020.1 is only supported in Vitis 2020.1. Untagged commits may not contain fully functional demos.


