How to Use a USB-TEMP, With a Thermocouple and RTD Sensor, to Measure Temperature With InstaCal and DAQami
This article explains how to use a MCC USB-TEMP module with a J-type thermocouple wire (MCC part # 745690-J001) and a 3-wire, 100 Ohm RTD sensor (MCC part # 745691-02). For software, the latest release of the MCC DAQ CD was used to install InstaCal and DAQami, onto a Windows 10 system.
When installing the MCC DAQ CD (mccdaq.exe), select DAQami and the InstaCal & Universal Library packages.
On a system with a 32-bit version of Windows OS, Measurement Computing’s software will appear in the folder path: ‘C:\Program Files\Measurement Computing’. On a system with a 64-bit version of Windows OS, Measurement Computing’s software will appear in the following folder paths: ‘C:\Program Files (x86)\Measurement Computing\DAQ’ ‘C:\Program Files\Measurement Computing\DAQami’
Next, connect the USB-TEMP module to the target system’s USB port. On some systems, a notification window may appear indicating the ‘device is ready’.
The next step is to launch MCC’s InstaCal software. ‘C:\Program Files (x86)\Measurement Computing\DAQ\inscal32.exe’ ‘C:\Program Files\Measurement Computing\DAQ\inscal32.exe’
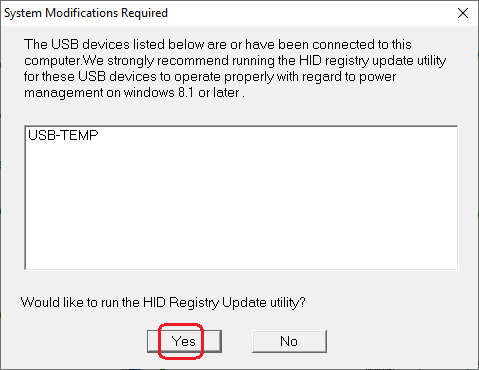
If connecting a USB-TEMP module to the target system, for the first time, then you will be prompted to run the HID Registry Update utility.
After rebooting the target system or cycling the USB cable connection to the module, restart InstaCal. A ‘Plug and Play Board Detection’ window will appear. Select the USB-TEMP device and click the OK button.
Once in InstaCal, the USB-TEMP module will appear in the PC Board List.
Right mouse-click on the USB-TEMP device to configure the device.
In this example, channel 0 was configured to use a single 3-wire, 100 Ohm RTD sensor (MCC part # 745691-02). Set the coefficient standard to ‘DIN 43760’ and click the ‘Show Connections’ button to view the appropriate wiring for the RTD sensor.
Next, click on the CH(2-3) tab to configure channel 2 with a Type J thermocouple.
Click the OK button to exit the Board Configuration window. A message window will prompt the user to save the configuration. Click 'Yes'.
Using InstaCal’s top menu, select TEST – ANALOG.
In the Board Test window, channel 0 was selected for the 3-wire RTD sensor and channel 2 was selected for the Type J thermocouple. Click the TEST button to acquire temperature readings. Click the OK button to exit the test window.
Close InstaCal and launch DAQami. If this is the first time using DAQami, then a message window will appear with several option. Click the OK button to continue in evaluation mode.
On the Getting Started window, click on the ‘New Configuration’ option followed by ‘Manual’.
In the upper left-hand corner, click on the leftmost icon (Available Devices). Click on the USB-TEMP device and drag the device onto the Device Panel, beneath the list.
On the right-side, click on the ‘Channels’ tab. Enable Analog Input channels ‘AI0’ and ‘AI2’ by selecting the Active checkbox. For both channel 0 (the 3-wire RTD sensor) and channel 2 (the Type J thermocouple), set the Channel Settings TC Type to ‘J’.
Click on the ‘Samples Rate’ tab to view the rate range.
In the upper left-hand corner, click on the second icon (Displays) from the left.
Next, click on the Scalar display option and drag it over to the Display Panel area, on the right.
Select an Active Channel and drag it onto the Scalar display.
Above the Display Panel area, click the green arrow to ‘run the acquisition without logging to disk’.
Otherwise, click the red circle to ‘run the acquisition and log the data to disk’.


