Building a ULx for NI LabVIEW Installer (2014)
This article will layout the steps to create a custom installer that deploys InstaCal with your ULx for NI LabVIEW application.
Guide
|
In order to build an Application (EXE) program the first step is to create an empty project. Next, right mouse click My Computer and choose Add File to add your VI(s). Below I added my ULx program called New ULx Example. |
|
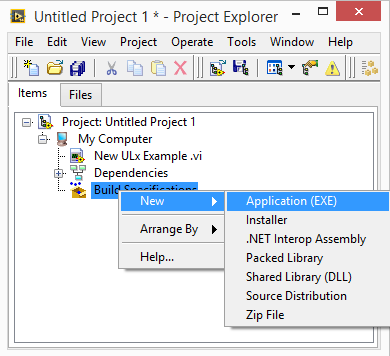
Next, right-mouse click Build Specifications and select New→Application (EXE) |
|
Enter a name for the build specification and target file name. |
|
Select Source Files and designate the start up file. |
|
Click the OK button to close the dialog. From the Project Explorer, right mouse click on the Build Specification and select Build. The resulting application EXE will be generated and stored at the location specified on the Information dialog. The EXE will run on a computer that has NI LabVIEW, ULx for NI LabVIEW and InstaCal. Next, right mouse click My Computer and add the ULx folder from \National Instruments\Shared\ULx. Use either Add→Folder (snapshot) or (auto-populating). |
|
Save the project then right mouse click the Build Specification, in this case New UL Example, and choose Build. |
Building an Installer for a Computer Without LabVIEW
This section discusses making an installer so that your program will run on a computer that does not have NI LabVIEW.
Right mouse click Build Specification and this time select New Installer. On the Installer Product Information page enter the Build Specification, Product Name and the path to where it will be saved.
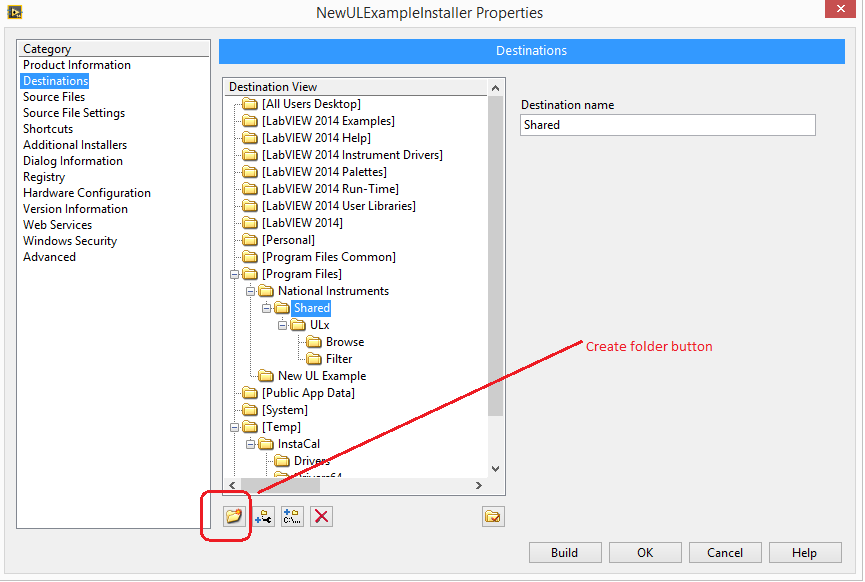
Next, select the Destinations page and create the following path structure under [Program Files]:
- National Instruments
- Shared
- ULx
- Browse
- Filter
At this time, also add the following path structure under [Temp]:
- InstaCal
- Drivers
- Drivers64
The [Temp] path will be used later for the InstaCal installer files. Add the above paths exactly as shown.
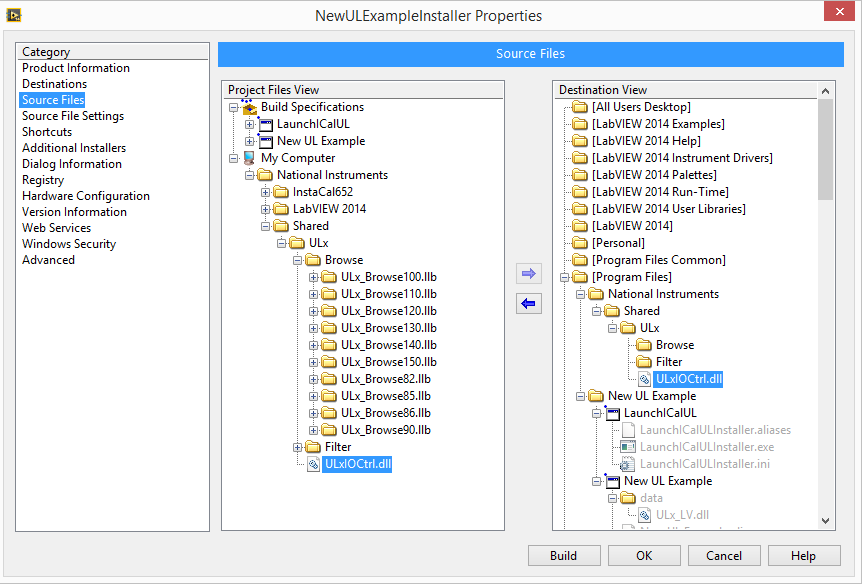
Next, select the Source Files page and add the appropriate Browse files from the Project Files View to the Destination View Browse folder. For this example, I'm using NI LabVIEW 2014 so I use the files from ULx_Browse140.llb. For NI LabVIEW 2015 use the files from ULx_Browse150.llb.
Do the same for the Filter files. For LabVIEW 2014 use the files from ULx_FilterSetting140.llb.
Make sure to add the ULxIOCtrl.dll to the Destination View ULx folder.
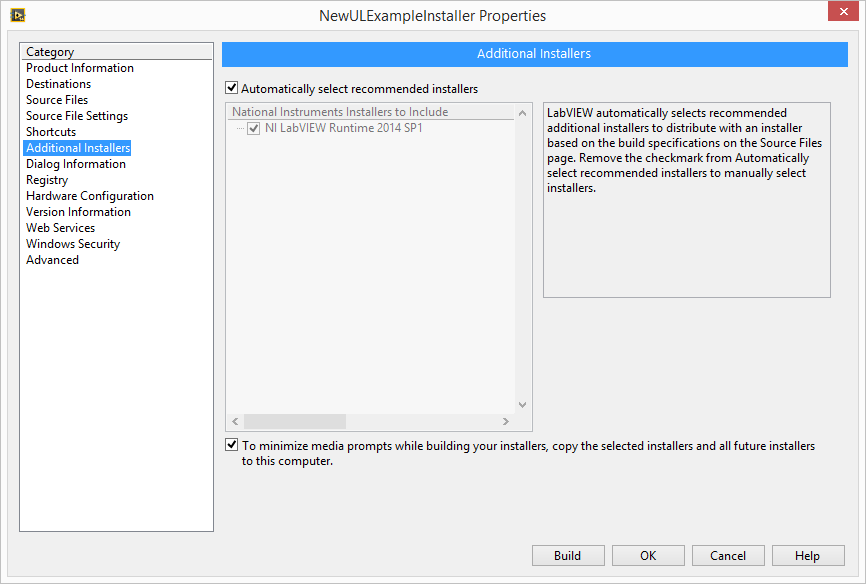
In order to run on a computer without NI LabVIEW, the run-time engine must be install. Under Additional Installers make sure it is selected.
Click OK to close the dialog and save the project. From the Project Explorer right mouse click the installer and choose Build. The resulting installer will be generated and stored at the location specified on the Product Information dialog.
The installer will put all the necessary files needed to run the ULx for NI LabVIEW program on a computer that has InstaCal.
The next steps will add the InstaCal installation. Even though the installer will install both the ULx for NI LabVIEW program and InstaCal, you will still need to run InstaCal to recognize and configure the device.
The MCC ULx examples are located in \National Instruments\LabVIEW 2014\Examples\ULx. MCC includes an example to launch the InstaCal MSI installer. The LaunchICalULInstaller.vi example will look at a temporary folder (C:\Users\UserName\AppData\Local\Temp\folder name) and verify that the *.msi file exists. If the file exists it will launch it.
The InstaCal installer has two possible names. If you use the physical CD it is in a folder called ICalUL and is named ICalUL.msi. This one installs InstaCal and the Universal Library examples. If you don't want the Universal Library examples use the InstaCal download image from the MCC website. Then use a program like 7-Zip to extract the InstaCal installation folder. The InstaCal download is called InstaCal.msi. For this example, i've extracted the InstaCal.msi installer from the InstaCal download. Note, adding \qn to the launch name will force InstaCal.msi to run silently - no dialogs will be displayed. For example: msiexec.exe /i InstaCal.msi \qn .
|
Save the VI, add it to the project and save the project. Next, create a New→Application (EXE) and configure just as you did in the first four steps of this article. |
|
Next, add the InstaCal installer folder to your project. To do this right mouse click My Computer and choose Add→Folder. My folder is called InstaCal652. |
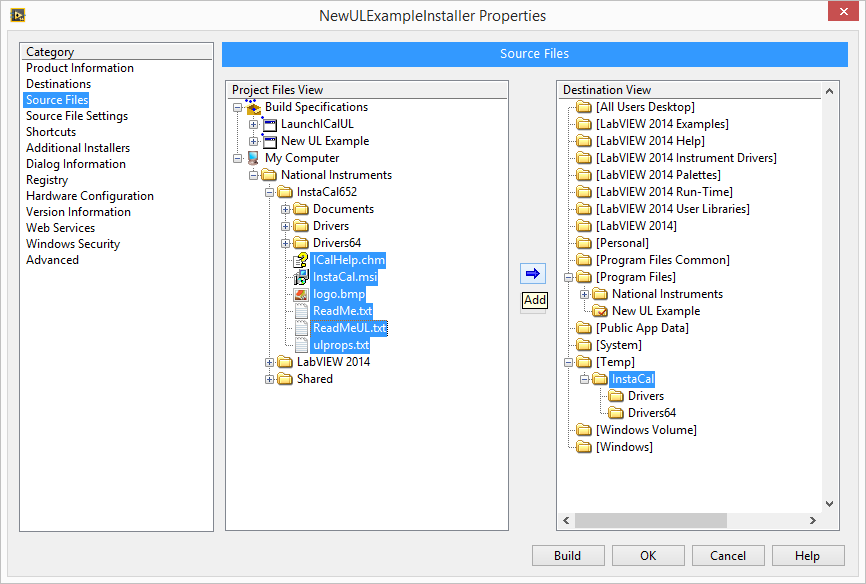
Under the Build Specifications, right mouse click the installer, choose Properties and select the Source Files page. Next add the InstaCal installer files to the path defined under [Temp]. First add the files from the root folder - see below. Next, select Drivers under both Project File View and Destination View. Move all the files from Project Files View→Drivers to Destination View→Drivers. Do the same for Drivers64. The contents of Documents is not needed.
Next, add the LaunchICalUL to Program Files as shown below.
Next Select the Advanced category. Check Run executable at end of installation and designate LaunchICalULInstaller.
Next select Shortcuts and remove the LaunchICalULInstaller from the shortcuts list. Press OK to close the dialog. Right mouse click the Build Specifications and choose Build All to update the application EXE(s) and the installer - Save the project. Test the installer on a computer without NI LabVIEW or InstaCal.


