

This is second part in this series.
Part 1 – Setting Up an MS Database
Part 3 – Creating an Application to View Data
Part 4 – Distributing Applications
Part 5 – Using Additional Software Packages
Creating an Application to Collect and Pass Data
In Part 1, we created an ODBC connection on the development computer, opened the database file, added a data table, and some data fields. In Part 2, we will create the front end application that will read different types of signals from our data acquisition device, display the data using various display objects, and write the collected data to the database.
As stated at the beginning of this article, for this application we will be using the Measurement Computing USB-2408 and the Universal Library, Microsoft Visual Basic 2010, and an add-in to Visual Basic called BERGtools.
I’ve chosen the USB-2408 because it fills the needs of our application with one device. I wanted to emulate a system containing a temperature input from a thermocouple, a voltage input from a pressure transducer, pulsed output from a tachometer, and digital input signal from a door interlock. The USB-2408 is capable of reading from all these various input types and more. I am emulating the signals externally, using a type T thermocouple, function generator set to sine wave, another function generator set to TTL pulsed output, and a 5 VDC output power supply respectively.
I’m using Visual Basic 2010 because I want to keep it compatible with those folks who don’t have Microsoft’s latest version but want to build this application. It is assumed you know your way around the Visual Basic IDE, so I’m going to skip most screen shots so as to focus on the code.
BERGtools is a free collection of displays and functions including meters, oscilloscopes, knobs, etc., I created to make viewing data ‘easier on the eyes’. We will use them here but you can easily work around them or use your own objects.
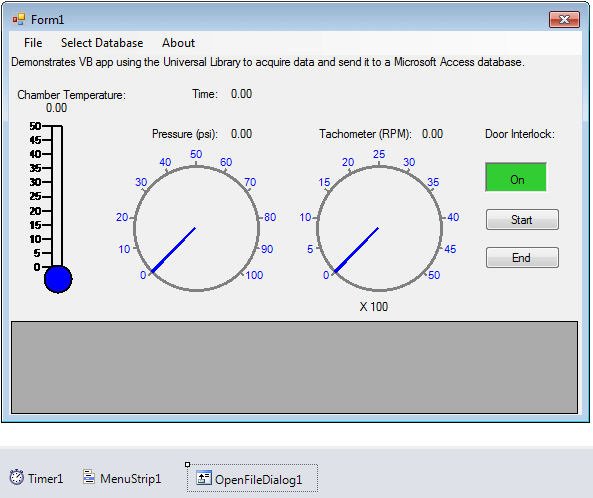
To begin, launch Visual Basic, and start a new project. We will call it “DataCollectionToDatabase.” Resize your form to 589,422.
Add a MenuStrip, DataGridView, Timer, OpenFileDialog,Thermometer, 2 KnobDials, an LED, 2 buttons, and 11 labels. Your form design should look like this:
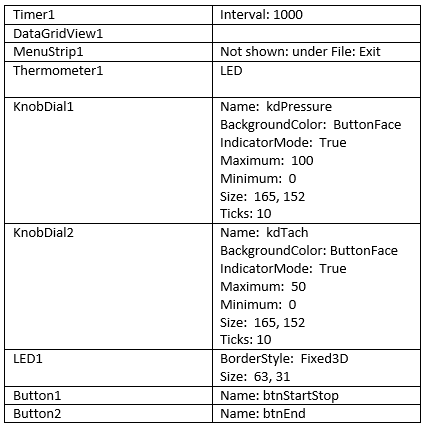
Of all the labels, only 4 need to be named:
The one over the thermometer: lblTempValue
The one over kdPressure (to the right): lblPressure
The one over kdTach (to the right): lblTach
The one to the right of Time: lblTime
All labels should set Autosize = true
From the Solution Explorer, click on the icon to “Show All Files”. Right click on References, select “Add Reference…” The Add Reference dialog will show. Click on .NET tab, Scroll down and select MccDaq, then click OK.
From the Solution explorer, right click on Form1.vb, and select View Code. Above Public Class Form1 Insert the following:
ImportsSystem.Data.OleDb
ImportsSystem.Runtime.InteropServices
ImportsSystem.IO
Next, add the variable declarations:
‘For Universal Library
DiminventoryAs MccDaq.DaqDeviceDescriptor()
PublicDaqboardAsNewMccDaq.MccBoard()
PublicUlStatAs MccDaq.ErrorInfo
DimLastCounterValueAs Int32= 0
DimbFirstEntryAsBoolean=False
‘For database
DimsConnectionStringAs String
PublicobjConnAsNewOleDbConnection()
DimdaMFGDataAsNewOleDbDataAdapter()
DimdsNewScanAsNewDataSet()
DimdtDataAsDataTable
DimtblTestDataAsDataTable
DimdrCurrentAsDataRow
The top sections are the global variables for the Universal Library. The bottom section are the global variables and declarations for the database.
Instantiate the USB-2408
Paste the following into the Form1_Load() event:
MccDaq.DaqDeviceManager.IgnoreInstaCal() ‘don’t use information from InstaCal.
System.Windows.Forms.Cursor.Current =Cursors.WaitCursor’change cursor to wait.
‘Load all the boards it can find
inventory = MccDaq.DaqDeviceManager.GetDaqDeviceInventory(MccDaq.DaqDeviceInterface.Any)
DimnumDevDiscoveredAs Integer= inventory.Length ‘how many was that?
System.Windows.Forms.Cursor.Current =Cursors.WaitCursor ‘change cursor to wait.
DimBoardfoundAsBoolean=False
IfnumDevDiscovered > 0Then
ForboardNumAsInteger= 0To numDevDiscovered – 1
Try
‘Create a new MccBoard object for Board and assign a board number
‘to the specified DAQ device with CreateDaqDevice()
Daqboard = MccDaq.DaqDeviceManager.CreateDaqDevice(boardNum,inventory(boardNum))
IfDaqboard.BoardName.Contains(“2408”)Then
Boardfound =True
Daqboard.FlashLED()
Exit For
Else
MccDaq.DaqDeviceManager.ReleaseDaqDevice(Daqboard)
EndIf
CatchuleAs MccDaq.ULException
MsgBox(ule.ErrorInfo.Message)
EndTry
Next
EndIf
IfBoardfound =False Then
MsgBox(“NoUSB-2408series board found in system. “,MsgBoxStyle.Critical,”No Board detected”)
End
EndIf
UlStat = Daqboard.FlashLED()
DimMyBoardNameAsString= Daqboard.BoardName.Trim
Me.Text = MyBoardName +”found as board number: “+ Daqboard.BoardNum.ToString
This snippet of code queries the system for any supported Measurement Computing devices, accessible through the Universal Library. It sifts through the devices found, looking for a USB-2408. If one is found, it uses it and changes the Form1.Text with an appropriate statement. It not, it pops up a message box stating it didn’t find a USB-2408.
Create the Local Database
Add this line into the Form1_Load() event after the above code:
‘Create the local database to DataGridView1
CreateDataBase()
And add the following subs and functions after the End Sub of the Form1_Load() event:
PrivateSub CreateDataBase()
DimdsAsNewDataSet
ds =CreateDataSet()
DataGridView1.DataSource = ds.Tables(“MeasuredData”)
EndSub
PrivateFunction CreateDataSet()AsDataSet
‘Creating a DataSet object for tables
DimMeasuredDataAsDataSet=NewDataSet()
‘Creating a table object
DimdtDataAsDataTable= CreateDACTable()
MeasuredData.Tables.Add(dtData)
ReturnMeasuredData
EndFunction
PrivateFunction CreateDACTable()AsDataTable
dtData =NewDataTable(“MeasuredData”)
‘Adding columns
AddNewColumn(dtData,”System.String”,”Time”)
AddNewColumn(dtData,”System.String”,”Temperature”)
AddNewColumn(dtData,”System.String”,”Pressure”)
AddNewColumn(dtData,”System.String”,”Tachometer”)
AddNewColumn(dtData,”System.String”,”Interlock”)
ReturndtData
EndFunction
PrivateSub AddNewColumn(ByReftableAsDataTable,ByValcolumnTypeAsString,ByVal columnNameAsString)
DimcolumnAsDataColumn= table.Columns.Add(columnName,Type.GetType(columnType))
EndSub
PrivateSubAddNewRow(ByReftableAsDataTable,ByReftimeAsString,ByReftemperatureAsDouble,ByRefpressureAsDouble,ByRefRPMAsInt32,ByRefinterlockAsBoolean)
DimnewrowAsDataRow= table.NewRow()
newrow(“Time”) = time
newrow(“Temperature”) = temperature
newrow(“Pressure”) =pressure
newrow(“Tachometer”) = RPM
newrow(“Interlock”) =interlock
table.Rows.Add(newrow)
EndSub
The above does the following:
Create a Dataset that includes a table called MeasuredData, and links it to the DataGridView1’s Datasource. MeasuredData has 1 row, made up of 5 columns with the field names; Time, Temperature, Pressure, Tachometer, and Interlock. Create the 5 columns with these names, and place the names in the top row.
From the Form View, double click on “Start” button, and add the following to the btnStartStop_Click() event:
If btnStartStop.Text = “Start” Then
btnStartStop.Text = “Stop”
OpenDatabase()
UlStat = Daqboard.CClear(0)
Timer1.Enabled = True
Else
btnStartStop.Text = “Start”
Timer1.Enabled = False
End If
Aside from the button text alternating between “Start” and “Stop”, when the button text is “Start”, open the external database, reset the counter and start Timer1. When the button text is “Stop”, stop Timer1.
Opening the external data base is essential to this project, and has its own subroutine.
How to Open the External Database
Paste this in below the End Sub of the btnStartStop_Click()event:
PrivateSubOpenDatabase()
‘How to open an oleDB data base
sConnectionString =”Provider=Microsoft.Jet.OLEDB.4.0;Data Source=c:\Users\Public\Documents\MCCGenericOdbc.mdb”
objConn =NewOleDbConnection(sConnectionString)
objConn.Open()
daMFGData =NewOleDbDataAdapter(“Select * From TestData”, objConn)
dsNewScan =New DataSet(“NewScan”)
daMFGData.FillSchema(dsNewScan,SchemaType.Source,”TestData”)
daMFGData.Fill(dsNewScan,”TestData”)
‘Create a new instance of a DataTable.
tblTestData = dsNewScan.Tables(“TestData”)
objConn.Close()
EndSub
Opening a link to a Microsoft Access database, requires a proper connection string like this:
sConnectionString =”Provider=Microsoft.Jet.OLEDB.4.0;Data Source=c:\Users\Public\Documents\MCCGenericOdbc.mdb”
The “;” delineates the Provider type from the database path and filename. It is important this be correct and be correctly formatted. The connection string is used to instantiate the database connection, called objConn. Open the connection and create a data adapter, by selecting the table “TestData” in the database and name it “daMFGData”. Create a dataset, “daNewScan”,set it up with the proper fields using FillSchema and Fill. Create a local data table aligned to the one in the database called “tblTestData”.
Lastly, close the connection for now.
Collecting Data and Sending to the Database
From the Form view, double click on Timer1. Enter the following in the Timer1_Tick()event:
DimMyDataScan(4)AsObject’array to hold the data generated by the scan
‘Read the temperature
UlStat = Daqboard.TIn(0, MccDaq.TempScale.Celsius, MyDataScan(1), MccDaq.VInOptions.Default)
IfUlStat.Value <> MccDaq.ErrorInfo.ErrorCode.NoErrorsThen
errhandler(UlStat)
Exit Sub
EndIf
Thermometer1.TempValue = MyDataScan(1)
lblTempValue.Text =Convert.ToDouble(MyDataScan(1)).ToString(“##0.00″) &”°C”
‘Read the voltage (Pressure)
UlStat = Daqboard.VIn(1, MccDaq.Range.Bip10Volts, MyDataScan(2), MccDaq.VInOptions.Default)
IfUlStat.Value <> MccDaq.ErrorInfo.ErrorCode.NoErrorsThen
errhandler(UlStat)
Exit Sub
EndIf
MyDataScan(2) *= 10 ‘apply scaling (Makes the data look cooler, it uses more of the pressure meter!)
lblPressure.Text =Convert.ToSingle(MyDataScan(2)).ToString(“##0.00”)
kdPressure.UpdateKnob(MyDataScan(2))
‘Read the counter (Tachometer)
UlStat = Daqboard.CIn(0, MyDataScan(3))
IfUlStat.Value <> MccDaq.ErrorInfo.ErrorCode.NoErrorsThen
errhandler(UlStat)
Exit Sub
EndIf
DimNewCountReadAsInteger= (MyDataScan(3) – LastCounterValue)
LastCounterValue = MyDataScan(3)
DimTachValAsDouble= (NewCountRead * 60)’apply scaling to RPM from RPS
kdTach.UpdateKnob(TachVal / 100)
lblTach.Text = (TachVal).ToString(“####0”)
‘Read the digital bit (door interlock)
DimMyDigBitAsBoolean
UlStat = Daqboard.DBitIn(MccDaq.DigitalPortType.FirstPortA, 0, MyDigBit)
IfUlStat.Value <> MccDaq.ErrorInfo.ErrorCode.NoErrorsThen
errhandler(UlStat)
Exit Sub
EndIf
Led1.Value = MyDigBit
MyDataScan(4) =”0″
IfMyDigBit =TrueThenMyDataScan(4) =”1″
‘Read the current Time
MyDataScan(0) =Convert.ToString(System.DateTime.Now)
lblTime.Text = MyDataScan(0)
In the above code, create an array called MyDataScan() to hold the collected data. Using Measurement Computing’s Universal Library functions, read from each of the 4 types of sensors; Temperature, voltage, counter, and digital input (TTL). Also read the time.
Note: proceeding each library call there is a small If-Then routine:
IfUlStat.Value <> MccDaq.ErrorInfo.ErrorCode.NoErrorsThen
errhandler(UlStat)
Exit Sub
EndIf
Each time a call is made to the Universal Library, an integer value is returned into UlStat. If UlStat equals zero, then the function executed correctly and the data is good. If UlStat is not equal to 0, then there was a problem executing the function, and the value of UlStat can be used to handle the error. If you were writing a more elaborate program, you would want to manage the returned error in your program so as to keep the program from using bad data or worse, crashing. More on that, in a bit.
Use the array to scale data if needed, and update all the meters, gauges, labels.
Next we are going to write the data to our DataGridView. Here’s how:
‘This goes to the datagrid
IfbFirstEntry =FalseThen
DimnewrowAsDataRow= dtData.NewRow()
newrow(“Time”) = MyDataScan(0)
newrow(“Temperature”) =MyDataScan(1).ToString()
newrow(“Pressure”) = MyDataScan(2).ToString
newrow(“Tachometer”) = TachVal.ToString
newrow(“Interlock”) = MyDataScan(4)
dtData.Rows.Add(newrow)
bFirstEntry =True
Else
DimdrEditRowAsDataRow
drEditRow= dtData.NewRow()
drEditRow= dtData.Rows.Item(0)
drEditRow.BeginEdit()
drEditRow(“Time”) =DateTime.Now.ToString()
drEditRow(“Temperature”) =Format(MyDataScan(1),”##0.0#”)
drEditRow(“Pressure”) =Format(MyDataScan(2),”##0.0#”)
drEditRow(“Tachometer”) =Format(TachVal,”####”)
drEditRow(“Interlock”) =MyDataScan(4)
drEditRow.EndEdit()
EndIf
We implement an If-Then-Else routine here because we need to add a new row to the grid. When the finished program runs, each time new data is collected, it is repeatedly written to the first row. We are not looking to collect and store data as it is received, we only want the one row of data. To make that work, we use the IF-Then-Else. The decision (IF) is based on ‘is this the first time in this timer loop?’ If it is, then we add a first row. If not, then just keep updating the same row. In the IF portion, we call .NewRow, and in the Else portion we call .BeginEdit() and .EndEdit().
Now we will write the data out to our external database. Add the following code:
Try ‘This goes out to the database
objConn.Open()
‘Obtain a new Data Row object from the DataTable.
drCurrent = tblTestData.NewRow()
drCurrent = tblTestData.Rows.Find(1)
drCurrent = tblTestData.Rows(0)
drCurrent.BeginEdit()
drCurrent(“Time”) =DateTime.Now.ToString()
drCurrent(“Temperature”) =MyDataScan(1).ToString()
drCurrent(“Pressure”) =Format(MyDataScan(2),”##0.0#”)
drCurrent(“Tachometer”) =TachVal
drCurrent(“Interlock”) =MyDataScan(4)
drCurrent.EndEdit()
DimobjCommandBuilderAs NewOleDbCommandBuilder(daMFGData)
objCommandBuilder.QuotePrefix =”[“
objCommandBuilder.QuoteSuffix =”]”
DimrAsInteger= daMFGData.Update(dsNewScan,”TestData”)
objConn.Close()
CatchexAsOleDbException
Timer1.Enabled =False
objConn.Close()
MsgBox(ex.Message.ToString(),MsgBoxStyle.Information,”Error Message”)
EndTry
Writing to the real database is all most the same as writing to the DataGridView. However here we have to open the database connection, find the first row, use the oleDbCommandBuilder() (be sure to include the QuotePrefix and QuoteSuffix), update the table, and close the database connection.
Now, for a little program management. Add our error handler subroutine. After the Timer1_Tick’s End sub, add the following:
PublicSuberrhandler(ByValulstatAs MccDaq.ErrorInfo)
‘Generic UL error handler
Timer1.Enabled =False
Try
objConn.Close()
CatchexAsException
EndTry
MessageBox.Show(ulstat.Message,”Universal Library Error”,MessageBoxButtons.OK,MessageBoxIcon.Error)
btnStartStop.Text =”Start”
EndSub
If there is an Universal Library error, stop the timer, close the database connection if it is open, display an error message stating the problem encountered, and reset the Start/Stop button to display “Start”. In a more involved application, you might have a Case statement, handling the problem programmatically, or offering solutions either in a more verbose message telling the user what happened and how to resolve it.
Add a graceful way to exit the program:
From the Form view, regarding the MenuStrip1, click on File, and then double click on Exit, and add the following code:
Timer1.Enabled =False
End
Because this is Windows, and there is always more than one way to do anything, go back to the Form view, double click on the ‘End’ button, and paste the same syntax there.
We are still missing a couple items, but that is as far as we need to go for this section.
You can now build and run this application. When you click “Start”, it will begin reading from the sensors connected to the USB-2408, update the screen, and log the data to the database. A word of caution, if you are expecting to open the database and look at the table hoping to see the data updating in real time, that won’t happen. What you will see on your screen is a snapshot in time, not real time, updating data. You can stop the application at any time, open the database and table and see that the table has been updated.
In the Part 3 we will build the application capable of reading the data in real time.
2 Comments on “Reading Generated Data in a Real-Time Distributed System – Part 2”