

Creating an Application to View Data with VB.NET
In Part 2, we created a working application to read telemetry from sensors connected to a USB-2408, write the telemetry or data to the screen in various ways, and write it out to the database we created in Part 1.
Part 1 – Setting Up an MS Database
Part 2 – Creating an Application to Collect and Pass Data
Part 4 – Distributing Applications
Part 5 – Using Additional Software Packages
Now, in Part 3, we will create the application to read the data back out of the database. It will be a mirror image of the part 2 application, but no data is collected here it will just show what was collected and stored to the database. It will operate like dual ported memory. This is all in preparation for the next part where we will distribute the two applications so as to have one application (DataCollectionToDatabase) on one computer, and the other app (DatabaseToDataDisplay) on another computer in a different part of the building.
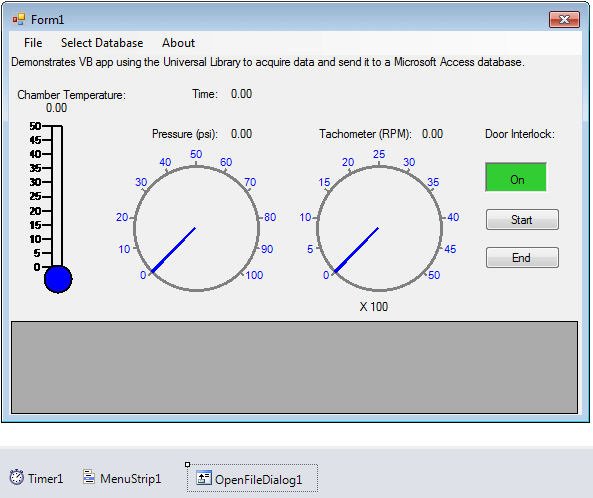
Again, launch Visual Basic, and start a new project. We will call it “DatabaseToDataDisplay.” Resize your form to 639, 358.
Add a MenuStrip, DataGridView, Timer, OpenFileDialog, Thermometer, 2 AnalogMeters, an LED, 2 buttons, and 7 labels. Rearrange and resize the objects so that your form design looks like this:
Change the following properties:
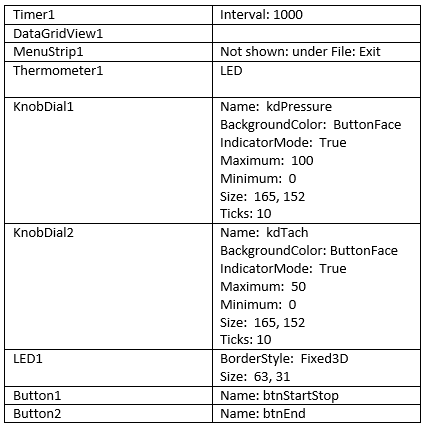
Of all the labels, only 2 need to be renamed:
The one under the thermometer: lblTempValue
The one to the right of Time: lblTime
All labels should be set to Autosize = True
From the Solution explorer, right click on Form1.vb, and select View Code. Above Public Class Form1 insert the following:
ImportsSystem.Data.OleDb
ImportsSystem.Runtime.InteropServices
ImportsSystem.IO
Next, add the variable declarations:
‘For database
DimsConnectionStringAsString
PublicobjConnAsNewOleDbConnection()
DimdsAsNewDataSet()
DimdaAsOleDb.OleDbDataAdapter
DimsqlAsString
Open the External Database and Read in the Data
There is a lot less going on in this application, just about all of it in happening in the Timer, so open the Timer1_Tick() event, and paste in the following:
Try ‘This goes out to the database
‘How to open an oleDB data base
sConnectionString =”Provider=Microsoft.Jet.OLEDB.4.0;Data Source=c:\Users\Public\Documents\MCCGenericOdbc.mdb” ‘for oleDB
objConn = NewOleDbConnection(sConnectionString)
objConn.Open()
‘Obtain a DataRow object from the DataTable.
da =NewOleDb.OleDbDataAdapter(“SELECT * FROM TestData”, objConn)
da.FillSchema(ds,SchemaType.Source,”TestData”)
da.Fill(ds,”TestData”)
objConn.Close()
CatchexAsOleDbException
Timer1.Enabled =False
objConn.Close()
MsgBox(ex.Message.ToString(),MsgBoxStyle.Information,”Error Message”)
EndTry
Try
DimMyDataScan = ds.Tables(“TestData”).Rows(0)
lblTime.Text = MyDataScan(1).ToString
Thermometer1.TempValue =Convert.ToDouble(MyDataScan(2))
lblTempValue.Text = MyDataScan(2).ToString +”°C”
amPressure.Value =Convert.ToDouble(MyDataScan(3))
amTach.Value =Convert.ToDouble(MyDataScan(4)/ 100)
DimrAsBoolean=Convert.ToBoolean(Val(MyDataScan(5)))
Led1.Value = r
CatchexAsOleDbException
Timer1.Enabled =False
MsgBox(ex.Message.ToString(),MsgBoxStyle.Information,”Error Message”)
EndTry
As with the previous app, we want to open the database. But now we want to obtain existing data from the TestData table. When we read in the entire table we use the Fill Schema and Fill commands. Read in the first row from the table and parse it (Dim MyDataScan = ds.Tables(“TestData”).Rows(0)). The data will automatically be placed into the array, ‘MyDataScan()’ for dissemination to the various labels and objects in this application. All the data is stored as strings, so there are data conversions going on in the code above.
The app could come up running, but for now let’s use a Start/Stop button, and so from the Form View, double click on “Start” button, and add the following to the btnStartStop_Click() event:
IfbtnStartStop.Text =”Start”Then
btnStartStop.Text =”Stop”
Timer1.Enabled =True
Else
btnStartStop.Text =”Start”
Timer1.Enabled =False
objConn.Close()
EndIf
The If/Then/Else above, alternates the Text property of the button between ‘Start’ and ‘Stop’, but when IF condition is true we also enable or start the timer. When the IF condition is false, we stop the timer, and close the link to the data base.
Add a graceful way to exit the program:
From the Form view, regarding the MenuStrip1, click on File, and then double click on Exit, and add the following code:
Timer1.Enabled =False
End
Because this is Windows, and there is always more than one way to do anything, go back to the Form view, double click on the End button, and paste the same syntax there.
We are still missing a couple items, but that is as far as we need to go for this section.
The two applications are now complete. Let’s run both of them from within the VisualBasic.NET environments. Here is what they look like, running in concert:
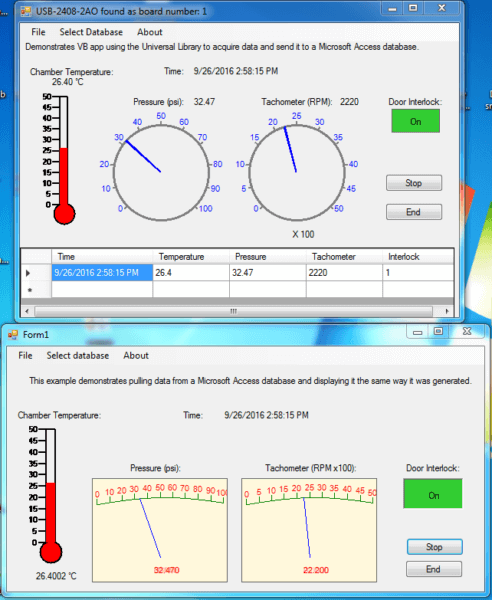
Despite the different types of meters used in the two applications, you can see the two applications are sharing the data. What you can’t see, is the top app is sending data to table “TestData” of database “MccGenericOdbc.mdb”, and the bottom app is reading data from the table “TestData” of database “MccGenericOdbc.mdb”. Since the two apps are running their own timers, data reads and writes are happening ‘on demand.’ For these applications, the data is one second delayed, which is why the data on the two forms is not exactly the same. There will always be some delay due to timers, Windows OS, and network traffic.
2 Comments on “Reading Generated Data in a Real-Time Distributed System – Part 3”