

In this third issue of our four-part blog post series covering the creation of a smart LED-lamp, we are designing the Android app controlling brightness and state of the LED. For this, we use an Analog Discovery Pro ADP3450 from Digilent, running in Linux Mode. During the first installment <INSERT LINK TO FIRST PART HERE>, we wrote the hardware abstraction layer (HAL) routines for the WaveForms SDK. In the second part , we created the Software functions for the two Pmods we use for our project: the Pmod ALS, measuring the intensity of the ambient light, and the Pmod BLE, which receives the settings from the smartphone app and transmits them to the ADP3450. There, we also tested the connections between the Pmods and the ADP3450.
First, we are going to create the app and then build the LED-driver hardware and the charging circuit for the battery.
Designing the Android App
For the smartphone app, we use the MIT App Inventor. You will need a Google account to log in. If you don’t have one or if you would rather not use it for this exercise, you can access it anonymously from this page. Make a note of the re-enter code displayed, so you can continue your work at a later stage.
The first step is to create the user interface. You can do that from scratch, but you can also download our pre-built project file and import it. If you want to avoid bothering with the creation of the app at all, you can also download and install the final application. As a shortcut, scan the QR code below with your phone.
Our application needs two switches for turning the lamp on and off, and setting the intensity to auto. It also requires three sliders for the three colors red, green, and blue. Done with that, go to the Extension menu on the left and place the Bluetooth LE component on the screen of your virtual phone.

Now enter the Blocks view and create the logic behind your user interface elements and the non-visible components. Here, you define what happens once you interact with the screen and the different parts on it, like sliders, buttons, or labels. Also, think about what actions should take place when Bluetooth connects or disconnects, receives a message, or sends a message to the Pmod BLE.
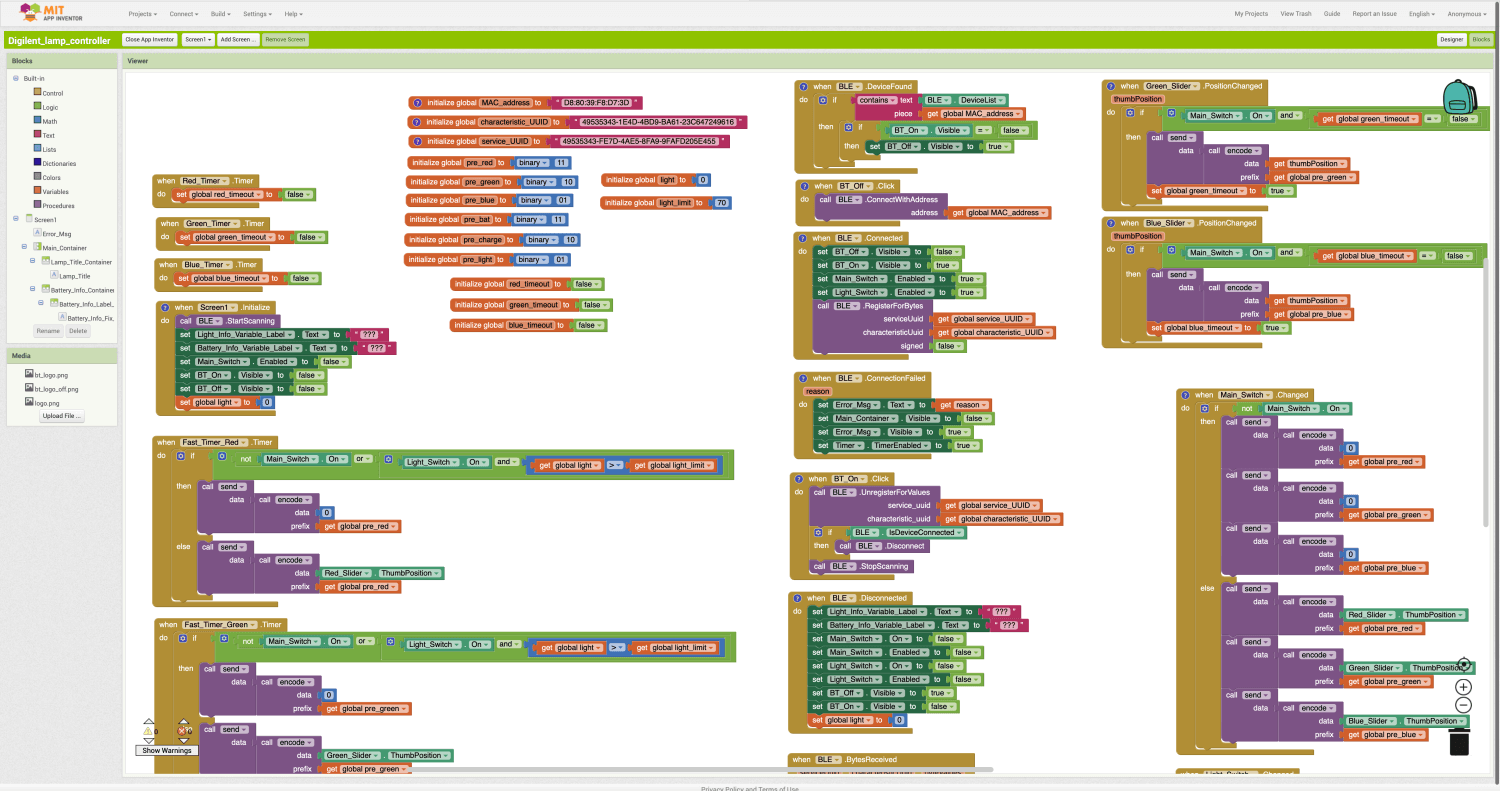
Give a thought to the format you want to send the data in. Also review the data formats of the Pmods and how you intend to interpret them.
If asked for the MAC address for the Pmod BLE, the service UUID, and the Characteristic UUID, refer to your notes from the second part of this blog series. There, you jotted them down.
If you believe you are all set, build the application and install it on your phone. Remember that it must allow installations from unknown sources.
Designing the LED Driver Circuit
Now it is time to design and assemble the LED driver. Here, to achieve linear brightness changes, you will need to control the current through the LED; just controlling the voltage is not sufficient. The ADP3450 does not feature a current supply, so you will have to design a voltage controlled current sink for each of the LED’s colors.
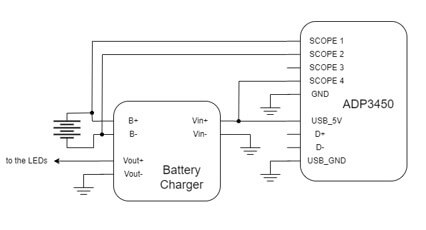
The various voltages are created through PWM signals on the digital lines of the ADP3450, which you should connect to a low-pass filter. Have a look at the schematic below . Calculate the power dissipation and choose an adequate resistor. Finally, attach everything to the battery as shown.
Building the Charger Circuit
As a last step, create the charger circuit for the lithium-polymer battery cell. Use an LT 3092 programmable current source from Analog Devices for that and connect it with a USB-A plug to one of the USB ports at the back of the ADP3450. These provide enough power for charging the battery. Refer to the schematic below for details.
With that done, you can move on to create the final application running on the Analog Discovery Pro ADP3450. That, and a description on how to test it, will be part of the fourth (and last) installment of this blog series.