


In today’s manufacturing world, companies are trying to do more with less staffing by maximizing throughput or looking for critical status of a production line without interrupting focus of production staffing.
In the past, a manager would often need to walk the production floor to see how the various processes are performing. This took time away from other important tasks, and required these managers to generate reports and perhaps present the data to other managers. One way that the process has evolved to reduce or even eliminate the need for manager oversight is by sending the data collected from various systems to a centralized (physical or cloud-based) data base.
Many manufacturing facilities utilize data acquisition and control products integrated directly into their production stands. These devices monitor and/or control the manufacturing process of products from all aspects of life today. The sensor data used to make programmed decisions to any part of the production process can also be used to inform and notify managers, supervisors, directors, administrators, etc. either as a consolidated view or as a report in near real-time.
The key to this is setting up a database as a repository or collection point for all the data being collected. Once the data base is created and setup, existing code used can be easily modified to send that telemetry to the data base where folks who needs to know, can run an app to see what is happening over in production.
This series of articles demonstrates creating and setting up a database and suggestions for augmenting applications written in but not limited to Visual Basic.NET, LabVIEW, and DASYLab.
Part 2 – Creating an Application to Collect and Pass Data
Part 3 – Creating an Application to View Data
Part 4 – Distributing Applications
Part 5 – Using Additional Software Packages
Setting Up an MS Database
There are a lot of ‘step by step’ instructions on how to accomplish this on the internet, just Google “How to set up an ODBC connection.” In lieu of that, here are my ‘step by step’ instructions (as performed on Windows 7/64 bit).
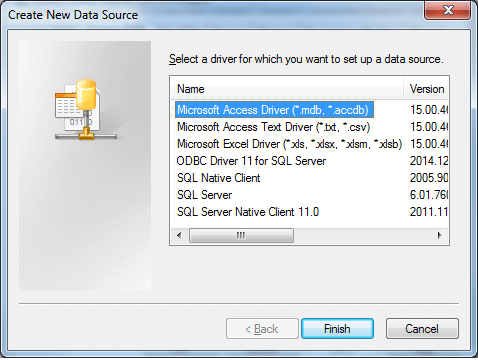
You will need to put an ODBC connection on the computer you’re working on. Click on Start>> Control Panel >> Administrative Tools, then double click on “Data Sources (ODBC)”. Click on the “System DSN” tab. User DSN means that only you will be able to access this data source, and System DSN means that anyone who is on the machine should be able to access the data source (though only if they provide the necessary credentials). Now click on Add…

We will be using Microsoft Access, so select ‘Microsoft Access Driver (*.mdb, *.accdb),’ then click Finish.
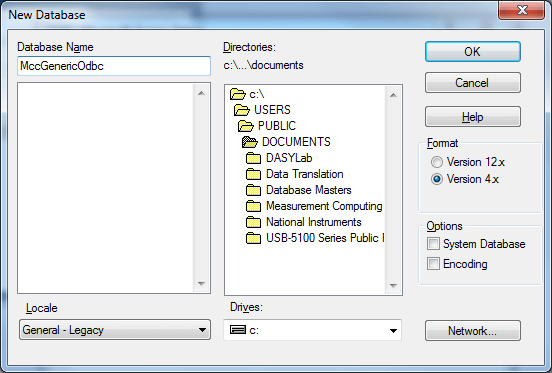
The ODBC Microsoft Access Setup dialog appears. Enter a Data Source Name, Description, and click on Create…

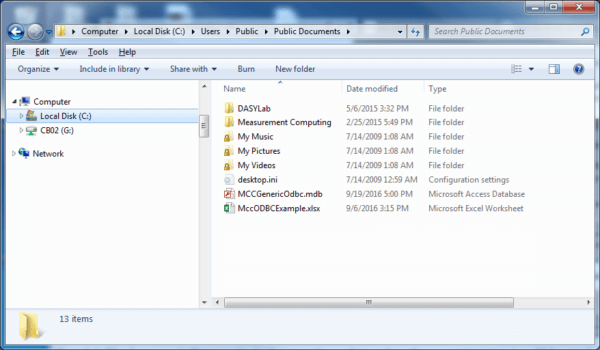
The new Database dialog appears. Enter the name of the database. Throughout this article, we will be working with the name MccGenericOdbc, and it is placed in C:\Users\Public\Documents.
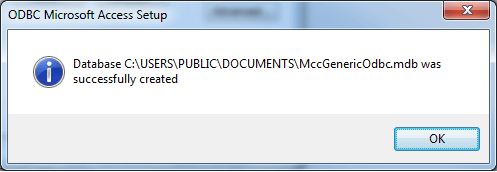
Click on OK. If all went correctly you should see this message:
Click on OK, and you will be back to the ODBC Microsoft Setup now with the database name inserted:

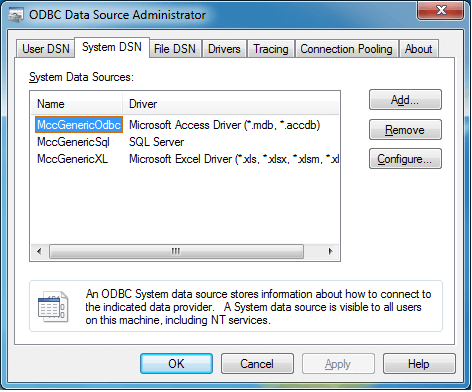
Click OK, and now your ODBC Data Source Administrator will look like this:
Open the Windows explorer and navigate to C:\Users\Public\Documents to see your new database:
It is assumed you have a copy of Microsoft Access to complete the following steps. However, if you do not, attached to this article is a useable copy of the database for this project.
Double click on MCCGenericOdbc.mdb to launch Microsoft Access and open the empty database. Click “Create > Table”.
![]()
A new Table appears. The first column is already labeled “ID”. We need 5 additional columns for our table. Notice the column to the right of ID is highlighted, and labeled “Click to add”. Click on it, and a drop down menu appears with various options for the data type. We want this first column to be the time the data was collected so select “Date & Time”. The cursor moves to the field name location. By default it is named “Field1”. Change that to “Time”. Repeat this process for the next 4 columns, making the data types all “Short Text”, and with the names changed to, “Temperature”, “Pressure”, “Tachometer”, and “Interlock”.
When completed, it will look like this:
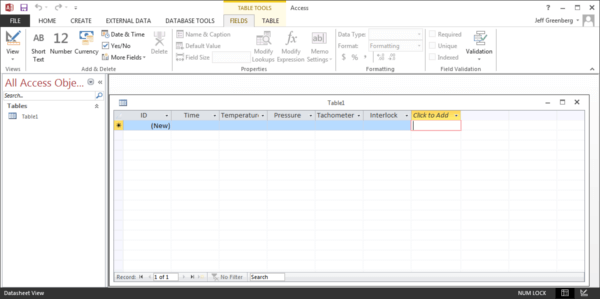
Click on “File”, “Save”, and a Save as dialog appears. Enter a name for the table. Enter “TestData” and click OK. Then close Access. We will be reading and writing to this data table in the next sections.
Reading generated data in a real-time distributed system can be challenging, but businesses must keep up with the latest trends and technologies. In this article, you provide tips and suggestions for augmenting applications.
Thank you for this article!