


Distributing the Applications to View the Data Remotely
The goal of this article series is to demonstrate how to create a data acquisition system on one system, and view the collected data in near real time from another. This can be accomplished by the use of a database and two VB.NET applications. In Part 1, we learned how to set up the database and make it accessible. In Part 2, we created a data acquisition application, reading from a USB-2408, and write the data to our database. Part 3, an app to read that collected data from the database and display it.
Part 1 – Setting Up an MS Database
Part 2 – Creating an Application to Collect and Pass Data
Part 3 – Creating an Application to View Data
Part 5 – Using Additional Software Packages
Up until now, all three components have been on one computer. Here in Part 4, we will deploy this system onto three computers: one for the database, one to collect the data, and one to view the data. If you have only two computers, you can still make this work by putting the database and data collection program on the same system.
We will need to make a couple tweaks to our applications. Nothing major, just to make it easier to find the database. Since the apps are no longer on the same PC, we need a way to have the app find and remember where the database is located. Sure, you could hard code it, but what if you move the database or one or both apps to other locations? Or, you need to add another computer as a data collection point or another person needs to see the collected data. Here’s one way to solve the problem. We will add code to create a configuration file that is automatically loaded at start up. If one is not available, click on a menu item so you can tell the program where the database is then store that location so the next time you run the program is will find it upon start up.
Editing the DataCollectionToDatabase App
Starting with the app from part 2, open DataCollectionToDatabase, go to the Code view of Form1.vb, and scroll to the top. Below Dim drCurrent As DataRow add the following:
Dim DatabaseFileNameAndPath As String
Dim Filename As String
Dim SettingsFileOut As IO.StreamWriter
Dim SettingsFileIn As IO.StreamReader
And, in the Form1_Load() event, below CreateDataBase() Add the following:
‘Get file path to user’s”MyDocuments\OledbExample\”
DimpathstringAsString=My.Computer.FileSystem.SpecialDirectories.MyDocuments
pathstring = pathstring +”\MeasurementComputing\OledbExample\”
System.IO.Directory.CreateDirectory(pathstring)
‘Create a file.
Filename =””
Filename = pathstring +”Database.CFG”
‘Read the data from the file and parse it.
Try
SettingsFileIn =NewStreamReader(Filename)
DatabaseFileNameAndPath = SettingsFileIn.ReadLine()
SettingsFileIn.Close()
CatchexAsException
EndTry
What this does: If there is a file named Database.CFG, located in your computer’s MyDocuments\Measurement Computing\OledExample folder, use the path located in that file. If the file does not exist, do nothing.
From the Solution Explorer, right click on Form1.vb, and select “View Designer.” Double click on “Select Database” menu item to open the SelectDatabaseToolStripMenuItem_Click() event, and add the following code:
OpenFileDialog1.Filter = “MSACCESS (*.mdb)|*.mdb|All Files (*.*)|*.*”
OpenFileDialog1.FileName = DatabaseFileNameAndPath
OpenFileDialog1.ShowDialog(Me)
DatabaseFileNameAndPath = OpenFileDialog1.FileName
If DatabaseFileNameAndPath = “” Then
MsgBox(“No file selected or bad file name selected.”, MsgBoxStyle.OkOnly, “Bad file name”)
Exit Sub
End If
‘Create a file path to user’s “MyDocuments\OledbExample\”
Dim pathstring As String = My.Computer.FileSystem.SpecialDirectories.MyDocuments
Pathstring = pathstring + “\MeasurementComputing\OledbExample\”
System.IO.Directory.CreateDirectory(pathstring)
‘Create the file.
Filename = pathstring +”Database.CFG”
SettingsFileOut =NewStreamWriter(Filename)
‘Write the DATABASE filename and path to the .cfg file
SettingsFileOut.WriteLine(DatabaseFileNameAndPath)
SettingsFileOut.Close()
We are using 2 string variables here and they can be confusing:
DatabaseFileNameAndPath is a string containing filename and path to the database itself,
Filename is a string containing the filename and path to DatabaseFilenameAndPath.
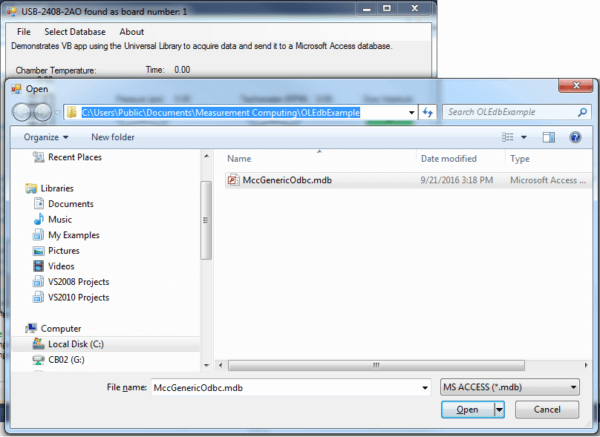
When this event is selected, the Open File dialog box appears with filters turned on to show just Microsoft Access files (with the extension of .mdb) or all files. The user navigates to the database, selects it, and clicks on OK. The path and file name are returned in the string DatabaseFilenameAndPath:
DatabaseFileNameAndPath = OpenFileDialog1.FileName
We want to store that path and file name somewhere locally where the app can find it the next time the app starts (that’s what we added at the end of the Form1_Load() event). As stated above, we want to put the string in a file Database.CFG, and place the file in MyDocuments\MeasurementComputing\OledbExample.
Editing the DatabaseToDataDisplayApp
Now that we have the first app modified, let’s modify the monitoring application. These edits are similar to DataCollectionToDatabase, I’ll just provide the edits.
Open the application. From the Solution Explorer, right click on Form1.vb, and select “ViewCode.”
Scroll to the top. Just below Dim sql As String add the following:
Dim DatabaseFileNameAndPath As String
Dim Filename As String
Dim SettingsFileOut As IO.StreamWriter
Dim SettingsFileIn As IO.StreamReader
In the Timer1_Tick() event, comment out this line:
sConnectionString = “Provider=Microsoft.Jet.OLEDB.4.0;Data Source=c:\Users\Public\Documents\MCCGenericOdbc.mdb” ‘for oleDB
And add:
sConnectionString =”Provider=Microsoft.Jet.OLEDB.4.0;Data Source=”& DatabaseFileNameAndPath
From the Solution Explorer, right click Form1.vb, select “View Designer.” Double click on Form1 to open the Form1_Load() event, and add the following:
‘Get file path to user’s”MyDocuments\OledbExample\”
DimpathstringAsString=My.Computer.FileSystem.SpecialDirectories.MyDocuments
pathstring = pathstring +”\MeasurementComputing\OledbExample\”
System.IO.Directory.CreateDirectory(pathstring)
‘Create a file.
Filename = pathstring +”Database.CFG”
‘Read the data from the file and parse it.
Try
SettingsFileIn =NewStreamReader(Filename)
DatabaseFileNameAndPath = SettingsFileIn.ReadLine()
SettingsFileIn.Close()
CatchexAsException
EndTry
Return to the Form1 Design view, double click on “Selectdatabase” menu item, and add the following to the generated event:
OpenFileDialog1.Filter =”MSACCESS (*.mdb)|*.mdb|All Files (*.*)|*.*”
OpenFileDialog1.FileName = DatabaseFileNameAndPath
OpenFileDialog1.ShowDialog(Me)
DatabaseFileNameAndPath = OpenFileDialog1.FileName
IfDatabaseFileNameAndPath =”” Then
MsgBox(“No file selected or bad file name selected.”, MsgBoxStyle.OkOnly,”Bad file name”)
Exit Sub
EndIf
‘Create a file path to user’s “MyDocuments\OledbExample\”
DimpathstringAsString=My.Computer.FileSystem.SpecialDirectories.MyDocuments
pathstring = pathstring +”\MeasurementComputing\OledbExample\”
System.IO.Directory.CreateDirectory(pathstring)
‘create the file.
Filename = pathstring +”Database.CFG”
SettingsFileOut =NewStreamWriter(Filename)
‘Write the DATABASE filename and path to the .cfg file
SettingsFileOut.WriteLine(DatabaseFileNameAndPath)
SettingsFileOut.Close()
Now, you can compile and create deployment projects for these applications so that they may be distributed. Place the database on a centrally accessible computer. If desired, you can do this distributed system on two computers by having both the DataCollectionToDatabase application and MccGenericOdbc.mdb on one computer, and the other computer running the DatabaseToDataDisplay app.
Make sure all computers are mapped to drives containing the database. Completed application can be found HERE.
Hello…is there a github folder…where we can download the sample code…thx & bye bye
I have added a link to the bottom of the post!
Great article, It was really very informative! Nicely explained the working and real-time distributed system.