

Have you ever used an H-bridge? Oh boy… let me tell you about H-bridges…
This is an H-bridge:
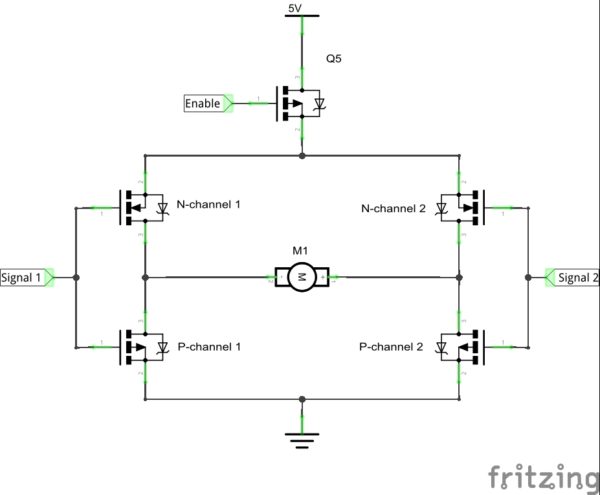
It’s a circuit commonly used for controlling motors, and frustrating newbies. Don’t get me wrong, it’s a fantastic circuit if you want to be able to run a motor both forwards and backwards. Bringing Signal 1 high, Signal 2 low, and enable high will make the motor spin one way, while bringing Signal 1 low and Signal 2 high will make it spin the reverse. What could be simpler?
But here’s the catch.
If somehow you forget to drop enable before switching between Signal 1 and Signal 2, or don’t give the transistors enough time to fully close, you can get a short across Signal 1 and Signal 2’s transistors… which will burn them out and kill your H-bridge. I’ve made H-bridges glow like LEDs this way, so I’ve since learned to be very paranoid about them.
But now there’s an alternative way to control your motors!
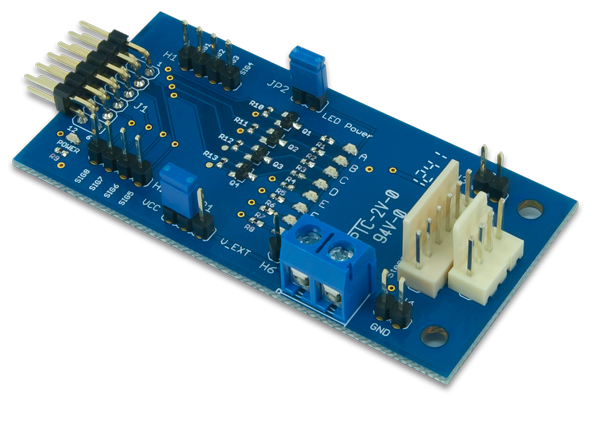
Meet the Pmod STEP! This handy little board was designed for stepper motors, and it’s been featured prominently in Kaitlyn’s FPGA claw game project. This board is seriously a delight to use. It’s simple, functional, and you don’t have to worry about shorting it out by sending the wrong signals!
Here’s why:
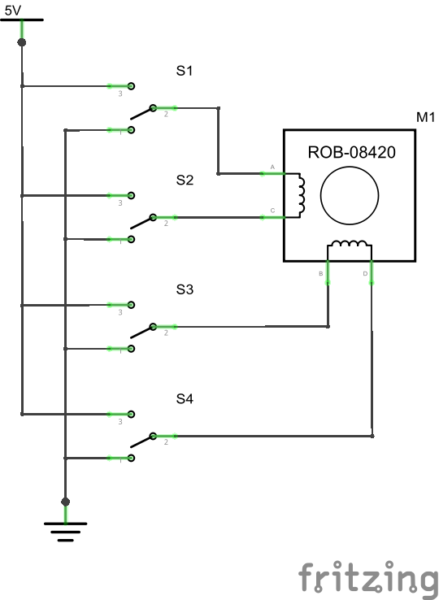
This schematic isn’t literally what is inside the Pmod STEP, but it’s convenient to think of the board as a series of 2-way switches.
By default, each switch is connected to ground. If I flip Switch 1, I bring that output high, which runs through the stepper and drains through Switch 2. To reverse the flow, all I need do is flip Switch 2 instead of Switch 1.
Because I have no connections that run straight to ground, I can toggle each of these switches into any configuration I want, and it’ll never short out!
That’s just conceptual. Here’s what’s really inside the chip:
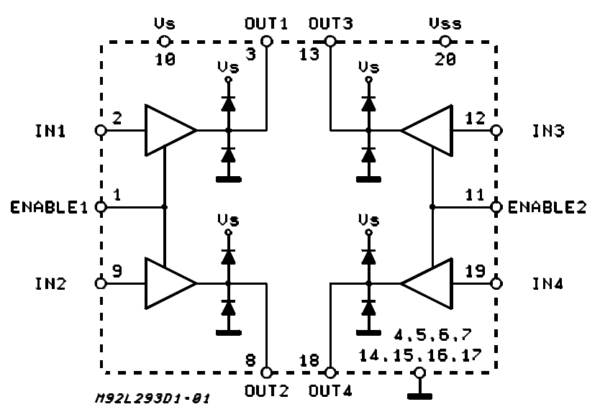
This is the block diagram for the ST 293DD motor driver IC that runs the Pmod STEP. Each of those triangles are called a “buffer”, and that’s what’s acting like the switches in the previous diagram. There are about a billion* different ways to make a buffer so I can’t tell you exactly how they’re wired. But for our purposes it is enough to know that when you apply a high voltage to the IN signal of one of these buffers, it toggles the respective OUT pin from low to high voltage as well.
You might be confused about those enable pins. What are they doing there? Well normally if you brought those pins low, it would disconnect the buffer entirely. That way instead of connecting to either high voltage or ground it doesn’t connect to anything, and acts like a disconnected wire. It would be like if you held one of those switches from before in a middle position, so it didn’t connect to either high or ground. In the Pmod STEP, however, the enable pins are both hard wired to high voltage so all these buffers are enabled all the time.
The practical upside of all of this is a very simple way to run motors. Toggle input 1, output 1 goes high. If a motor is connected to one pin that’s high, and one that’s low, it’ll run that direction. Switch which pins are high and which are low, and the motor changes direction. That’s all there is to it! No fussing with enable pins, and no worrying about shorts!
I had the pleasure of using the Pmod STEP to identify the wiring of a stepper we had lying around. I wasn’t sure which wires were what coils, or what order I needed to use them in order to get the motor to turn.
Because the stepper I was using was a bi-polar stepper, I needed to be able to reverse the polarity of its coils. If I had used an H-bridge to do this, I would have constantly been worrying about shorting something out. Instead by using the Pmod STEP, I was able to play with this board without risk!
The Pmod STEP is pretty wonderful, and I highly recommend you check it out if you want an easy and hassle free way to add any sort of motor to your projects. Steppers or otherwise.
*The “billion” figure may have been slightly exaggerated.