

Imagine you have just a few measurements left before you can hand over your latest project to your sales team so that they can present it to potential customers. But those tests are complicated to set up, and you have noticed some irregularities over the past few days. To get everything done and nailed down, you need a reliable measurement tool that you can script to automatically run complex and repetitive tests. In addition, you may want to integrate your instrument into a more extensive system so that you can respond to external events quickly and store data live in a cloud and/or on a hard drive.
But what might such a device look like? And does such a thing even exist?
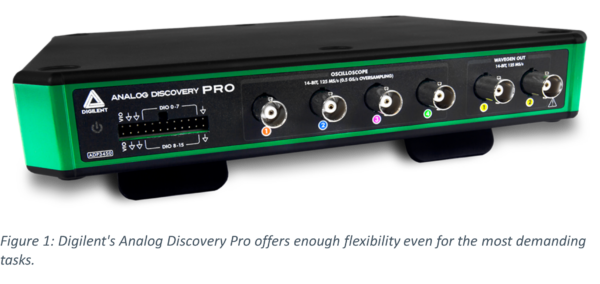
The answer to the latter question is “yes,” and the device is Digilent’s Analog Discovery Pro ADP3450. It is a true mixed-signal oscilloscope with a sampling rate of up to 0.5 GS/s, and it comes with four single-ended analog channels, each having a resolution of 14 bits. Thus, the instrument meets the requirements of your professional test benches in the laboratory. Additionally, this multipurpose instrument provides you with a two-channel arbitrary signal generator, two external trigger inputs, and 16 digital I/O ports. It interfaces to a host computer via the device mode USB port or its RJ-45 Ethernet connector. Additionally, a version with only two analog channels, the ADP 3250, is available as well.
One Software Supports Multiple Instruments
You can control the device through the free software WaveForms, also from Digilent. This application is compatible with Windows, macOS, and Linux operating systems and provides a user experience with the look and feel of traditional lab equipment. WaveForms offers 13 software instruments, like an oscilloscope, a waveform and a pattern generator, a data logger, static I/Os, a voltmeter, power supplies, a curve tracer, and various analyzers. With them, you can acquire, record, analyze, document, and create different signals, also from multiple domains. To perform even more sophisticated tests, the WaveForms application comes with a math channel and a script editor tool that allows you to program the instruments in JavaScript.
If the script editor does not offer enough customizability in your given context, or you require automation beyond what it permits, a software development kit (SDK) is available as well. The application programming interfaces (APIs) of this SDK can be accessed through a dynamic library either by writing code in Python, or in C/C++, C#, and Visual Basic. Creating your own code allows you to design custom functions tailored to your needs.
But what if you require higher adaptability or connectivity? Then, the Analog Discovery Pro ADP3450 offers you even more flexibility and customizability through its Linux mode. In this mode, you can deploy the device and run your tests and measurements on the ADP3450 itself. Once started in Linux mode, the ADP3450 boots into a terminal-based Linux Distribution from Debian, pre-installed on the device, and the entire setup behaves like an embedded system. In this mode, you will benefit from an enhanced networking capability, be it through Ethernet or, if required, through the addition of a recommended Wi-Fi dongle.
High Connectivity For All Your Needs
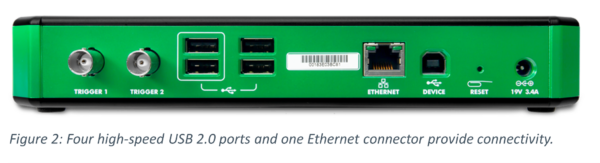
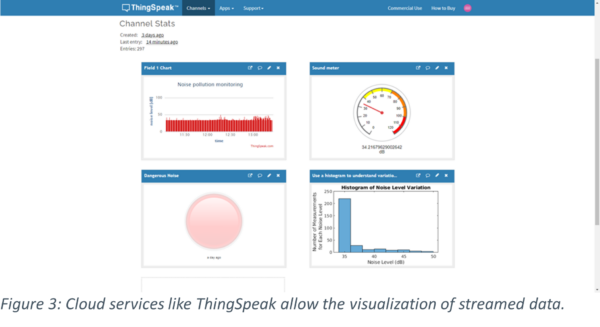
Furthermore, the four high-speed USB 2.0 ports are active in this mode. There you can connect peripherals like FAT/FAT32 formatted flash drives, where you can store your acquired data locally, for example, in CSV format. Alternatively, you can stream these data via USB or Wi-Fi, for instance, to a cloud-based service like ThingSpeak from MathWorks, for storage, display, or manipulation[1]. Or to any other existing 3rd party logging environment. All these features remove the requirement for an additional host device like a Raspberry Pi or a PC. And if you need to talk to the ADP3450, you can always connect to it through a serial terminal program like PuTTY or TeraTerm. An Internet connection for remote access or to the Internet of Things (IoT) is also available.
You can use the WaveForms software and a connected USB drive to update the onboard Linux. New images are provided directly by Digilent. You can write your tests in Python, C/C++, C#, or Visual Basic. They can access the full functionality of the WaveForms SDK but can also be part of a larger measurement environment. As no host is involved, you can get fast, nearly close-to-immediate results from your test. The complexity of your automated script can go beyond the capabilities offered when the device is run in standard mode together with WaveForms. And you can include the ADP3450 in other applications and access it easily from there.
Likewise, you can read parameters from a different instrument through Ethernet, Wi-Fi, or Cloud services, for example, to start a specific measurement just if another test equipment reports that a particular threshold value has been exceeded. You can schedule your tests to run at a specific time of day as well. This is useful for finding that one annoying error that only occurs at the 12th chime of midnight. And if you fit a Wi-Fi dongle and a portable power supply (the ADP3450 needs a 19 V input), you can perform measurements in the field. The device can also be accessed remotely if residing in your company’s network or, if appropriately configured, over a virtual private network (VPN). In short, the Linux mode of the ADP3450 simplifies the realization of complex or repetitive test and measurement tasks, no matter whether you are currently in your product’s development or test phase.
Starting in Linux Mode Is Easy
Perhaps now you ask: How do I get the ADP3450 into Linux mode? The process itself is pretty straightforward. The first step is to connect to it through a serial terminal emulation program. Doing that before you boot into Linux mode makes sure that you don’t miss any critical messages printed during boot, including the login dialog. To ensure your connection works as expected, set the serial port used for the ADP3450 in your program to 115200 baud, 8 bits, 1 stop bit, and no parity. The physical connection between the instrument and your host PC is a standard USB cable connected to the device mode USB port on the back of the ADP3450.
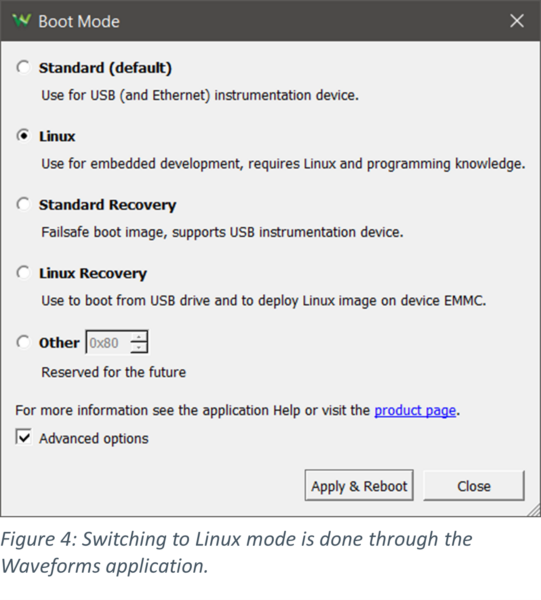
Once the serial connection is established, start the WaveForms application, open the device manager, and select the “Linux” option. Then click on “Apply & Reboot”. Check the boot messages on the serial terminal. On completion of the boot process, you will be greeted by the login prompt. Use the ingredients provided in the reference manual for the ADP3450. As they are identical for all Analog Discovery Pro devices, it might be a good decision to replace them with a username and a password of your choice. This is especially true if you intend to connect your tool to the Internet to avoid that your tool is accessed by somebody else.
With this set, you can move on. The following step might be to connect the Analog Discovery Pro to the Internet, either through the Ethernet port or a Wi-Fi dongle. On its reference pages, Digilent maintains a list of compatible devices. You can also find a step-by-step procedure for establishing the connection there. And finally, you might want to install Python and start scripting, or to connect to a logging environment in the Cloud to stream your data. Again, tutorials are available on Digilent’s website to help you here and to get you going with your particular test and measurement task.
[1] https://digilent.com/reference/test-and-measurement/analog-discovery-pro-3×50/linux-thingspeak-demo
This article didn’t cover running an oscilloscope on Linux mode. It only made it to getting the asp into Linux mode then links other articles. Title should say, getting your adp into Linux mode is easy.