


Reading Generated Data in a Real-Time Distributed System

In today’s manufacturing world, companies are trying to do more with less staffing by maximizing throughput or looking for the critical status of a production line without interrupting the focus of production staffing.

In the past, a manager would often need to walk the production floor to see how the various processes are performing. This took time away from other important tasks, and required these managers to generate reports and perhaps present the data to other managers. One way that the process has evolved to reduce or even eliminate the need for manager oversight is by sending the data collected from various systems to a centralized (physical or cloud-based) database.

Many manufacturing facilities utilize data acquisition and control products integrated directly into their production stands. These devices monitor and/or control the manufacturing process of products from all aspects of life today. The sensor data used to make programmed decisions to any part of the production process can also be used to inform and notify managers, supervisors, directors, administrators, etc., either as a consolidated view or as a report in near real-time.

The key to this is setting up a database as a repository or collection point for all the data being collected. Once the database is created and set up, existing code used can be easily modified to send that telemetry to the database, where folks who need to know can run an app to see what is happening over in production.

This series of articles demonstrates creating and setting up a database and suggestions for augmenting applications written in but not limited to Visual Basic.NET, LabVIEW, and DASYLab.

Setting Up an MS Database

Here are my ‘step by step’ instructions (as performed on Windows 7/64 bit).

You will need to set up an ODBC connection on the computer you’re working on. Click on Start >> Control Panel >> Administrative Tools, then double-click on “Data Sources (ODBC)”. Click on the “System DSN” tab. User DSN means that only you will be able to access this data source, and System DSN means that anyone who is on the machine should be able to access the data source (though only if they provide the necessary credentials). Now click on Add.

ODBC Data Source Administrator, Add button

We will be using Microsoft Access, so select ‘Microsoft Access Driver (*.mdb, *.accdb),’ then click Finish.

Create New Data Source dialog

The ODBC Microsoft Access Setup dialog appears. Enter a Data Source Name and Description, and click on Create.

ODBC Microsoft Access Setup dialog

The new Database dialog appears. Enter the name of the database. Throughout this article, we will be working with the name MccGenericOdbc, and it is placed in C:\Users\Public\Documents.

New Database dialog

Click on OK. If all went correctly, you should see this message:

Click on OK, and you will be back to the ODBC Microsoft Setup now with the database name inserted:

Click OK, and now your ODBC Data Source Administrator will look like this:

Open Windows Explorer and navigate to C:\Users\Public\Documents to see your new database:

It is assumed you have a copy of Microsoft Access to complete the following steps. However, if you do not, attached to this article is a usable copy of the database for this project.

Double-click on MCCGenericOdbc.mdb to launch Microsoft Access and open the empty database. Click “Create > Table”.

A new Table appears. The first column is already labeled “ID”. We need 5 additional columns for our table. Notice the column to the right of ID is highlighted and labeled “Click to add”. Click on it, and a drop-down menu appears with various options for the data type. We want this first column to be the time the data was collected, so select “Date & Time”. The cursor moves to the field name location. By default, it is named “Field1”. Change that to “Time”. Repeat this process for the next 4 columns, making the data types all “Short Text”, and with the names changed to “Temperature”, “Pressure”, “Tachometer”, and “Interlock”.

When completed, it will look like this:

Click on “File”, “Save”, and a Save as dialog appears. Enter a name for the table. Enter “TestData” and click OK. Then close Access. We will be reading and writing to this data table in the next sections.

Creating an Application to Collect and Pass Data

As stated at the beginning of this article, for this application we will be using the Measurement Computing USB-2408 and the Universal Library, Microsoft Visual Basic 2010, and an add-in to Visual Basic called BERGtools.

I’ve chosen the USB-2408 because it fills the needs of our application with one device. I wanted to emulate a system containing a temperature input from a thermocouple, a voltage input from a pressure transducer, pulsed output from a tachometer, and a digital input signal from a door interlock. The USB-2408 is capable of reading from all these various input types and more. I am emulating the signals externally, using a type T thermocouple, a function generator set to a sine wave, another function generator set to TTL pulsed output, and a 5 VDC output power supply, respectively.

I’m using Visual Basic 2010 because I want to keep it compatible with those folks who don’t have Microsoft’s latest version but want to build this application. It is assumed you know your way around the Visual Basic IDE, so I’m going to skip most screenshots so as to focus on the code.

BERGtools is a free collection of displays and functions including meters, oscilloscopes, knobs, etc., I created to make viewing data ‘easier on the eyes’. We will use them here, but you can easily work around them or use your own objects.

To begin, launch Visual Basic and start a new project. We will call it “DataCollectionToDatabase.” Resize your form to 589,422.

Add a MenuStrip, DataGridView, Timer, OpenFileDialog, Thermometer, 2 KnobDials, an LED, 2 buttons, and 11 labels. Your form design should look like this:
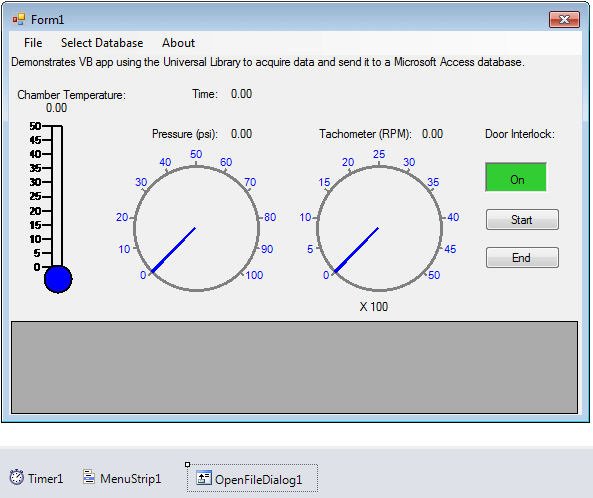
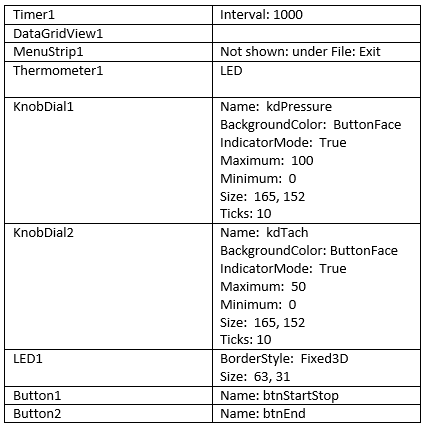
form design
properties

Of all the labels, only 4 need to be named:

The one over the thermometer: lblTempValue. 

The one over kdPressure (to the right): lblPressure. 

The one over kdTach (to the right): lblTach. 

The one to the right of Time: lblTime

All labels should set Autosize = true

From the Solution Explorer, click on the icon to “Show All Files”. Right-click on References, select “Add Reference.” The Add Reference dialog will show. Click on the .NET tab, scroll down, and select MccDaq, then click OK.

From the Solution Explorer, right-click on Form1.vb, and select View Code. Above Public Class Form1, insert the following:

Imports System.Data.OleDb

Imports System.Runtime.InteropServices

Imports System.IO


Next, add the variable declarations:

‘For Universal Library

Dim inventory As MccDaq.DaqDeviceDescriptor()

Public Daqboard As New MccDaq.MccBoard()

Public UlStat As MccDaq.ErrorInfo

Dim LastCounterValue As Int32 = 0

Dim bFirstEntry As Boolean = False


‘For database

Dim sConnectionString As String

Public objConn As New OleDbConnection()

Dim daMFGData As New OleDbDataAdapter()

Dim dsNewScan As New DataSet()

Dim dtData As DataTable

Dim tblTestData As DataTable

Dim drCurrent As DataRow


The top sections are the global variables for the Universal Library. The bottom section are the global variables and declarations for the database.

Instantiate the USB-2408

Paste the following into the Form1_Load() event:

MccDaq.DaqDeviceManager.IgnoreInstaCal()    ‘don’t use information from InstaCal.

System.Windows.Forms.Cursor.Current = Cursors.WaitCursor ‘change cursor to wait.


‘Load all the boards it can find

inventory = MccDaq.DaqDeviceManager.GetDaqDeviceInventory(MccDaq.DaqDeviceInterface.Any)

Dim numDevDiscovered As Integer = inventory.Length   ‘how many was that?

System.Windows.Forms.Cursor.Current = Cursors.WaitCursor   ‘change cursor to wait.

Dim Boardfound As Boolean = False


If numDevDiscovered > 0 Then

    For boardNum As Integer = 0 To numDevDiscovered – 1

        Try

            ‘Create a new MccBoard object for Board and assign a board number

            ‘to the specified DAQ device with CreateDaqDevice()

            Daqboard = MccDaq.DaqDeviceManager.CreateDaqDevice(boardNum, inventory(boardNum))

            If Daqboard.BoardName.Contains(“2408”) Then

                Boardfound = True

                Daqboard.FlashLED()

                Exit For

            Else

                MccDaq.DaqDeviceManager.ReleaseDaqDevice(Daqboard)

            End If

        Catch ule As MccDaq.ULException

            MsgBox(ule.ErrorInfo.Message)

        End Try

    Next

End If


If Boardfound = False Then

    MsgBox(“No USB-2408 series board found in system. “, MsgBoxStyle.Critical, “No Board detected”)

    End

End If


UlStat = Daqboard.FlashLED()

Dim MyBoardName As String = Daqboard.BoardName.Trim

Me.Text = MyBoardName + ” found as board number: ” + Daqboard.BoardNum.ToString

This snippet of code queries the system for any supported Measurement Computing devices, accessible through the Universal Library. It sifts through the devices found, looking for a USB-2408. If one is found, it uses it and changes the Form1.Text with an appropriate statement. If not, it pops up a message box stating it didn’t find a USB-2408.

Create the Local Database

Add this line into the Form1_Load() event after the above code:

‘Create the local database to DataGridView1

CreateDataBase()

And add the following subs and functions after the End Sub of the Form1_Load() event:

Private Sub CreateDataBase()

    Dim ds As New DataSet

    ds = CreateDataSet()

    DataGridView1.DataSource = ds.Tables(“MeasuredData”)

End Sub


Private Function CreateDataSet() As DataSet

    ‘Creating a DataSet object for tables

    Dim MeasuredData As DataSet = New DataSet()

    ‘Creating a table object

    Dim dtData As DataTable = CreateDACTable()

    MeasuredData.Tables.Add(dtData)

    Return MeasuredData

End Function


Private Function CreateDACTable() As DataTable

    dtData = New DataTable(“MeasuredData”)

    ‘Adding columns

    AddNewColumn(dtData, “System.String”, “Time”)

    AddNewColumn(dtData, “System.String”, “Temperature”)

    AddNewColumn(dtData, “System.String”, “Pressure”)

    AddNewColumn(dtData, “System.String”, “Tachometer”)

    AddNewColumn(dtData, “System.String”, “Interlock”)

    Return dtData

End Function


Private Sub AddNewColumn(ByRef table As DataTable, ByVal columnType As String, ByVal columnName As String)

    Dim column As DataColumn = table.Columns.Add(columnName, Type.GetType(columnType))

End Sub


Private Sub AddNewRow(ByRef table As DataTable, ByRef time As String, ByRef temperature As Double, ByRef pressure As Double, ByRef RPM As Int32, ByRef interlock As Boolean)

    Dim newrow As DataRow = table.NewRow()

    newrow(“Time”) = time

    newrow(“Temperature”) = temperature

    newrow(“Pressure”) = pressure

    newrow(“Tachometer”) = RPM

    newrow(“Interlock”) = interlock

    table.Rows.Add(newrow)

End Sub

The above does the following: Create a Dataset that includes a table called MeasuredData, and links it to the DataGridView1’s Datasource. MeasuredData has 1 row, made up of 5 columns with the field names: Time, Temperature, Pressure, Tachometer, and Interlock. Create the 5 columns with these names, and place the names in the top row.

From the Form View, double-click on the “Start” button, and add the following to the btnStartStop_Click() event:

If btnStartStop.Text = “Start” Then

    btnStartStop.Text = “Stop”

    OpenDatabase()

    UlStat = Daqboard.CClear(0)

    Timer1.Enabled = True

Else

    btnStartStop.Text = “Start”

    Timer1.Enabled = False

End If


Aside from the button text alternating between “Start” and “Stop”, when the button text is “Start”, open the external database, reset the counter, and start Timer1. When the button text is “Stop”, stop Timer1.

Opening the external database is essential to this project and has its own subroutine.

How to Open the External Database

Paste this below the End Sub of the btnStartStop_Click() event:

Private Sub OpenDatabase()

    ‘How to open an OLE DB database

    sConnectionString = “Provider=Microsoft.Jet.OLEDB.4.0;Data Source=c:\Users\Public\Documents\MCCGenericOdbc.mdb”

    objConn = New OleDbConnection(sConnectionString)

    objConn.Open()

    daMFGData = New OleDbDataAdapter(“Select * From TestData”, objConn)

    dsNewScan = New DataSet(“NewScan”)

    daMFGData.FillSchema(dsNewScan, SchemaType.Source, “TestData”)

    daMFGData.Fill(dsNewScan, “TestData”)

    ‘Create a new instance of a DataTable.

    tblTestData = dsNewScan.Tables(“TestData”)

    objConn.Close()

End Sub

Opening a link to a Microsoft Access database requires a proper connection string like this:

sConnectionString = “Provider=Microsoft.Jet.OLEDB.4.0;Data Source=c:\Users\Public\Documents\MCCGenericOdbc.mdb”


The “;” delineates the Provider type from the database path and filename. It is important that this be correct and be correctly formatted. The connection string is used to instantiate the database connection, called objConn. Open the connection and create a data adapter by selecting the table “TestData” in the database and naming it “daMFGData”. Create a dataset, “daNewScan”, set it up with the proper fields using FillSchema and Fill. Create a local data table aligned to the one in the database called “tblTestData”.

Lastly, close the connection for now.

Collecting Data and Sending to the Database

From the Form view, double-click on Timer1. Enter the following in the Timer1_Tick() event:

Dim MyDataScan(4) As Object ‘array to hold the data generated by the scan


‘Read the temperature

UlStat = Daqboard.TIn(0, MccDaq.TempScale.Celsius, MyDataScan(1), MccDaq.VInOptions.Default)

If UlStat.Value <> MccDaq.ErrorInfo.ErrorCode.NoErrors Then

    errhandler(UlStat)

    Exit Sub

End If

Thermometer1.TempValue = MyDataScan(1)

lblTempValue.Text = Convert.ToDouble(MyDataScan(1)).ToString(“##0.00”) & “°C”


‘Read the voltage (Pressure)

UlStat = Daqboard.VIn(1, MccDaq.Range.Bip10Volts, MyDataScan(2), MccDaq.VInOptions.Default)

If UlStat.Value <> MccDaq.ErrorInfo.ErrorCode.NoErrors Then

    errhandler(UlStat)

    Exit Sub

End If

MyDataScan(2) *= 10 ‘apply scaling (Makes the data look cooler, it uses more of the pressure meter!)

lblPressure.Text = Convert.ToSingle(MyDataScan(2)).ToString(“##0.00”)

kdPressure.UpdateKnob(MyDataScan(2))


‘Read the counter (Tachometer)

UlStat = Daqboard.CIn(0, MyDataScan(3))

If UlStat.Value <> MccDaq.ErrorInfo.ErrorCode.NoErrors Then

    errhandler(UlStat)

    Exit Sub

End If

Dim NewCountRead As Integer = (MyDataScan(3) – LastCounterValue)

LastCounterValue = MyDataScan(3)

Dim TachVal As Double = (NewCountRead * 60) ‘apply scaling to RPM from RPS

kdTach.UpdateKnob(TachVal / 100)

lblTach.Text = (TachVal).ToString(“####0”)


‘Read the digital bit (door interlock)

Dim MyDigBit As Boolean

UlStat = Daqboard.DBitIn(MccDaq.DigitalPortType.FirstPortA, 0, MyDigBit)

If UlStat.Value <> MccDaq.ErrorInfo.ErrorCode.NoErrors Then

    errhandler(UlStat)

    Exit Sub

End If

Led1.Value = MyDigBit

MyDataScan(4) = “0”

If MyDigBit = True Then MyDataScan(4) = “1”


‘Read the current Time

MyDataScan(0) = Convert.ToString(System.DateTime.Now)

lblTime.Text = MyDataScan(0)


In the above code, create an array called MyDataScan() to hold the collected data. Using Measurement Computing’s Universal Library functions, read from each of the 4 types of sensors: temperature, voltage, counter, and digital input (TTL). Also read the time.

Note: preceding each library call, there is a small If-Then routine:

If UlStat.Value <> MccDaq.ErrorInfo.ErrorCode.NoErrors Then

    errhandler(UlStat)

    Exit Sub

End If

Each time a call is made to the Universal Library, an integer value is returned into UlStat. If UlStat equals zero, then the function executed correctly and the data is good. If UlStat is not equal to 0, then there was a problem executing the function, and the value of UlStat can be used to handle the error. If you were writing a more elaborate program, you would want to manage the returned error in your program so as to keep the program from using bad data or worse, crashing. More on that in a bit.

Use the array to scale data if needed, and update all the meters, gauges, and labels.

Next, we are going to write the data to our DataGridView. Here’s how:

‘This goes to the datagrid

If bFirstEntry = False Then

    Dim newrow As DataRow = dtData.NewRow()

    newrow(“Time”) = MyDataScan(0)

    newrow(“Temperature”) = MyDataScan(1).ToString()

    newrow(“Pressure”) = MyDataScan(2).ToString

    newrow(“Tachometer”) = TachVal.ToString

    newrow(“Interlock”) = MyDataScan(4)

    dtData.Rows.Add(newrow)

    bFirstEntry = True

Else

    Dim drEditRow As DataRow

    drEditRow = dtData.NewRow()

    drEditRow = dtData.Rows.Item(0)

    drEditRow.BeginEdit()

    drEditRow(“Time”) = DateTime.Now.ToString()

    drEditRow(“Temperature”) = Format(MyDataScan(1), “##0.0#”)

    drEditRow(“Pressure”) = Format(MyDataScan(2), “##0.0#”)

    drEditRow(“Tachometer”) = Format(TachVal, “####”)

    drEditRow(“Interlock”) = MyDataScan(4)

    drEditRow.EndEdit()

End If


We implement an If-Then-Else routine here because we need to add a new row to the grid. When the finished program runs, each time new data is collected, it is repeatedly written to the first row. We are not looking to collect and store data as it is received; we only want the one row of data. To make that work, we use the IF-Then-Else. The decision (IF) is based on ‘is this the first time in this timer loop?’ If it is, then we add a first row. If not, then just keep updating the same row. In the IF portion, we call NewRow, and in the Else portion we call BeginEdit () and EndEdit ().

Now we will write the data out to our external database. Add the following code:

Try ‘This goes out to the database

    objConn.Open()

    ‘Obtain a new Data Row object from the DataTable.

    drCurrent = tblTestData.NewRow()

    drCurrent = tblTestData.Rows.Find(1)

    drCurrent = tblTestData.Rows(0)

    drCurrent.BeginEdit()

    drCurrent(“Time”) = DateTime.Now.ToString()

    drCurrent(“Temperature”) = MyDataScan(1).ToString()

    drCurrent(“Pressure”) = Format(MyDataScan(2), “##0.0#”)

    drCurrent(“Tachometer”) = TachVal

    drCurrent(“Interlock”) = MyDataScan(4)

    drCurrent.EndEdit()

    Dim objCommandBuilder As New OleDbCommandBuilder(daMFGData)

    objCommandBuilder.QuotePrefix = “[“

    objCommandBuilder.QuoteSuffix = “]”

    Dim r As Integer = daMFGData.Update(dsNewScan, “TestData”)

    objConn.Close()

Catch ex As OleDbException

    Timer1.Enabled = False

    objConn.Close()

    MsgBox(ex.Message.ToString(), MsgBoxStyle.Information, “Error Message”)

End Try

Writing to the real database is almost the same as writing to the DataGridView. However, here we have to open the database connection, find the first row, use the OleDbCommandBuilder () (be sure to include the QuotePrefix and QuoteSuffix), update the table, and close the database connection.

Now, for a little program management. Add our error handler subroutine. After the Timer1_Tick’s End sub, add the following:

Public Sub errhandler(ByVal ulstat As MccDaq.ErrorInfo)

    ‘Generic UL error handler

    Timer1.Enabled = False

    Try

        objConn.Close()

    Catch ex As Exception

    End Try

    MessageBox.Show(ulstat.Message, “Universal Library Error”, MessageBoxButtons.OK, MessageBoxIcon.Error)

    btnStartStop.Text = “Start”

End Sub


If there is a Universal Library error, stop the timer, close the database connection if it is open, display an error message stating the problem encountered, and reset the Start/Stop button to display “Start”. In a more involved application, you might have a Case statement, handling the problem programmatically, or offering solutions either in a more verbose message telling the user what happened and how to resolve it.

Add a graceful way to exit the program:

From the Form view, regarding the MenuStrip1, click on File, and then double-click on Exit, and add the following code:

Timer1.Enabled = False

End

Because this is Windows, and there is always more than one way to do anything, go back to the Form view, double-click on the ‘End’ button, and paste the same syntax there.

We are still missing a couple of items, but that is as far as we need to go for this section.

You can now build and run this application. When you click “Start”, it will begin reading from the sensors connected to the USB-2408, update the screen, and log the data to the database. A word of caution: if you are expecting to open the database and look at the table hoping to see the data updating in real time, that won’t happen. What you will see on your screen is a snapshot in time, not real-time updating data. You can stop the application at any time, open the database and table, and see that the table has been updated.

Creating an Application to View Data with VB.NET

Now, we will create the application to read the data back out of the database. It will be a mirror image of the collection application, but no data is collected here — it will just show what was collected and stored to the database. It will operate like dual-ported memory. This is all in preparation for distributing the two applications so as to have one application (DataCollectionToDatabase) on one computer, and the other app (DatabaseToDataDisplay) on another computer in a different part of the building.

Again, launch Visual Basic, and start a new project. We will call it “DatabaseToDataDisplay.” Resize your form to 639, 358.

Add a MenuStrip, DataGridView, Timer, OpenFileDialog, Thermometer, 2 AnalogMeters, an LED, 2 buttons, and 7 labels. Rearrange and resize the objects so that your form design looks like this:

Change the following properties:

Of all the labels, only 2 need to be renamed:

The one under the thermometer: lblTempValue. The one to the right of Time: lblTime

All labels should be set to Autosize = True

From the Solution Explorer, right-click on Form1.vb, and select View Code. Above Public Class Form1, insert the following:

Imports System.Data.OleDb

Imports System.Runtime.InteropServices

Imports System.IO


Next, add the variable declarations:

‘For database

Dim sConnectionString As String

Public objConn As New OleDbConnection()

Dim ds As New DataSet()

Dim da As OleDb.OleDbDataAdapter

Dim sql As String

Open the External Database and Read in the Data

There is a lot less going on in this application, just about all of it in happening in the Timer, so open the Timer1_Tick() event, and paste in the following:

Try ‘This goes out to the database

    ‘How to open an OLE DB database

    sConnectionString = “Provider=Microsoft.Jet.OLEDB.4.0;Data Source=c:\Users\Public\Documents\MCCGenericOdbc.mdb”  ‘for oleDB

    objConn = New OleDbConnection(sConnectionString)

    objConn.Open()

    ‘Obtain a DataRow object from the DataTable.

    da = New OleDb.OleDbDataAdapter(“SELECT * FROM TestData”, objConn)

    da.FillSchema(ds, SchemaType.Source, “TestData”)

    da.Fill(ds, “TestData”)

    objConn.Close()

Catch ex As OleDbException

    Timer1.Enabled = False

    objConn.Close()

    MsgBox(ex.Message.ToString(), MsgBoxStyle.Information, “Error Message”)

End Try


Try

    Dim MyDataScan = ds.Tables(“TestData”).Rows(0)

    lblTime.Text = MyDataScan(1).ToString

    Thermometer1.TempValue = Convert.ToDouble(MyDataScan(2))

    lblTempValue.Text = MyDataScan(2).ToString + “°C”

    amPressure.Value = Convert.ToDouble(MyDataScan(3))

    amTach.Value = Convert.ToDouble(MyDataScan(4) / 100)

    Dim r As Boolean = Convert.ToBoolean(Val(MyDataScan(5)))

    Led1.Value = r

Catch ex As OleDbException

    Timer1.Enabled = False

    MsgBox(ex.Message.ToString(), MsgBoxStyle.Information, “Error Message”)

End Try


As with the previous app, we want to open the database. But now we want to obtain existing data from the TestData table. When we read in the entire table, we use the Fill Schema and Fill commands. Read in the first row from the table and parse it (Dim MyDataScan = ds.Tables(“TestData”). Rows(0)). The data will automatically be placed into the array, ‘MyDataScan()’ for dissemination to the various labels and objects in this application. All the data is stored as strings, so there are data conversions going on in the code above.

The app could come up running, but for now let’s use a Start/Stop button, and so from the Form View, double-click on the “Start” button, and add the following to the btnStartStop_Click() event:

If btnStartStop.Text = “Start” Then

    btnStartStop.Text = “Stop”

    Timer1.Enabled = True

Else

    btnStartStop.Text = “Start”

    Timer1.Enabled = False

    objConn.Close()

End If

The If/Then/Else above alternates the Text property of the button between ‘Start’ and ‘Stop’, but when the IF condition is true, we also enable or start the timer. When the IF condition is false, we stop the timer and close the link to the database.

Add a graceful way to exit the program:

From the Form view, regarding the MenuStrip1, click on File, and then double-click on Exit, and add the following code:

Timer1.Enabled = False

End


Because this is Windows, and there is always more than one way to do anything, go back to the Form view, double-click on the End button, and paste the same syntax there.

We are still missing a couple of items, but that is as far as we need to go for this section.

The two applications are now complete. Let’s run both of them from within the Visual Basic.NET environments. Here is what they look like, running in concert:

both apps running side by side

Despite the different types of meters used in the two applications, you can see the two applications are sharing the data. What you can’t see is that the top app is sending data to the table “TestData” of the database “MccGenericOdbc.mdb”, and the bottom app is reading data from the table “TestData” of the database “MccGenericOdbc.mdb”. Since the two apps are running their own timers, data reads and writes are happening ‘on demand.’ For these applications, the data is one second delayed, which is why the data on the two forms is not exactly the same. There will always be some delay due to timers, Windows OS, and network traffic.

Distributing the Applications to View the Data Remotely

The goal of this article series is to demonstrate how to create a data acquisition system on one system, and view the collected data in near real time from another. This can be accomplished by the use of a database and two VB.NET applications.

Up until now, all three components have been on one computer. Here, we will deploy this system onto three computers: one for the database, one to collect the data, and one to view the data. If you have only two computers, you can still make this work by putting the database and data collection program on the same system.

We will need to make a couple of tweaks to our applications. Nothing major, just to make it easier to find the database. Since the apps are no longer on the same PC, we need a way to have the app find and remember where the database is located. Sure, you could hard-code it, but what if you move the database or one or both apps to other locations? Or, you need to add another computer as a data collection point, or another person needs to see the collected data. Here’s one way to solve the problem. We will add code to create a configuration file that is automatically loaded at startup. If one is not available, click on a menu item so you can tell the program where the database is, then store that location so the next time you run the program, it will find it upon start up.

Editing the DataCollectionToDatabase App

Starting with the collection app, open DataCollectionToDatabase, go to the Code view of Form1.vb, and scroll to the top. Below Dim drCurrent As DataRow, add the following:

Dim DatabaseFileNameAndPath As String

Dim Filename As String

Dim SettingsFileOut As IO.StreamWriter

Dim SettingsFileIn As IO.StreamReader


And, in the Form1_Load() event, below CreateDataBase() Add the following:

‘Get file path to user’s “MyDocuments\OledbExample\”

Dim pathstring As String = My.Computer.FileSystem.SpecialDirectories.MyDocuments

pathstring = pathstring + “\MeasurementComputing\OledbExample\”

System.IO.Directory.CreateDirectory(pathstring)


‘Create a file.

Filename = “”

Filename = pathstring + “Database.CFG”


‘Read the data from the file and parse it.

Try

    SettingsFileIn = New StreamReader(Filename)

    DatabaseFileNameAndPath = SettingsFileIn.ReadLine()

    SettingsFileIn.Close()

Catch ex As Exception

End Try


What this does: If there is a file named Database.CFG, located in your computer’s MyDocuments\Measurement Computing\OledExample folder, use the path located in that file. If the file does not exist, do nothing.

From the Solution Explorer, right-click on Form1.vb, and select “View Designer.” Double-click on the “Select Database” menu item to open the SelectDatabaseToolStripMenuItem_Click() event, and add the following code:

OpenFileDialog1.Filter = “MSACCESS (*.mdb)|*.mdb|All Files (*.*)|*.*”

OpenFileDialog1.FileName = DatabaseFileNameAndPath

OpenFileDialog1.ShowDialog(Me)

DatabaseFileNameAndPath = OpenFileDialog1.FileName

If DatabaseFileNameAndPath = “” Then

    MsgBox(“No file selected or bad file name selected.”, MsgBoxStyle.OkOnly, “Bad file name”)

    Exit Sub

End If

‘Create a file path to user’s “MyDocuments\OledbExample\”

Dim pathstring As String = My.Computer.FileSystem.SpecialDirectories.MyDocuments

pathstring = pathstring + “\MeasurementComputing\OledbExample\”

System.IO.Directory.CreateDirectory(pathstring)

‘Create the file.

Filename = pathstring + “Database.CFG”

SettingsFileOut = New StreamWriter(Filename)


‘Write the DATABASE filename and path to the .cfg file

SettingsFileOut.WriteLine(DatabaseFileNameAndPath)

SettingsFileOut.Close()

We are using 2 string variables here, and they can be confusing:

DatabaseFileNameAndPath is a string containing the filename and path to the database itself. Filename is a string containing the filename and path to DatabaseFileNameAndPath.

When this event is selected, the Open File dialog box appears with filters turned on to show just Microsoft Access files (with the extension of .mdb) or all files. The user navigates to the database, selects it, and clicks on OK. The path and file name are returned in the string DatabaseFilenameAndPath:

DatabaseFileNameAndPath = OpenFileDialog1.FileName

We want to store that path and file name somewhere locally where the app can find it the next time the app starts (that’s what we added at the end of the Form1_Load() event). As stated above, we want to put the string in a file Database.CFG, and place the file in MyDocuments\MeasurementComputing\OledbExample.

Editing the DatabaseToDataDisplay App

Now that we have the first app modified, let’s modify the monitoring application. These edits are similar to DataCollectionToDatabase. I’ll just provide the edits.

Open the application. From the Solution Explorer, right-click on Form1.vb, and select “View Code.”

Scroll to the top. Just below Dim sql As String, add the following:

Dim DatabaseFileNameAndPath As String

Dim Filename As String

Dim SettingsFileOut As IO.StreamWriter

Dim SettingsFileIn As IO.StreamReader

In the Timer1_Tick() event, comment out this line:

sConnectionString = “Provider=Microsoft.Jet.OLEDB.4.0;Data Source=c:\Users\Public\Documents\MCCGenericOdbc.mdb”   ‘for oleDB

And add:

sConnectionString = “Provider=Microsoft.Jet.OLEDB.4.0;Data Source=” & DatabaseFileNameAndPath


From the Solution Explorer, right-click Form1.vb, select “View Designer.” Double click on Form1 to open the Form1_Load() event, and add the following:

‘Get file path to user’s “MyDocuments\OledbExample\”

Dim pathstring As String = My.Computer.FileSystem.SpecialDirectories.MyDocuments

pathstring = pathstring + “\MeasurementComputing\OledbExample\”

System.IO.Directory.CreateDirectory(pathstring)


‘Create a file.

Filename = pathstring + “Database.CFG”


‘Read the data from the file and parse it.

Try

    SettingsFileIn = New StreamReader(Filename)

    DatabaseFileNameAndPath = SettingsFileIn.ReadLine()

    SettingsFileIn.Close()

Catch ex As Exception

End Try


Return to the Form1 Design view, double-click on the “Select database” menu item, and add the following to the generated event:

OpenFileDialog1.Filter = “MSACCESS (*.mdb)|*.mdb|All Files (*.*)|*.*”

OpenFileDialog1.FileName = DatabaseFileNameAndPath

OpenFileDialog1.ShowDialog(Me)

DatabaseFileNameAndPath = OpenFileDialog1.FileName

If DatabaseFileNameAndPath = “” Then

    MsgBox(“No file selected or bad file name selected.”, MsgBoxStyle.OkOnly, “Bad file name”)

    Exit Sub

End If


‘Create a file path to user’s “MyDocuments\OledbExample\”

Dim pathstring As String = My.Computer.FileSystem.SpecialDirectories.MyDocuments

pathstring = pathstring + “\MeasurementComputing\OledbExample\”

System.IO.Directory.CreateDirectory(pathstring)


‘create the file.

Filename = pathstring + “Database.CFG”

SettingsFileOut = New StreamWriter(Filename)


‘Write the DATABASE filename and path to the .cfg file

SettingsFileOut.WriteLine(DatabaseFileNameAndPath)

SettingsFileOut.Close()

Now, you can compile and create deployment projects for these applications so that they may be distributed. Place the database on a centrally accessible computer. If desired, you can do this distributed system on two computers by having both the DataCollectionToDatabase application and MccGenericOdbc.mdb on one computer, and the other computer running the DatabaseToDataDisplay app.

Make sure all computers are mapped to drives containing the database. Completed application can be found HERE.

Using Additional Software to View Data Remotely

Now that we’ve created a working distributed data collection and display system (see the sections above), let’s briefly explore other software packages available to access the database for both reading and writing. Here are two software packages you can use to read the data from the database (of course, they can write to it as well, but that is not part of this article).

DASYLab

We can use DASYLab to retrieve data from our MS ACCESS database. DASYLab is a graphical software package that includes ODBC support. With the help of CJ Butler, we were able to access the local database here in Massachusetts from her office in New Hampshire (about 100 miles!) using her VPN connection to an MCC server.

All she needed to do was map the Drive to her local computer, run the ODBC Administrator on her local computer, and create the attached worksheet.

Worksheet
DASYLab Display

Beyond DASYLab, other software packages, including LabVIEW, can also connect to and read from the same database via ODBC, giving you additional flexibility in how you access and visualize your collected data.

This concludes our series on building a real-time distributed data acquisition system. You have now seen how to create the database, collect and store data, display it in near real time, distribute the applications across multiple computers, and access the same data from alternative ODBC-compatible software. We hope this project gives you a solid foundation for developing your own distributed data acquisition and monitoring applications.

Author

Be the 1st to vote.

2 Comments on “Reading Generated Data in a Real-Time Distributed System”

Leave a Reply

Your email address will not be published. Required fields are marked *