

As many of you have heard (otherwise I presume you wouldn’t be reading this post) the Analog Discovery 3 has been released by Digilent. One of the biggest questions that I had as one of the team members responsible for creating the documentation on the Analog Discovery 3 Resource Center was “How does the Analog Discovery 3 compare to the Analog Discovery 2?”
In this post, I’ll go through and highlight as many of the differences and changes that exist between the two devices (Check our other article if you only want the facts about Analog Discovery 3). I’ll start out with what improved.
MSRP:
MSRP is actually an improvement – which I personally didn’t expect. The Analog Discovery 3 retails for $379 USD, which is $20 less than the retail price of the Analog Discovery 2 of $399. The academic price of the Analog Discovery 3 goes for $249 USD if you qualify as an academic through our verification system.
Sample Buffer Size:
This is the biggest hardware improvement that the Analog Discovery 3 benefits from is thanks to the Spartan 7 FPGA present inside the device instead of the Spartan 6. All of the sample buffers for collecting data (or sending customized data out for things like the Waveform and Pattern Generators) have doubled in size. Instead of only being able to collect up to 16,384 samples of analog and digital data per channel (the amount of buffer allocated to each instrument type is dependent on what Device Configuration you select of course) that the Analog Discovery 2 was limited to, each system can now acquire (or send out) up to 32,768 samples at the full sample rate per channel. Admittedly, with this larger amount of data capture you will be on the hook for analyzing longer sequences of complex data, but that’s what you wanted right?
Large sample buffer sizes aren’t the only ones that benefit; all of the minimum sample buffers have been increased as well. Previously on the Analog Discovery 2, if you selected Configuration 4 to increase the Logic Analyzer and Pattern Generator to their maximum sample size of 16,384 samples per channel, the analog channels suffered quite a bit with the analog input channels on the Oscilloscope, dropping down to a 512 sample buffer size. The analog output channels on the Arbitrary Waveform Generator suffered even further, going to only 256 samples. Configuration 3 was even worse, dropping support for the Logic Analyzer and Pattern Generator entirely to let the AWG have 16,384 samples.
Not so with the Analog Discovery 3; now all systems both analog and digital will have at least 2,048 samples to work with no matter what configuration is selected.
The FM and AM parameters of the modulation feature of the Arbitrary Waveform Generator also got a bump. Rather than being subjected to a range of simply not existing (looking at you configurations 4 and 6) to a high point of 2048 samples at only 9 bits of resolution, the Analog Discovery 3 now has a minimum of 2048 samples at 16-bit resolution for both the FM/PM and AM/SUM (did I mention that phase modulation and summation options are now available?) on both channels and an even larger sample set of 8192 samples at 16-bit resolution in configuration 6. I don’t know about you, but I’m glad to see that configuration 6 turned its around.
The above buffer size improvements are only part of the story.
One of the lesser known capabilities of the Analog Discovery 2 was the ability to use the two user Power Supply channels through the Arbitrary Waveform Generator and manipulate them as very slow arbitrary waveform generator channels of their own. This was useful to be able to apply a slow ramping effect to the power supplies output and observe how the external circuitry being tested reacted to changing supply voltages. However, the buffer was only available in Configuration 6, so you had to really want the ability in order to access it.
With the Analog Discovery 3, you can always control the two power supplies as their own AWGs. They are still very slow as they are still power supplies, not DACs, but now this feature will be readily available in any configuration.
While sample buffer size increases are all well and good, who says upgraded hardware needs to be limited to simply that when you can also have…
Digital Loopback:
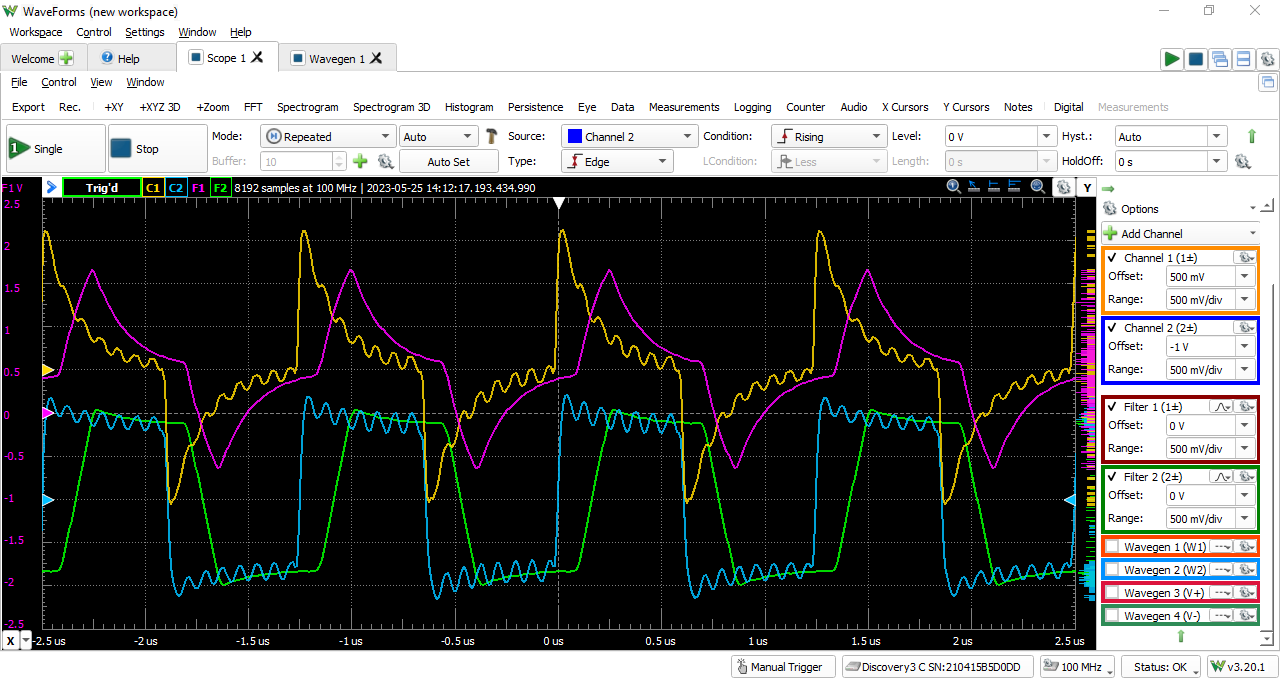
One occasionally asked feature with the Analog Discovery 2 and the other Digilent Test and Measurement devices was the ability to directly view what the Arbitrary Waveform Generator was generating without having to sacrifice one of the Oscilloscope channels to do it. Or conversely, directly take the data captured by the one of the Oscilloscope channels and send it right back out the Waveform Generator without having to first save the capture and then play it back as a custom waveform. With the Analog Discovery 3, we say, “Why not both?”
New to the Analog Discovery 3, users can now digitally capture and view analog data between the Oscilloscope and Arbitrary Waveform Generator. Need to echo an analog signal being received on the Scope but with a different amplitude and offset? No problem.
How about having a very easy visual reference of the signal generated by the Arbitrary Waveform Generator so you can compare it to the attenuated signal after it goes through a filter? Actually, why bother setting up an external filter at all when you can use…
Hardware Filters:
Hardware filters! No, not the software filters that let you implement a band-pass filter or a Lock-In amplifier that WaveForms does for you on the computer side, but a FIR filter implemented and directly configurable on the Analog Discovery 3 itself to help smooth out your rippling incoming signals; even made up modulation nonsense uh I mean, completely sensible signals you might generate while playing around in the Waveform Generator instrument.
Sample Rate:
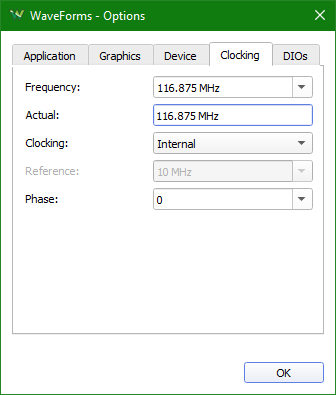
Originally only limited to the Analog Discovery Pro ADP3000 (or by overclocking the Digital Discovery), the Analog Discovery 3 can adjust it’s System Clock Frequency away from the default value of 100 MHz to as low as 50 MHz and as high as 125 MHz, allowing samples to be taken at faster rates (while using the higher frequency clock of course), whereas the Analog Discovery 2 was forever stuck at 100 MHz. Why not just simply lock in the system clock frequency to 125 MHz and call it a day you ask? While tempting idea, due to how sampling (or generating) frequencies are derived, achieving some of the more familiar frequencies such as 50 MHz at the higher 125 MHz is not feasible in hardware. So the default of 100 MHz is left but can easily be changed in the Clocking tab of the Device Options.
DIO Pin Settings:
Speaking of things originally limited to the ADP 3000 series boards and the Digital Discovery, the Analog Discovery 3 can also change the internal pull resistor type for all of its digital I/O pins. Nice perk, I like it.
Power Supplies:
The two programmable user power supplies on the Analog Discovery 3, when using an auxiliary power supply, have now increased their current output for both channels from Analog Discovery 2’s rating of 700 mA or 2.1 W per channel up to 800 mA or 2.4 W for both the 5 V and -5 V supplies. In fairness, it’s not a drastic jump but you never mind having a bit of extra headroom with power supplies. It also helps that you can more easily control them directly from the Waveform Generator instrument like I mentioned earlier.
—————–
In the interest of clarity, here is a list of things that stayed the same between the two devices (not necessarily a bad thing):
Software Support:
WaveForms, WaveForms SDK, MATLAB, LabVIEW. Every bit of software support that you have come to expect and appreciate with the Analog Discovery 2 is still here proudly supporting the Analog Discovery 3.
Backwards Compatibility:
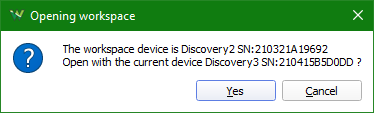
This is probably one of the most pressing questions people have when comparing the two products: “Can I migrate my project from the Analog Discovery 2 to the Analog Discovery 3 without issue or problems”.
As the main engineer who put together the Analog Discovery 3 Reference Manual and curated the associated Specifications document, I will say that 98 to 99% of projects can be migrated from the Analog Discovery 2 to the Analog Discovery 3 without issue. Simply click ‘Yes’ on the prompt when asked if you want open the existing workspace with the Analog Discovery 3 and continue on your merry way.
The one to two percent of users that won’t be able to migrate quite so easily are the users who have a WaveForms SDK application hardcoded to use the Analog Discovery 2, users dependent on the embedded audio jack of the Analog Discovery 2, and those who used the 1.8 V Digital input setting. The last two are addressed in more detail later on this article.
Resolution:
The Analog Discovery 3, like it’s predecessor, has 14 bit resolution on its Analog inputs and outputs (keeping that sweet 335 uV resolution across the entire low gain setting of -2.5 V to +2.5 V) and 16 bit resolution on the digital I/O.
That’s not to say there has been no improvement in this area though; the noise buffer on the Oscilloscope now is now its own dedicated buffer and is at 14 bit resolution rather than 13 bit resolution, and the Scope inputs themselves also support 15 and 16 bit resolution if you are using a lower sample rate (check out the Oscilloscope section of the Reference Manual for more details).
Communication with Host PC:
The Analog Discovery 3, while it has the new USB Type C® port (and included USB C to USB C cable) for easier connectivity without having to turn both the board and cable over multiple times before they finally fit together and for the higher rated power spec that comes with USB Type C, the overall communication rate uses USB 2.0 as it was determined that the improved throughput of USB 3.2 Gen 1 (and later generations) did not improve the accessibility and usability of the Analog Discovery 3 with most applications. Features that were limited by the USB 2.0 rate have been improved though, such as the maximum Record rate increasing from 1 MS/s to up to 10 MS/s for a single channel.
—————–
And because I want to give you all the facts, the things that are no longer available with the Analog Discovery 3:
Audio jack:
The audio jack is no longer embedded in the Analog Discovery 3. The functionality that it offered is now instead present in the Audio Adapter+ with it’s pair of mono/stereo inputs and pair of mono/stereo outputs.
Hardware Design Guide:
Regrettably, it was decided that the now-more-busy-than-they-used-to-be R&D group should not recreate the Hardware Design Guide for the Analog Discovery 3. If you have any specific hardware capability questions about the Analog Discovery 3, please feel free to post them on the Test and Measurement section on the Digilent Forum, https://forum.digilent.com/forum/8-test-and-measurement/, and we will do our best to respond to your query.
1.8 LVCMOS Digital Input support:
This unloved option (at least as far as the developer of the WaveForms software could tell from all of their years of supporting and improving on the WaveForms software) was unfortunately removed as a hardware option for the Analog Discovery 3.
—————–
Okay, we’ve finally made it to the end of the article (surely you didn’t scroll down here without reading). The short version of what we learned is that the Analog Discovery 3 brings several improvements and enhancements over its predecessor, the Analog Discovery 2. With a lower MSRP and increased sample buffer sizes, users can now collect and analyze larger amounts of data, allowing for more in-depth analysis and experimentation.
If this sounds like the product for you, find out more on the Digilent store page: https://digilent.com/shop/analog-discovery-3/.
Still unsure if the Analog Discovery 3 is for you? I highly recommend checking out the two Resource Centers for the Analog Discovery 3 and the Analog Discovery 2 for a comprehensive set of resources that you can browse to your heart’s desire.
I just recently purchased the Discovery analog 3. I downloaded the software, and it seems that my capability is that of the 2. I have the Wavegen and not an Arbitrary function generator. Where can I find the software for the discovery 3. I never had the 2 so this device is new to me. It seems to have great potential. The software works fine but it does not reflect the functions mentioned in your write up.
I’m a newbie to this device and need help.
Joe
Hi Joe,
In the Wavegen Instrument, for each channel next to it’s “Run” button, you will want to click on the dropdown menu that says “Simple” and choose a different option such as “Modulation”, “Custom”, or “Play”, to be able to get the “arbitrary” aspect of the Waveform Generator though modulation, creating your own output in app, or playing back a file already stored on your computer.
If you have any further questions about this, the Digilent engineers, including myself, would be happy to help you out in a more visual format over on the Digilent Forum: https://forum.digilent.com/forum/8-test-and-measurement/.
Thx for clearification. Because on the first look it seemed to be a AD 2 just with usb c connector.
Digilent tried to be a bit better than that lol. Probably my favorite improvement is how you always have access to every instrument no matter what configuration you select.
I hadn’t really noticed before that you were pretty severely limited if you chose any other configuration besides Configuration 1 on the AD2, but now that I’m looking again after working with the AD3, I’m surprised people didn’t complain about this more often.
Any change of a modification that would allow the spectrum analyzer to work on HAM frequencies? up to 500MHz?