Hello and welcome back to the Digilent Blog!
When designing something, especially for the first time, it’s almost always recommended that you first create a prototype. This can come in many different forms: sewing pieces of scrap fabric together, painting in the corner, a miniaturized version, or just an improvised contraption. Arguably, this is the nice thing about prototyping, figuring out if something works without putting the full amount of effort into a project that might flop. But what should you expect to do in prototyping an electronics project?
We recent came out with our own PCB ruler. In addition to just being fun, you can make small projects directly on the ruler.

However, I found that this project left something to be desired. Like a set of wheels and an ensuing trail of flame. While I’m fairly certain that fire is generally unaccepted in most work environments (effectively stopping that particular goal), making a drag racing ruler is much more feasible. However, having never worked a racing vehicle outside of Hot Wheels cars in my younger days, I needed to test out a prototype to confirm that I could actually make a racing ruler without it performing terribly.
http://littlemisskate.ca/wp-content/uploads/2014/04/Hot-wheels-HWtrackbuilder-1.jpg

Before I ever actually build a prototype though, I always mentally walk through a checklist of what I need for my electronic prototype: an idea of what the final project would look like, access to most of the components or their equivalents, easily adjustable “settings”, being unafraid of jerry-building the prototype, and being mentally prepared for it not to work the first time. Or even the fourth time. I’ll walk through what I did to help paint a slightly better idea of what I mean.
Ideally, this drag racing ruler would be as light as possible with a pair of dolly wheels, a single or a pair of drive wheels with their corresponding motor(s), the Digilent ruler, an H-Bridge motor driver, a microcontroller to direct the H-Bridge, a battery, and any wires as appropriate.
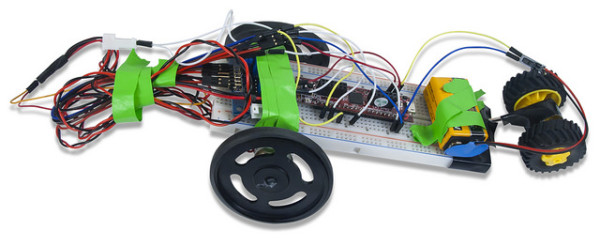
Once I knew how my glorious final project was going to look, I looked around to see what I had available to test the project for feasibility. The biggest thing that I wanted to use was a breadboard since using the Digilent ruler will likely require soldering (to ensure a clean look) but soldering does not lend itself towards correcting any mistakes or adjustments you might want to make. The breadboard is definitely heavier than the ruler so it’s not truly representative how sleek and fast the racing ruler will be, but it’ll essentially work the same. This is the same idea for the motors; you just need them to be able to spin, not be the final set of motors at your desired voltage and torque in order to test the project.
I also looked for easy ways to get everything together. Naturally, the breadboard played a big part in this, but jumper wires were also a huge help in being able to switch around which digital pins were being used as well as how the various power sources were routed around the project. Similarly, tape was used to help hold things either in place, like the 9V battery, or out of the way like all of the wires connecting the microcontroller to the dual H-Bridge to the motors.

But the biggest thing that I made sure to do for this prototype, and arguably what is needed for all of the prior steps, was the mental preparation that it may not work as planned the first time or for many subsequent times. It doesn’t have to be a catastrophic failure, but perhaps the racer drives in a circle rather a straight line, the wheels might fall off since the hot glue doesn’t hold them on the motors super well, or wires connecting all of the power disconnect and stop the motors from running. If all of these examples seem like they are specific enough to indicate that I had some experience with them, you are correct.
I won’t pretend that this post is the end-all be-all reference for your prototyping needs, but I hope that I gave some inspiration and encouragement to push through the initial creation phase. What sort of project are you working on?

