

In preparation for this year’s NI Week, and with the help of LabVIEW, LabVIEW MakerHub LINX, and the chipKIT WF32, I was able to make a plug and play demo that includes 8 different Pmods: PmodACL (accelerometer), PmodALS (ambient light sensor), PmodCMPS (compass), PmodGYRO (gyroscope), PmodJSTK (joystick), PmodMIC3 (microphone), PmodTC1 (thermocouple), and PmodTMP3 (ambient temperature sensor). If you’re interested in LabVIEW and chipKIT WF32, check out the LabVIEW Physical Computing Kit, which includes both LabVIEW Home Bundle and the WF32.
The idea for this project was to have the user plug either an SPI or an I2C Pmod into the corresponding wire, select the Pmod from the menu on the front panel of LabVIEW, and click run to read the values from the Pmod that’s plugged in. See the Instructable for this demo here.
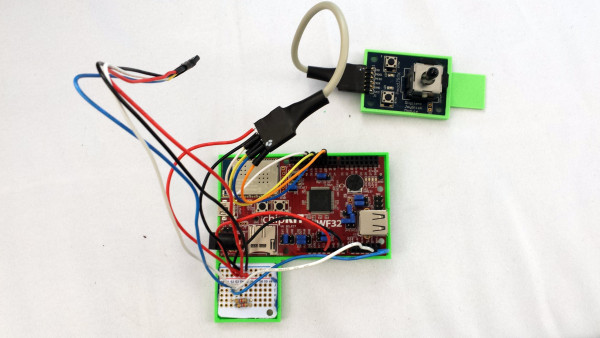
The picture above shows how you plug in each Pmod. Green bumpers were made for the SPI Pmods (pictured above on the PmodJSTK) and these Pmods were then connected to the corresponding wire. The 4 wire bundle on the left is the I2C wire for the I2C Pmods with pink bumpers (not pictured).
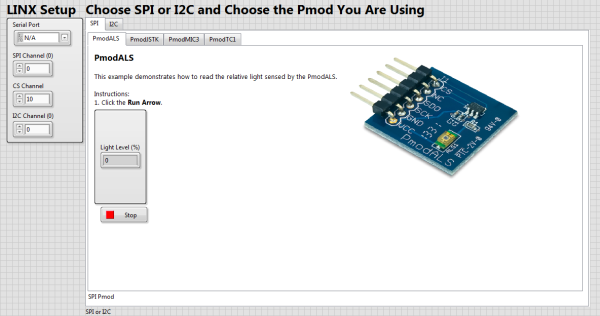
Below is the front panel in LabVIEW. Upon opening the program, you simply select the serial port connected to the chipKIT WF32. From here, choose a Pmod and select the corresponding tab on the front panel. Some Pmods have extra settings you can change. Once you’re ready, click the run button and then the stop button when you’re done. Now you can select a new Pmod and follow the same steps!
To get the LabVIEW code to work, enum controls were used to select the correct Pmod code to run. I made subVIs for each Pmod so users wouldn’t have to poke through the datasheets for each Pmod to see how exactly it works. If you’re interested in what is in the subVI, just double click on the block and the code will appear.
Interested in learning more about I2C, SPI, and/or LabVIEW? Check out my in-depth blog posts about SPI and I2C connections and how to code the interface in LabVIEW below. Use these two posts as guides to write your own interface code in LabVIEW and feel free to share what you make on both the Digilent forums and LabVIEW MakerHub forums. Also, try using the LabVIEW code I wrote for the Pmods to create your own projects using LabVIEW and the Pmod of your choice.
1) SPI
2) I2C