

When I first started working with oscilloscopes at UW Bothell, there were so many parameters and settings that it made me feel unsure about what I should start focusing on first. After a couple lab procedures, I was comfortable with hooking up scope probes, scaling the display appropriately to capture waveforms, and taking measurements. What I didn’t understand was how the oscilloscope usually displayed a dynamic waveform in a static state. Furthermore, when my lab partner and I had dynamic waveforms that were not being displayed statically, our lab instructor would come by and make a quick adjustment to the knob labeled “trigger”, stabilizing the waveform display. Triggers had not been a point of focus in our introductory material, and we all needed help adjusting them from time to time. It seemed that most of the students didn’t know what was really going on with this “trigger thing”. So, we learned that sometimes it helped to just push in the trigger knob if our waveform was getting cray-cray on the screen. Really though, we just hoped we would throw the scope leads on our circuit, scale the display screen, and cross our fingers that the trigger didn’t need to “get pulled”. I like to call this the pray and hope method (generally ineffective with technology).

As an Electrical and Computer intern at Digilent in Seattle, I have been working with the Marketing Team to develop fun and intriguing web-based “attractions” for the company and their products and services. After all, things have to be presentable, and that includes waveforms. Because of this, my supervisor gave me the rundown on triggers so I could finally understand what they do and why they are necessary. Now, I am pleased to be able to share that information with you!
The trigger tells your oscilloscope during what event or condition to start the acquisition process, and displays that event or condition at time zero. For basic trigger operation, you adjust the trigger parameters to “hone-in” on a stable event for the wave that repeats at a regular interval. Below is an example of me trying to capture a pulse width modulation (PWM) waveform on the Waveforms Oscilloscope with only default trigger settings.
Notice how the waveform just flies across the display in a way that doesn’t help with any kind of analysis or measurement. So, I adjusted the trigger level from 0V to 1V, which resulted in the display you can see in the following screen capture. Note: the video also contains me making the adjustment so the first part still shows the previous waveform display.
Now, the waveform isn’t static per se, but that’s because it is a PWM wave and is dynamic in nature. But, instead of pulses flying around on the screen, the wave is sort of “locked” to the rising edge of a pulse, and displays a few periods showing that the width of that pulse is being modulated! I can clearly see how the duty cycle is changing in real time! In this stable condition, I can accurately take measurements and export data.
So, what should you be aware of and comfortable adjusting? After some research, I have found that there are many types of triggers and many ways to customize how they are operating. Advanced trigger options can get really deep, especially digital and logic analyzer triggers, but there are 3 basic parameters that should dramatically help you if you are not already comfortable working with them:
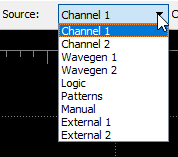
Source: Considering what the trigger is using for the source of its data acquisition is the first step. The trigger may rely on a condition from one of its scope channels or from an external source if necessary. If you have two channels on your scope displaying waveforms, one might be more reliable than the other.
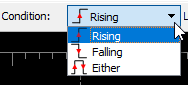
Condition: This parameter tells the trigger what part of the wave to pay attention to when starting data acquisition. The two most commonly used conditions are “Rising Edge” and “Falling Edge.” What this means is that the trigger will start collecting data when it detects either a positive rate of change or negative rate of change in the wave. Just like sources, one of these edges may prove more reliable than the other.
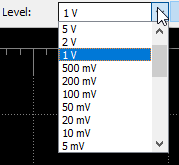
Level: The level parameter tells the trigger what value for the set condition to start taking data. For example: if I had my condition set to rising edge, and I set the level to 1V (like in the previous video examples), the trigger will start taking data on the rising edge of the wave when it reaches 1V. The reason that helped so much with the video examples was because there was a lot more time spent at 0V, more noise at that voltage level, and the wave technically never “rose” to 0V, making it a poor choice for a trigger. 1V on the rising edge was a much more reliable and stable condition than at 0V, providing a more comprehensive representation of the waveform.
As I mentioned previously, there are many more advanced settings for triggers that may or may not prove to be useful, it just depends on the application and the signal you are working with. Further experience and more complex waveforms can unveil the need to dive deeper into these advanced trigger options. Here is a screen capture of some of the Waveforms Oscilloscope advanced trigger options:

And for a taste, here is a screen capture of some of the Waveforms Logic Analyzer advanced trigger options:

Download WaveForms software for free, and run it in demo mode to experiment with different trigger options and to see for yourself how much the different trigger options can drastically affect the presentation of signals and their data!
Below, I have included a few links to some articles that I consulted for writing this post, and that discuss some of these more advanced parameters and trigger types.
- https://www.electronicdesign.com/technologies/test-measurement/article/21801795/why-you-should-care-about-oscilloscope-trigger-system-basics
- http://www.tmatlantic.com/encyclopedia/index.php?ELEMENT_ID=12861
- https://www.radio-electronics.com/info/t_and_m/oscilloscope/oscilloscope-trigger.php
Good