

Recently, a community member detailed a project he had done on the Xilinx blog related to the Analog Discovery 2. His goal was to break out the instruments included in the Analog Discovery 2, so that they could be used more easily with conventional BNC-terminated probes and cables. And while it was noted that one can pick up a BNC Adapter Board at the Digilent Store, he decided to take his own approach and build a custom one!
First, he considered purchasing four BNC connectors and an extruded aluminum box, but then a different wave of inspiration struck. Instead, he picked up a OdiySurveil Cat 5 Passive HD Transceiver balun box from Amazon for $12.59.
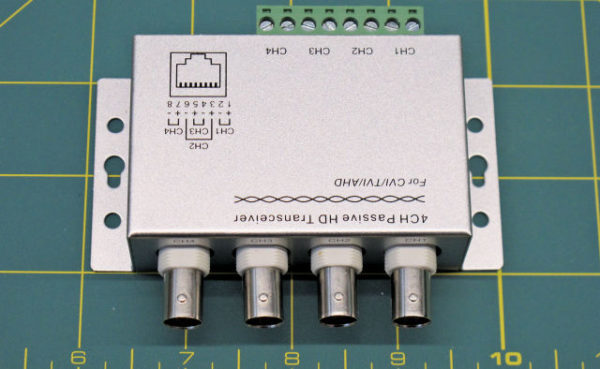
These balun boxes are designed to take as many as four channels of HD video from coax cables and route them over long lengths (1500m !!!) of twisted-pair cabling. The balun box’s beefy steel enclosure is pre-punched for four BNCs and comes complete with four BNC connectors connected to an RJ45, Cat5 Ethernet connector and an 8-pin Phoenix Contact screw-terminal block through a pcb securely mounted inside of the box. It’s twelve bucks and change, nicely finished with no drilling or milling required, delivered to your door in two days by Amazon Prime.
After removing some unnecessary components with a screwdriver and cleaning up the pads, he shorted out the appropriate connections with eight jumper wires. Then he ran into his second big design decision.
Then, I needed to decide whether to use the box’s Phoenix Contact terminal block or the RJ45 connector to connect to the Analog Discovery 2’s double-row, 0.1-inch header strip. At first, I thought I’d use the terminal block but the more I considered that RJ45 connector, the better it looked. A quick trip over to IT here at Xilinx secured a Cat6 cable in a huge box of orphaned Ethernet cables.
I snipped one end off of the cable and then cut the outer insulation off of the cable end. There were the four unshielded, twisted-wire pairs that I needed for the connection to the Analog Discovery 2
Once all the materials were together, he acquired some Dupont pins and crimped them on. Some heat-shrink tubing cleaned up the aesthetic and kept everything where it was supposed to be and voila! A homemade Analog Discovery BNC Adapter Board was born.

Despite noting at the end of the post that this was possibly not the most efficient or cost-effective means of reaching the goal, compared to buying one from the Store, it is still super exciting to see what people can do to make their hardware their own. Additionally projects like this can be great learning experiences to explore and ensure you really understand how everything works! Please let us know in the comments below if you might try this cool build out or if you have done something like this on your own! Also check out the full post here!