

Imagine you’re enjoying a serene holiday in Japan, the tranquility only interrupted by news of a sudden disaster striking your PCB back home. Panic sets in – do you rush to book the first flight back? Or perhaps frantically video call someone across timezones to walk them through a debug session, all while pulling your hair out in stress? None of that is necessary. Why? Because you have the ADP3450 already set up at home. With this powerful tool, you can remotely access and debug your system with precision and ease, all from the comfort of your current location ☀️
Prerequisites
- An ADP3450 running in Linux mode (see the other tutorial to find out how to do this!)
- A compatible Wireless dongle (I used a TP-Link TL-WN823N)
- If you’re on Windows:
- PuTTY for connecting to the serial terminal on the ADP3450. You can get the latest MSI package. If you’re in doubt which one you need, it’s probably 64-bit x86!
Setting up the wireless adapter
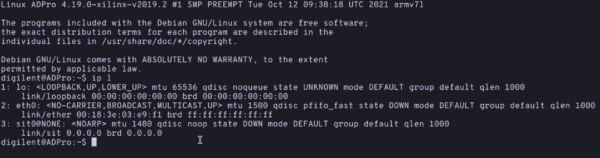
The first thing we need to do is connect to the ADP serial terminal. Once your ADP is running in Linux mode, use:
screen /dev/tty.yourdeviceid 115200if you’re on macOS or Linux- Or if you’re on Windows, use PuTTY to connect to the correct COM port (which you can find from the Device Manager) with a baud rate of 115200.
- You can see more details of connecting to the ADP serial terminal in the previous tutorial.
Once connected, we can list the available network adapters with:
ip l
You should see three wireless adapters, lo the local loopback interface, eth0 the ethernet port and sit0 a virtual network adapter.
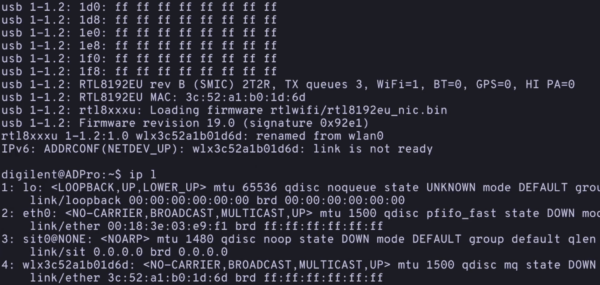
- Now plug in the USB wireless dongle. This should be plugged into the bottom left USB port on the back of the ADP.
- You will see a stream of output appear on the terminal and a message saying the device has been renamed from
wlan0to a unique identifier. - Mine said
wlx3c52a1b01d6d. Take note of this, we will need it shortly! - If we run
ip lagain now, we will see our new device show up
- You will see a stream of output appear on the terminal and a message saying the device has been renamed from
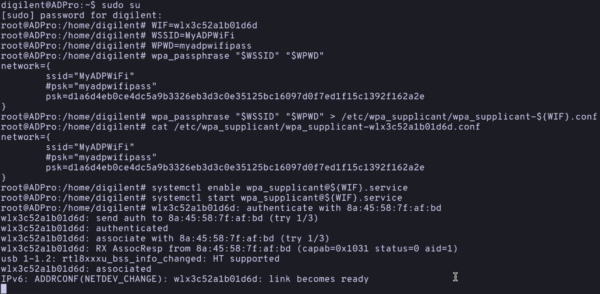
- We need to tell the ADP how to connect to your WiFi and we will create a configuration file to do this.
- First we need to be in superuser mode to do this because we are not able to create new network configurations as the standard digilent user. You do this with
sudo su- The password is
digilent - You will see the username change from
digilenttoroot
- Next we will set our WiFi details as environment variables for the next set of commands. You do that with the following commands:
WIF=wlx3c52a1b01d6d(replace this value here with the unique value you saved above)WSSID=YourNetworkNameWPWD=YourNetworkPassword
- Now that we have these details available as environment variables, we can create a configuration file for the ADP to connect. Here’s the command for that:
wpa_passphrase "$WSSID" "$WPWD" > /etc/wpa_supplicant/wpa_supplicant-${WIF}.conf- If you want to see what the
wpa_passphrasecommand did, you can output the contents of the file it just wrote to with:cat /etc/wpa_supplicant/wpa_supplicant-${WIF}.conf
- To connect to this WiFi network, we will now need to enable and start a service for this network interface. We can do this as follows:
systemctl enable wpa_supplicant@${WIF}.servicesystemctl start wpa_supplicant@${WIF}.service- This will now cause the ADP to connect to this WiFi network automatically on boot.
- After starting the wpa_supplicant service, you should see some text that says
authenticatedandlink becomes ready. If you don’t see an authenticated message, you may have typed your WiFi username or password incorrectly.
- Now if we run
ip awe should see we have been assigned an IP address on our WiFi network. - Take note of this IP address!
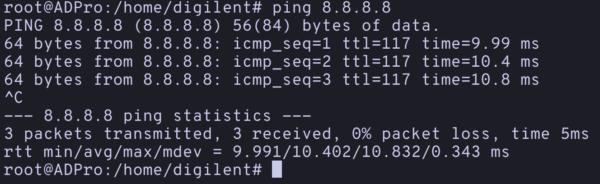
- To double check that we are connected to the internet, we can run
ping 8.8.8.8. You should see a response of 64 bytes from the server, indicating we are connected to the internet. Press^C(Ctrl + C) to exit the ping.
- Type
exitto exit superuser mode. - The prompt should return to saying
digilentinstead ofroot.
Setting up SSH for remote access
Creating a keypair
To log in remotely to the ADP, we need to create some SSH keys. Back in your terminal on your machine, we can run the following commands to create some keys!
On macOS/Linux:
ssh-keygen -t ed25519 -a 100 -C adpkey -f ~/.ssh/adpkey- This saves a public/private keypair into the
.sshdirectory in your home directory.
- This saves a public/private keypair into the
- When prompted for a passphrase, leave it blank.
On Windows:
- Open PuTTYgen
- In Parameters, select EDDSA and set the bit size to 255. Sometimes, the EDDSA option may show up as ED25519.
- Click Generate.
- Leave the passphrase blank.
- Copy down the Public key in the text field as we will use that shortly to copy into the ADP.
- Click Save Private Key and choose a safe place to save the
.ppkfile.
Copying the public key to the ADP3450
On macOS and Linux, this is super easy to do with just one command:
ssh-copy-id -i ~/.ssh/adpkey digilent@your-ip-address- The IP address after the
@should match the IP address you got from your ADP when running theip acommand earlier.
- The IP address after the
- When prompted for a password, you should use the default password for the digilent user of
digilent. - You might have noticed that it doesn’t seem very secure to have this default username and password combination open for anyone to log in remotely! We will secure this before opening it up to the wider internet.
On Windows:
- We might not have the
ssh-copy-idcommand available to us, but we can still copy the key to the ADP manually. - Go back to the serial terminal you have open to the ADP in PuTTY (or reconnect if you closed it)
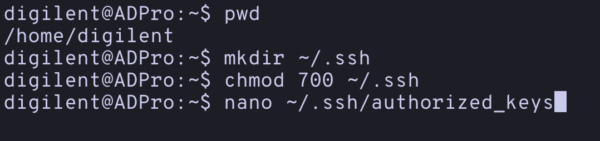
- Make sure you are in the digilent home directory.
- The prompt should say
digilent@ADPro:~$if it saysroot, you haven’t exited superuser mode and need to typeexit. - You can check you are in the digilent home directory by seeing the
~$in the prompt or typingpwd(meaning print working directory) which should show/home/digilent
- The prompt should say
- We need to make a directory to keep the user ssh keys.
mkdir ~/.sshchmod 700 ~/.ssh(This makes the directory only readable by the digilent user. It won’t work if the directory is too permissive as the SSH service will block it)
- Create a new file in the directory with an editor of your choice.
nano ~/.ssh/authorized_keys(note the US English spelling!)- Paste in the contents of the public key you just created. This will be the file ending in
.pub. In Windows it will be in the text field in PuTTYgen titledPublic key for pasting into OpenSSH authorized_keys file. - The key might look incomplete, and start with a
$. Don’t worry, it’s just scrolled to the right. If you move the cursor down or back to the left, you will see the rest of the key. - Save the file and exit the editor, in nano, this is done with
Ctrl + X, typingYand hitting enter.
Shrouk walks you through the whole process in our latest YouTube video: https://youtu.be/yCoqerUw7Vo
Is there a second article to this planned? You mentioned how to secure the default shell access, after copying the public key to the ADP3450 the article ends, without explaining how to use it finally in a remote debugging session. Did I miss something?