Product Landing Pages
Product landing pages are designed to be the best place for users to quickly find technical information related to a Digilent product. Product landing pages use the Digilent Infobox Plugin to maintain a consistent look and feel and enable users to quickly locate the desired information and resources. All Product landing pages should follow Wiki Best Practices.
Example product landing pages:
Location
Product landing pages should be located in /reference/<PRODUCT-FAMILY>/<PRODUCT-NAME>/start
- <PRODUCT-FAMILY> - the product family of the device. For example, pmod, programmable-logic, microprocessor
- <PRODUCT-NAME> - The product name. For example, pmodacl2, pmodad1, arty, basys-3
Sections
Product landing pages should contain the following sections in order:
Wiki Configuration Parameters
Product landing pages should disable the table of contents (TOC) using:
~~NOTOC~~
Title
The title should match the official product name with no additional descriptors.
Example:
- Use PmodACL2
- Not PmodACL2 Landing Page
Infobox
Use the Digilent Infobox Plugin to create a product specific infobox. At a minimum each product should include a link to the store page, reference manual and technical support.
Infobox Sections
- Features
- Describes the product from the end user perspective.
- Key Specifications
- Specific technical description of the product features.
- Electrical
- Relevant electrical information such as supply voltage, logic level, bus, etc.
- Physical
- Width, length, weight, etc
- Design Resources
- Items the user will use when designing with the product.
- Fritzing Part
- Eagle file
- Vivado Board Files
- Master XDG
- Documentation
- Documents related to the product. Things a user will consume (read) rather than use.
- Primary IC - Link to pdf datasheet for the primary IC used on the device
- Schematic - PDF schematic
- Pinout
- Create one section per connector:
- The section header should match connector name (ex. J1, J2, J3).
- The first item in each section should be an image indicating pin numbers. These will generally be shared images that live in the product family namespace.
- List all pins as Pin X <PRIMARY-FUNCTION>
- If a secondary function exists add it in parenthesis after the primary function.
Example Infobox:
- User Selectable Resolution
- Less than 2 uA consumption at 100 Hz
- Single or double tap detection
- Activity and inactivity monitoring
- Free fall detection
- Follows the Digilent Pmod Interface Specification
{{Digilent Infobox
| Store Page = https://digilent.com/shop/pmod-acl2-3-axis-mems-accelerometer/
| Manual = [[reference-manual]]
| Support = https://forum.digilent.com/forum/7-add-on-boards/
| Title = PmodACL2
| Subtitle = 3-Axis MEMS Accelerometer
| Header = Features
| Bullet = User Selectable Resolution
| Bullet = Less than 2 uA consumption at 100 Hz
| Bullet = Single or double tap detection
| Bullet = Activity and inactivity monitoring
| Bullet = Free fall detection
| Header = Key Specifications
| Range = ±2/4/8g
| Resolution = 12-bits
| FIFO Depth = 512 Samples
| Header = Electrical
| Bus = [[learn/fundamentals/communicaiton-protocols/spi/start | SPI]]
| Logic Level = 3.3v
| Header = Physical
| Width = 0.95 in (2.41 cm)
| Length = 0.80 in (2.03cm)
| Header = Design Resources
| Fritzing Part = {{pmodacl2.fzpz| }}
| Header = Documentation
| Primary IC = [[http://www.analog.com/media/en/technical-documentation/data-sheets/ADXL362.pdf | ADXL362]]
| Schematic = {{pmodacl2_sch.pdf| }}
| Header = Support
| Header = J1 Pinout
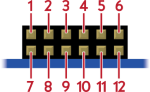
| Full Row = {{ :reference:pmod:pmod-pinout-2x6.png?direct |}}
| Pin 1 = ~CS
| Pin 2 = MOSI
| Pin 3 = MISO
| Pin 4 = SCLK
| Pin 5 = GND
| Pin 6 = VCC
| Pin 7 = INT2
| Pin 8 = INT1
| Pin 9 = NC
| Pin 10 = NC
| Pin 11 = GND
| Pin 12 = VCC
| Header = J2 Pinout
| Pin 1 = INT1
| Pin 2 = GND
| Header = J3 Pinout
| Pin 1 = INT2
| Pin 2 = GND
}}
Reference Manual First Section
Embed the product overview and image gallery from the product reference manual using the include plugin:
{{page>reference-manual}}
Wiki Hosted Files
When attaching files such as schematic PDF, reference manual PDF, fritzing part, etc upload the files to the highest level namespace that is specific to the file. For example PmodACL2 files should be uploaded to the /reference/pmod/pmodacl2 namespace. This makes it easy to find and include these files in subpages.
Files with unique extension (.fzpz, .brd, etc) should be named with the lower case product name. For example, the PmodACL2 fritzing part should be named 'pmodacl2.fzpz'.
Files without unique extensions (.pdf, .png, .vi) should be named as follows:
- <productname>-<content type>.extension
- <productname> is the lower case product name.
- <content type> is a lower case abbreviation of the content type.
For example the PDF version of the PmodACL2 schematic should be named 'pmodacl2-sch.pdf'.
The PDF version of the PmodACL2 reference manual should be named 'pmodacl2-rm'.
Content types include:
- Schematic - sch
- Reference Manual - rm
Code Libraries (Optional)
Include links to code library APIs in this section (not example projects). Omit this section if no code libraries exist. Links to GitHub repositories are preferred but not required.
Split code libraries into the following sections:
- Microprocessor
- Programmable Logic
- LabVIEW
Call out non-Digilent libraries by adding the following after the library link:
- by <USERNAME>
- When we know the name of the group / user that created the library.
- - Community Library
- When we do know know the name of the group / user that created the library.
Example Projects (Optional)
Include links to example projects in this section. Omit this section if no example projects exist.
Split code libraries into the following sections:
- Microprocessor
- Programmable Logic
- LabVIEW
Call out non-Digilent project by adding the following after the project link:
- by <USERNAME>
- When we know the name of the group / user that created the library.
- - Community Library
- When we do know know the name of the group / user that created the library.
Tags
Add tags at the bottom of the product page using the tag plugin.
Always include:
- Product family
- Product name
Pmods:
- pmod-start
- This indicates it is a pmod landing page
- pmod-<BUS>
- Ex. pmod-spi pmod-i2c pmod-uart
- Functionality descriptors
- Ex. accelerometer, adc, temperature