Pmod MIC3 Audio Streaming/Recording

Introduction
This project streams live audio data from the Digilent Pmod MIC3 and displays it through the WaveForms oscilloscope. It demonstrates how multiple different instruments can be used together to test a sensor, by initiating SPI transactions to capture data, then processing the digital values returned and plotting them as the analog waveforms that they represent. In a situation where a custom sensor is being prototyped, you would also be able to scope the analog data itself, and compare the results of the conversions to the real waveform. The download also includes a script that performs a 1.25 second recording, providing higher-resolution data. The data is presented as a waveform in the time domain and as an FFT.
Inventory
- A Digilent Test and Measurement device that supports WaveForms' Scope, Patterns, and Logic instruments.
- An Analog Discovery (Legacy) can also be used.
- WaveForms Installation
- Breadboard (Recommended)
-
- Includes two WaveForms workspaces for displaying live audio data (MicLive) and displaying recorded audio data (MicRec).
Description
Each workspace included in the ZIP Archive includes a script which runs each of the relevant instruments and plots the audio data.
This script streams live audio data from the Digilent Pmod MIC3 and displays it through the WaveForms oscilloscope. The download also includes a script that performs a 1.25 second recording, providing higher-resolution data. The data is presented as a waveform in the time domain and as an FFT.
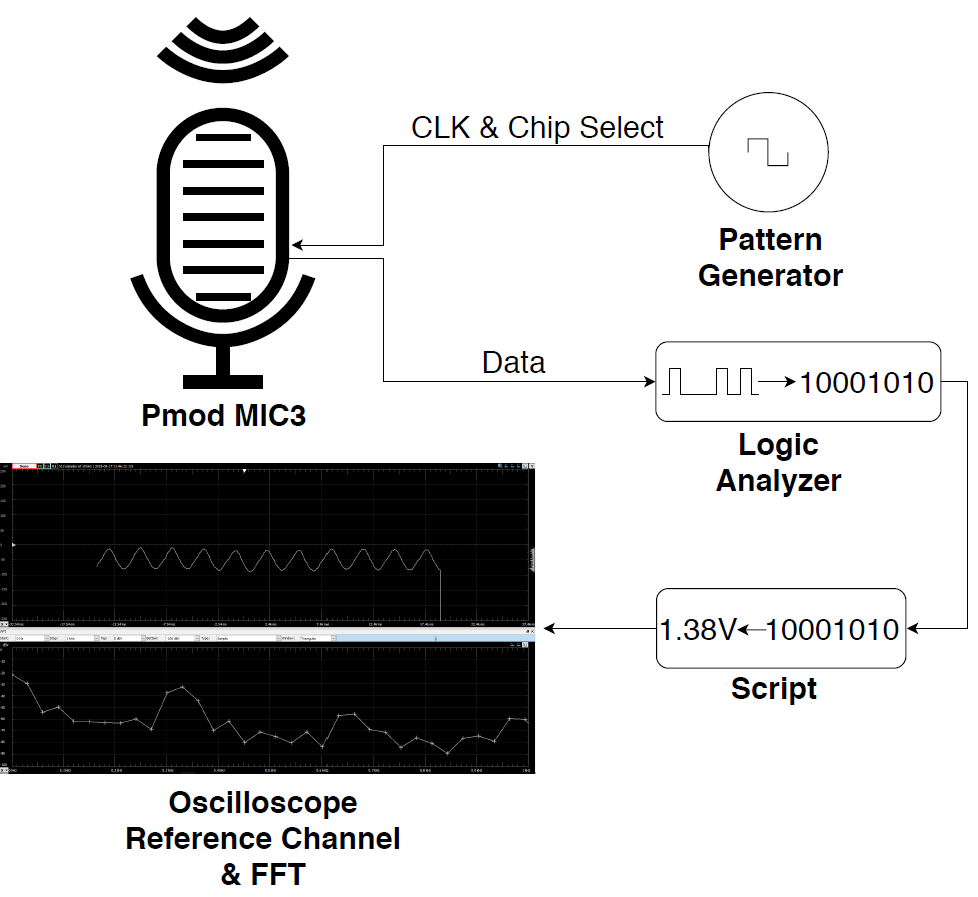
The script utilizes the pattern generator to produce the clock and chip select signals required for SPI communication with the MIC3. The MIC3 transmits 16-bits of data, of which the 12 least-significant are the audio data. Samples are taken by the logic analyzer every 500 milliseconds (or once, over a period of 1.25 seconds), which is pushed into an array that is displayed in the Oscilloscope plot as a reference channel. The data is displayed in both the time domain and frequency domain.
Please read the Pmod MIC3's Reference Manual and see the flow diagram (Figure 1, below) for more information.
Setup Instructions
1. Software Setup
Start by downloading and extracting the WaveForms workspaces from the ZIP Archive linked in the Inventory section, above.
Open WaveForms and plug in the Analog Discovery via a microUSB cable. WaveForms will generate a prompt asking to switch to the device used with the workspace. Select No and navigate to Settings → Device Manager in the menu bar at the top of the window, to check that the active device is the Analog Discovery that was plugged in. When selecting the device in the Device Manager dialog, be sure that configuration #4 is selected.
Open the MicLive workspace in WaveForms.
2. Hardware Setup
Connect the Pmod MIC3 to the Analog Discovery's DIO pins as in the table below:
Table 1. Physical Connections
| DIO Pin | Pmod Pin |
|---|---|
| DIO-0 | SS |
| None | MOSI |
| DIO-1 | CLK |
| DIO-2 | MISO |
| GND | GND |
| V+ | VCC |
3. Running the Script
Once the workspace loads, press the Run button in the Script Instrument, or press F5 on the keyboard. The Analog Discovery will start communicating with the Pmod and streaming data through the oscilloscope.
To check that the system is functioning correctly, play a single tone into the microphone using a tone-generation application for a smartphone or a computer. The selected frequency will show up as a bump in the FFT.
The script streams the audio data live, so the sample size is not large and thus the FFT does not have a high resolution. If a higher-resolution FFT is desired, use the included MicRec.dwf3work workspace. This workspace is set up the same as MicLive, but the script records a 1.25 second sample instead of streaming data. A single tone with MicRec will appear as a much sharper spike on the FFT.
4. Stopping the Script
When finished using the MicLive script, press the Stop button in the Script window, the Stop buttons in the Patterns 1 and Logic 1 windows, and the Master Enable is On button in the Supplies window (all three instruments are in one sub-window, with tabs for switching at the bottom).
The MicRec script doesn't require any further steps, as all instruments are stopped at the end of the script.
Final Notes
For more guides and example projects for your Test and Measurement device, please visit its Resource Center, which can be found through this wiki's Test and Measurement page.
For more information about how to use the Pmod MIC3 featured in this demo, please visit its Resource Center.
For technical support, please visit the Digilent Forums.