Update an Existing Vitis Platform's Hardware Specification
If a hardware design is changed after having created a Vitis application project, several steps must be taken in order to update the Vitis workspace with a newly exported XSA file. The XSA file contains all of the information relevant to Vitis about the hardware platform, and changing a platform project's specification based on this file will automatically load in any changes. This includes adding new drivers for new IP that have been installed and changing the files that define the addresses and other details of any installed IP that may have been renamed or had their addresses changed.
These steps assume that you have already regenerated the bitstream and reexported hardware in the same way that would be done prior to creating a new Vitis workspace.
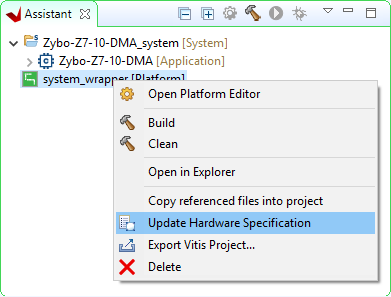
Within Vitis' Assistant pane, find the platform project that you wish to update with the new hardware. This project will typically have a name that ends with “_wrapper”, and is marked with the text “[Platform]”.
Right click on this project and select Update Hardware Specification.
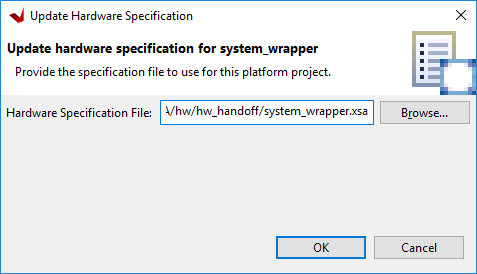
In the dialog that pops up, click Browse, and navigate to the location of the XSA file that you want the platform to target. Click Open to select this file.
Double check that the Hardware Specification File path matches that of the XSA file you want to use, then click OK to start the automatic process of updating the platform.
When complete, a dialog will pop up to state that the platform project has been updated. Click OK to acknowledge this.
At this point, changes to the hardware specification have been loaded into the hardware platform. The bitstream will have been updated, if it was loaded into the XSA file. The set of drivers and the xparameters file will have changed to match what is in the modified design. Changes to the software application may be required before the application can be built and programmed onto the board, however, detailing what may need to be done is outside of the scope of this guide.


