Create a Main C Source to Control AXI GPIO Peripherals
An application needs source files to define its behavior. This step will show how to create a new source file for the application, and provide some example code.
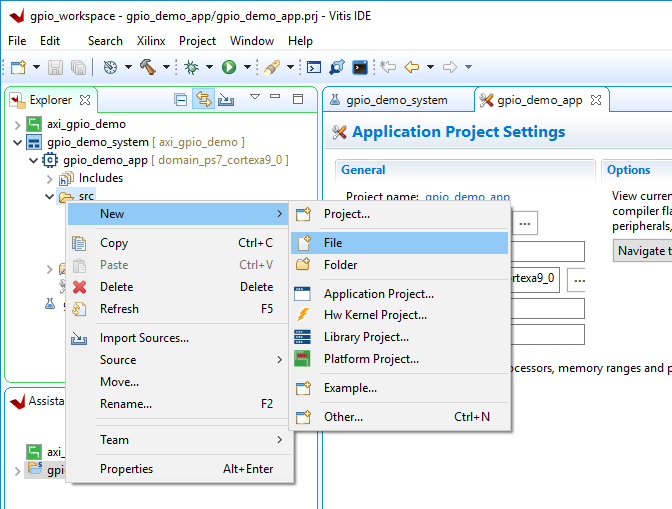
In Vitis' Explorer pane, find the application projects “src” directory. Right click on it and select New → File.
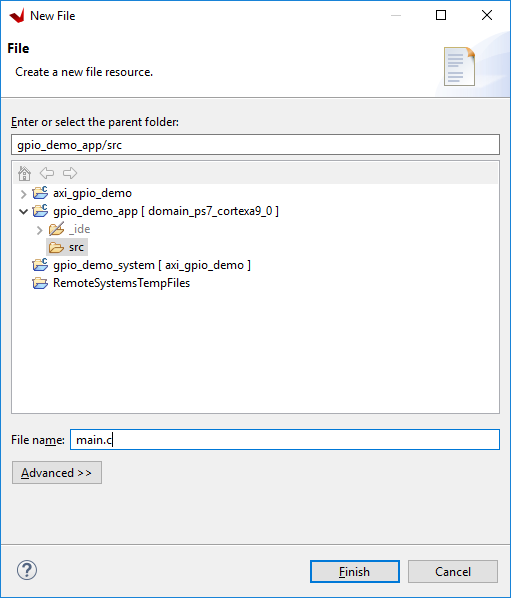
In the dialog that pops up, name the file “main.c”. The parent folder can be specified as well, but through the use of the right click in the previous step, the correct folder has already been chosen.
For Vitis 2023.2, users have reported that device IDs for GPIO IPs are no longer included in the xparameters header and that GPIOs are now initialized using their base addresses instead. For example, when initializing the GPIO used to access button states, one would call the following function to get its configuration information rather than the corresponding line in the sample code provided below: XGpio_LookupConfig(XPAR_AXI_GPIO_BUTTONS_BASEADDR);
Copy and paste the code to the right into the empty main.c file that has now been opened. Change the BTN_MASK and LED_MASK macros so that they contain a number of '1's equal to the number of buttons and leds connected to the GPIO peripherals in the hardware design.
Header Files - Additional Information
This code pulls in several headers that are automatically pulled into the Vitis workspace:
xparameters.h is a file generated during the process of exporting a platform from Vivado. It includes information on the hardware design, including addresses and some configuration parameters for AXI IPs. This is used by the example code to find the device IDs that must be passed to the GPIO drivers, so that they can look up the driver configuration required to correctly initialize the GPIO devices.
xil_printf.h gives access to the xil_printf function, which can be used to print to standard output, and requires less memory space than the stdio library.
xgpio.h gives access to the XGpio drivers, which are used to provide a standard API for controlling AXI GPIO peripherals. Several functions from this API are used in the example, including the GPIO reads, writes, and direction-setting calls.
xil_types.h contains a variety of different C types. In this case, it is only used to get access to the “u32” (unsigned 32-bit int) type, which is used in arguments to XGpio function calls.
What the Example Code Does
When the example is started, the message “Entered function main” is printed to a connected serial console. After that, the AXI GPIO IPs and drivers are initialized, and the application constantly loops, checking whether any button is pressed, and if they are, setting the LEDs high. When no buttons are pressed, the LEDs are held low.
#include "xparameters.h"
#include "xil_printf.h"
#include "xgpio.h"
#include "xil_types.h"

// Get device IDs from xparameters.h
#define BTN_ID XPAR_AXI_GPIO_BUTTONS_DEVICE_ID
#define LED_ID XPAR_AXI_GPIO_LED_DEVICE_ID
#define BTN_CHANNEL 1
#define LED_CHANNEL 1
#define BTN_MASK 0b1111
#define LED_MASK 0b1111

int main() {
	XGpio_Config *cfg_ptr;
	XGpio led_device, btn_device;
	u32 data;

	xil_printf("Entered function main\r\n");

	// Initialize LED Device
	cfg_ptr = XGpio_LookupConfig(LED_ID);
	XGpio_CfgInitialize(&led_device, cfg_ptr, cfg_ptr->BaseAddress);

	// Initialize Button Device
	cfg_ptr = XGpio_LookupConfig(BTN_ID);
	XGpio_CfgInitialize(&btn_device, cfg_ptr, cfg_ptr->BaseAddress);

	// Set Button Tristate
	XGpio_SetDataDirection(&btn_device, BTN_CHANNEL, BTN_MASK);

	// Set Led Tristate
	XGpio_SetDataDirection(&led_device, LED_CHANNEL, 0);

	while (1) {
		data = XGpio_DiscreteRead(&btn_device, BTN_CHANNEL);
		data &= BTN_MASK;
		if (data != 0) {
			data = LED_MASK;
		} else {
			data = 0;
		}
		XGpio_DiscreteWrite(&led_device, LED_CHANNEL, data);
	}
}


