Real Analog: Chapter 2
- Chapter 2 Materials
-
- Lecture Material:
- Lecture 5 PowerPoint Slides: Circuit reduction
- Lecture 6 PowerPoint Slides: Circuit reduction examples, practical application: temperature measurement
- Chapter 2 Videos:
- Lab 2 Video 2: Potentiometers: Variable resistors
- Lab 2 Video 2: Resistors 2: Resistance of networks of resistors. Using time-varying voltage sources to plot voltage-current characteristics of resistors.
- Lab 2 Video 3: Non-ideal effects: Non-ideal voltage sources and voltage measurements. Analog Discovery power supply limitations.
-
-
- Exercise Solutions: Chapter 2 exercise solutions
- Homework: Chapter 2 homework problems
2. Introduction and Chapter Objectives
In Chapter 1, we presented Kirchhoff's laws (which govern the interaction between circuit elements) and Ohm's law (which governs the voltage-current relationships for resistors). These analytical tools provide us with the ability to analyze any circuit containing only resistors and ideal power supplies. However, we also saw in Chapter 1 that a circuit analysis, which relies strictly on a brute-force application of these tools can become complex rapidly - we essentially must use as our unknowns the voltage differences across all resistors and the currents through all resistors. This generally results in a large number of unknowns and a correspondingly large number of equations, which must be written and solved in order to analyze any but the simplest circuit.
In the next few chapters, we will still apply Kirchhoff's laws and Ohm's law in our circuit analysis, but we will focus on improving the efficiency of our analyses. Typically, this improvement in efficiency is achieved by reducing the number of unknowns in the circuit, which reduces the number of equations, which must be written to describe the circuit's operation.
In this chapter, we introduce analysis methods based on circuit reduction. Circuit reduction consists of combining resistances in a circuit to a smaller number of resistors, which are (in some sense) equivalent to the original resistive network. Reducing the number of resistors, of course, reduces the number of unknowns in a circuit.
We begin our discussion of circuit reduction techniques by presenting two specific, but very useful, concepts: Series and parallel resistors. These concepts will lead us to voltage and current divider formulas. We then consider reduction of more general circuits, which typically corresponds to identifying multiple sets of series and parallel resistances in a complex resistive network. This chapter then concludes with two important examples of the application of circuit reduction techniques: the analysis of non-ideal power sources and non-ideal measurement devices; without an understanding of these devices, it is impossible to build practical circuits or understand the consequences of a voltage or current measurement.
After Completing this Chapter, You Should be Able to:
- Identify series and parallel combinations of circuit elements
- Determine the equivalent resistance of series resistor combinations
- Determine the equivalent resistance of parallel resistor combinations
- State voltage and current divider relationships from memory
- Determine the equivalent resistance of electrical circuits consisting of series and parallel combinations of resistors
- Sketch equivalent circuits for non-ideal voltage and current meters
- Analyze circuits containing non-ideal voltage or current sources
- Determine the effect of non-ideal meters on the parameter being measured
2.1 Series Circuit Elements and Voltage Division
There are a number of common circuit element combinations that are quite easily analyzed. These “special cases” are worth noting since many complicated circuits contain these circuit combinations as sub-circuits. Recognizing these sub-circuits and analyzing them appropriately can significantly simplify the analysis of a circuit.
This chapter emphasizes two important circuit element combinations: elements in series and elements in parallel. Also discussed is the use of these circuit element combinations to reduce the complexity of a circuit’s analysis.
Series Connections
Circuit elements are said to be connected in series if all of the elements carry the same current. An example of two circuit elements connected in series is shown in Fig. 2.1. Applying KCL at node a and taking currents out of the node as positive we see that:
$$-i_1+i_2=0$$
or
$$i_1=i_2 \qquad (Eq. 2.1)$$
Equation (2.1) is a direct outcome of the fact that the (single) node a in Fig. 2.1 interconnects only two elements - there are no other elements connected to this node through which current can be diverted. This observation is so apparent (in many cases1)) that equation (2.1) is generally written by inspection for series elements such as those shown in Fig. 2.1 without explicitly writing KCL.
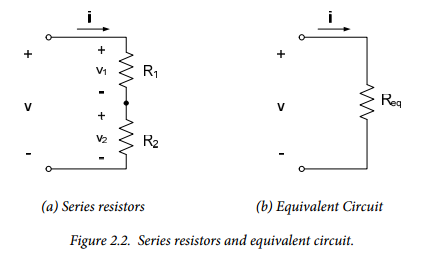
When resistors are connected in series, a simplification of the circuit is possible. Consider the resistive circuit shown in Fig. 2.2(a). Since the resistors are in series, they both carry the same current. Ohm's law gives:
\begin{align*} v_1 = R_1i \\ v_2=R_2i \\ (Eq.2.2) \end{align*}
Applying KVL around the loop:
$$ -v+v_1+v_2=0 \Rightarrow v=v_1+v_2 \qquad (Eq. 2.3)$$
Substituting equations (2.2) into equation (2.3) and solving for the current i results in:
$$ i = \frac{v}{R_1+R_2} \qquad (Eq. 2.4) $$
Now consider the circuit of Fig. 2.2(b). Application of Ohm's law to this circuit and solution for the current i gives:
$$ i = \frac{v}{R_{eq}} \qquad (Eq. 2.5) $$
Comparing equation (2.4) with equation (2.5), we can see that the circuits of Figs. 2.2(a) and 2.2(b) are indistinguishable if we select:
$$R_{eq}=R_1+R_2 \qquad (Eq. 2.6)$$
Figures 2.2(a) and 2.2(b) are called equivalent circuits if the equivalent resistance of Fig. 2.2(b) is chosen as shown in equation (2.6). Req of equation (2.6) is called the equivalent resistance of the series combination of resistors R1 and R2.
This result can be generalized to a series combination of N resistances as follows:
A series combination of N resistors R1, R2, …, RN can be replaced with a single equivalent resistance $R_{eq}=R_1+R_2+ \cdots + R_N$. The equivalent circuit can be analyzed to determine the current through the series combination of resistors.
Voltage Division
Combining equations (2.2) with equation (2.4) results in the following expressions for Vi and v2:
$$v_1= \frac{R_1}{R_1+R_2}v \qquad (Eq. 2.7)$$
$$v_2= \frac{R_2}{R_1+R_2}v \qquad (Eq. 2.8)$$
These results are commonly called voltage divider relationships, because they state that the total voltage drop across a series combination of resistors is divided among the individual resistors in the combination. The ratio of each individual resistor's voltage drop to the overall voltage drop is the same as the ratio of the individual resistance to the total resistance.
The above results can be generalized for a series combination of N resistance as follows:
The voltage drop across any resistor in a series combination of N resistances is proportional to the total voltage drop across the combination of resistors. The constant of proportionality is the same as the ratio of the individual resistor value to the total resistance of the series combination. For example, the voltage drop of the kth resistance in a series combination of resistors given by:
$$ v_k=\frac{R_k}{R_1+R_2+ \cdots +R_N}v \qquad (Eq. 2.9)$$
Example 2.1
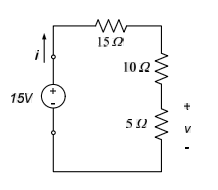
For the circuit below, determine the voltage across the 5Ω resistor, v, the current supplied by the source, i, and the power supplied by the source.
The voltage across the 5Ω resistor can be determined from our voltage divider relationship:
$$ v = [\frac{5Ω}{5Ω + 15Ω + 10Ω}] \cdot 15V= \frac{5}{30} \cdot 15V = 2.5V $$
The current supplied by the source can be determined by dividing the total voltage by the equivalent resistance:
$$i= \frac{15V}{R_{eq}}= \frac{15V}{5Ω+15Ω+10Ω}= \frac{15V}{30Ω}=0.5A$$
The power supplied by the source is the product of the source voltage and the source current:
$$P=iv=(0.5A)(15V)=7.5W$$
We can double-check the consistency between the voltage v and the current i with Ohm's law. Applying Ohm's law to the 5Ω resistor, with a 0.5A current, results in $v=(5Ω)(0.5A)=2.5V$, which agrees with the result obtained using the voltage divider relationship.
Section Summary
- If only two elements connect at a single node, the two elements are in series. A more general definition, however, is that circuit elements in series all share the same current - this definition allows us to determine series combinations that contain more than two elements. Identification of series circuit elements allows us to simplify our analysis, since there is a reduction in the number of unknowns: there is only a single unknown current for all series elements.
- A series combination of resistors can be replaced by a single equivalent resistance, if desired. The equivalent resistance is simply the sum of the individual resistances in the series combination. Therefore, a series combination of N resistors $R_1,R_2, \cdots, R_N$ can be replaced with a single equivalent resistance $R_{eq}=R_1+R_2+ \cdots + R_N$.
- If the total voltage difference across a set of series is known, the voltage differences across any individual resistor can be determined by the concept of voltage division. The term voltage division comes from the fact that the voltage drop across a series combination of resistors is divide among the individual resistors. The ratio between the voltage difference across a particular resistor and the total voltage difference is the same as the ratio between the resistance of that resistor and the total resistance of the combination. If vk is the voltage across the kth resistor, and RTOT is the total resistance of the series combination, the mathematical statement of this concept is:
$$ \frac{v_k}{v_{TOT}} = \frac{R_k}{R_{TOT}} $$
Exercises
2.2 Parallel Circuit Elements and Current Division
Circuit elements are said to be connected in parallel if all of the elements share the same pair of nodes. An example of two circuit elements connected in parallel is shown in Fig. 2.3. Applying KVL around the loop of Fig. 2.3 results in:
$$ v_1=v_2 \qquad (Eq. 2.10)$$
This result is so common that equation (2.10) is generally written by inspection fro parallel elements such as those shown in Fig. 2.3 without explicitly writing KVL.
We can simplify circuits, which consist of resistors connected in parallel. Consider the resistive circuit shown in Fig. 2.4(a). The resistors are connected in parallel, so both resistors have a voltage difference of v. Ohm's law applied to each resistor results in:
$$ i_1= \frac{v}{R_1} \\ i_2= \frac{v}{R_2} \\ \qquad (Eq. 2.11) $$
Applying KCL at node a:
$$i=i_1 + i_2 \qquad (Eq. 2.12)$$
Substituting equations (2.11) into equation (2.12):
$$ i = \left[ \frac{1}{R_1} + \frac{1}{R_2} \right] v \qquad (Eq. 2.13)$$
or
$$v= \frac{1}{\frac{1}{R_1}+\frac{1}{R_2}}\cdot i \qquad (Eq. 2.14)$$
If we set $ R_{eq} = \frac{1}{\frac{1}{R_1} + \frac{1}{R_2}}$, we can draw Fig. 2.4(b) as being equivalent to Fig. 2.4(b).
We can generalize this result for N parallel resistances:
A parallel combination of N resistors $R_1, R_2, \cdots, R_N$ can be replaced with a single equivalent resistance:
$$ R_{eq} = \frac{1}{\frac{1}{R_1} + \frac{1}{R_2}+ \cdots \frac{1}{R_N}} \qquad (Eq. 2.15)$$
For the special case of two parallel resistances, $R_1$ and $R_2$, the equivalent resistance is commonly written as:
$$R_{eq}= \frac{R_1R_2}{R_1+R_2} \qquad (Eq. 2.16)$$
This alternative way to calculate $R_{eq}$ can be also used to calculate $R_{eq}$ for larger numbers of parallel resistors since any number of resistors could be combined two at a time.
Current Division
Substituting equation (2.14) into equations (2.11) results in:
$$i_1 = \frac{1}{R_1}\cdot \frac{i}{ \frac{1}{R_1} + \frac{1}{R_2}} \qquad (Eq. 2.17)$$
Simplifying:
$$i_1=\frac{R_2}{R_1+R_2} \qquad (Eq. 2.18)$$
Likewise, for the current $i_2$:
$$i_2 = \frac{R_1}{R_1+R_2} \qquad (Eq. 2.19)$$
Equations (2.18) and (2.19) are the current divider relationships for two parallel resistances, so called because the current into the parallel resistance combination is divided between the two resistors. The ratio of one resistor's current to the overall current in the same as the ratio of the other resistance to the total resistance.
The above results can be generalized for a series combination of N resistances. By Ohm's law, $v = R_{eq} i$. Substituting our previous result for the equivalent resistance for a parallel combination of N resistors results in:
$$v= \frac{1}{\frac{1}{R_1}+\frac{1}{R_2} + \cdots \frac{1}{R_N}} \cdot i \qquad (Eq. 2.20)$$
Since the voltage difference across all resistors is the same, the current through the kth resistor is, by Ohm's law:
$$i_k=\frac{v}{R_k} \qquad (Eq. 2.21)$$
Where $R_k$ is the resistance of the kth resistor. Combining equations (2.20) and (2.21) gives:
$$i_k= \frac{\frac{1}{R_k}}{\frac{1}{R_1}+\frac{1}{R_2}+ \cdots \frac{1}{R_N}} \cdot i \qquad (Eq. 2.22)$$
It is often more convenient to provide the generalized result of equation (2.20) in terms of the conductance of the individual resistors. Recall that the conductance is the reciprocal of the resistance, $G=\frac{1}{R}$. Thus, equation (2.22) can be re-expressed as follows:
The Current through any resistor in a parallel combination of N resistances is proportional to the total current into the combination of resistors. The constant of proportionality is the same as the ratio of the conductance of the individual resistor value to the total conductance of the parallel combination. For example, the current through the kth resistance in a parallel combination of resistors is given by:
$$i_k=\frac{G_k}{G_1+G_2+ \cdots + G_N}i \qquad (Eq. 2.23)$$
Where i is the total current through the parallel combination of resistors.
One final comment about notation: two parallel bars are commonly used as shorthand notation to indicate that two circuit elements are in parallel. For example, the notation $R_1 \parallel R_2$ indicates that the resistors $R_1$ and $R_2$ are in parallel. The notation $R_1 \parallel R_2$ is often used as shorthand notation for the equivalent resistance of the parallel resistance combination, in lieu of equation (2.16).
Double-checking results for parallel resistances:
- The equivalent resistance for a parallel combination of N resistors will always be less than the smallest resistance in the combination. In fact, the equivalent resistance will always obey the following inequalities:
$$\frac{R_{min}}{N} \leq R_{eq} \leq R_{min}$$
- Where $R_{min}$ is the smallest resistance value in the parallel combination.
- In a parallel combination of resistances, the resistor with the smallest resistance will have the largest current and the resistor with the largest resistance will have the smallest current.
Section Summary
- If several elements interconnect the same two nodes, the two elements are in parallel. A more general definition, however, is that circuit elements in parallel all share the same voltage difference. As with series circuit elements, identification of parallel circuit elements allows us to simplify our analysis, since there is a reduction in the number of unknowns: there is only a single unknown voltage difference for all of the parallel elements.
- A parallel combination of resistors can be replaced by a single equivalent resistance, if desired. The conductance of the parallel combination is simply the sum of the individual conductance of the parallel resistors. Therefore, a parallel combination of N resistors $R_1$, $R_2$, $\cdots$, $R_N$ can be replaced with a single equivalent resistance:
$$R_{eq} = \frac{1}{\frac{1}{R_1}+\frac{1}{R_2}+\cdots\frac{1}{R_N}}$$
- If the total current through a set of parallel resistors is known, the current through any individual resistor can be determined by the concept of current division. The term current division comes form the fact that the current through a parallel combination of resistors is divided among the individual resistors. The ratio between the current through a particular resistor and the total current is the same as the ratio between the conductance of that resistor and the total conductance of the combination. If $i_k$ is the voltage across the kth resistor, $i_{TOT}$ is the total current through the parallel combination, $G_k$ is the conductance of the kth resistor, and $G_{TOT}$ is the total conductance of the parallel combination, the mathematical statement of this concept is:
$$\frac{v_k}{i_{TOT}}=\frac{G_k}{G_{TOT}}$$
Exercises
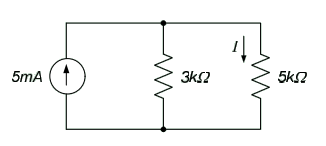
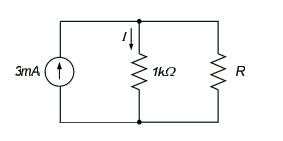
1. Determine the value of I in the circuit below.
2. Determine the value of R in the circuit below which makes I=2mA.
2.3 Circuit Reduction and Analysis
The previous results give us an ability to potentially simplify the analysis of some circuits. This simplification results if we can use circuit reduction techniques to convert a complicated circuit to a simpler, but equivalent, circuit which we can use to perform the necessary analysis. Circuit reduction is not always possible, but when it is applicable it can significantly simplify the analysis of a circuit.
Circuit reduction relies upon identification of parallel and series combinations of circuit elements. The parallel and series elements are then combined into equivalent elements and the resulting reduced circuit is analyzed. The principles of circuit reduction are illustrated below in a series of examples.
Example 2.2
Determine the equivalent resistance seen by the terminals of the resistive network shown below.
The sequence of operations performed is illustrated below. The 6Ω and 3Ω resistances are combined in parallel to obtain an equivalent 2Ω resistance. This 2Ω resistance and the remaining 6Ω resistance are in series, these are combined into an equivalent 8Ω resistance. Finally, this 8Ω resistor and the 24Ω resistor are combined in parallel to obtain an equivalent 6Ω resistance. Thus, the equivalent resistance of the overall network is 6Ω.
Example 2.3
In the circuit below, determine the power delivered by the source.
In order to determine power delivery, we need to determine the total current provided by the source to the rest of the circuit. We can determine current easily if we convert the resistor network to a single, equivalent, resistance. A set of steps for doing this are outlined below.
Step 1: The four ohm and two ohm resistors, highlighted on the figure to the left below in blue, are in series. Series resistances add directly, so these can be replaced with a single six ohm resistor, as shown on the figure to the right below.
Step 2: The tree ohm resistor and the two six ohm resistors are now all in parallel, as indicated on the figure to the left below. These resistances can be combined into a single equivalent resistor $R_{eq}=\frac{1}{\frac{1}{3}+\frac{1}{6}+\frac{1}{6}}=1.5\Omega$. The resulting equivalent circuit is shown to the right below.
The current out of the source can now be readily determined from the figure to the right above. The voltage drop across the 1.5Ω resistor is 6V, so Ohm's law gives $i=\frac{6V}{1.5\Omega}=4A$. Thus, the power delivered by the source is $P=(4A)(6V)=24W$. Since the sign of the current relative to the current does not agree with the passive sign convention, the power is generated by the source.
Example 2.4
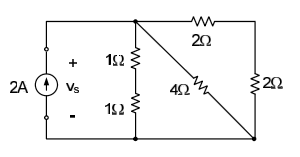
For the circuit shown below, determine the voltage, $v_s$, across the 2A source.
The two 1Ω resistors and the two 2Ω resistors are in series with one another, as indicated on the figure to the left below. These can be combined by simply adding the series resistances, leading to the equivalent circuit shown to the right below.
The three remaining resistors are all in parallel (they all share the same nodes) so they can be combined using the relation $R_{eq}=\frac{1}{\frac{1}{2}+\frac{1}{4}+\frac{1}{4}}=1\Omega$. Note that it is not necessary to combine all three simultaneously, the same result is obtained by successive combinations of two resistances. For example, the two 4Ω resistors can be combined using equation (2.16) to obtain: $R_{eq1}=\frac{4 \cdot 4}{4+4}=2\Omega$. The total equivalent resistance can then be determined by a parallel combination of $R_{eq1}$ and the 2Ω resistor: $R_{eq}=\frac{2 \cdot 2}{2+2}=1 \Omega$.
The voltage across the source can now be determined from Ohm's law: $v_s=(1\Omega)(2A)=2V$. The assumed polarity of the source voltage is correct.
Example 2.5: Wheatstone Bridge
A Wheatstone bridge circuit is shown below. The bridge is generally presented as shown in the figure to the left; we will generally use the equivalent circuit shown to the right. A Wheatstone bridge is commonly used to convert a variation in resistance to a variation in voltage. A constant supply voltage $V_s$ is applies to the circuit. The resistors in the circuit all have a nominal resistance of R; the variable resistor has a variation $\Delta R$ from this nominal value. The output voltage $v_{ab}$ indicates the variation $\Delta R$ in the variable resistor. The variable resistor in the network is often a transducer whose resistance varies dependent upon some external variable such as temperature.
By voltage division, the voltages $v_b$ and $v_a$ (relative to ground) are:
$$v_b=\frac{(R+\Delta R)}{2R+\Delta R}V_s$$
and
$$v_a=Ri_2=\frac{V_s \cdot R}{2R}=\frac{V_s}{2}$$
The voltage $v_{ab}$ is then:
$$v_{ab}=v_a-v_b= \left( \frac{1}{2} - \frac{R+ \Delta R}{2R + \Delta R} \right) V_s = \left( \frac{(2R+ \Delta R) - 2(R+ \Delta R)}{2(2R+ \Delta R)} \right) V_s = - \frac{\Delta R}{2(2R+ \Delta R)} \cdot V_s $$
For the case in which $\Delta R << 2R$, this simplifies to:
$$v_{ab} \approx - \frac{V_s}{4R}\Delta R$$
And the output voltage is proportional to the change in resistance of the variable resistor.
Practical Applications:
A number of common sensors result in a resistance variation resulting from some external influence. Thermistors change resistance as a result of temperature changes; strain gages change resistance as a result of deformation, generally due to application of a load to the part to which the gage is bonded; photoconductive transducers, or photoresistors, change resistance as a result of changes in light intensity. Wheatstone bridges are commonly used in conjunction with these types of sensors.
Section Summary
- In a circuit, which contains obvious series and/or parallel combinations of resistors, analysis can be simplified by combining these resistances into equivalent resistances. The reduction in the overall number of resistances reduces the number of unknowns in the circuit, with a corresponding reduction in the number of governing equations. Reducing the number of equations and unknowns typically simplifies the analysis of the circuit.
- Not all circuits are reducible.
Exercises
- For the circuit shown, determine:
- $R_{eq}$ (the equivalent resistance seen by the source)
- The currents $I_1$ and $I_2$
2.4 Non-ideal Power Supplies
In section 1.2, we discussed ideal power sources. In that section, an ideal voltage supply was characterized as providing a specified voltage regardless of the current requirements made upon the device. Likewise, an ideal current source was defined as providing a specified voltage regardless of the voltage potential difference across the source. These models are not realistic - since an ideal voltage source can provide infinite current with non-zero voltage difference and an ideal current source can provide infinite voltage difference with non-zero current, either device is capable of delivering infinite power. In many cases, the ideal voltage and current source models will be adequate, but in cases where we need to more accurately replicate the operation of realistic power supplies, we will need to modify our models of these devices.
In this section, we present simple models for voltage and current sources which incorporate more realistic assumptions as to the behavior of these devices.
Non-ideal Voltage Sources
An ideal voltage source was defined in section 1.2 as providing a specified voltage, regardless of the current flow out of the device. For example, an ideal 12V battery will provide 12V across its terminals, regardless of the load connected to the terminals. A real 12V battery, however, provides 12V across its terminals only when its terminals are open-circuited. As we draw current from the terminals, the battery will provide less than 12V - the voltage will decrease as more and more current is drawn from the battery. The real battery thus appears to have an internal voltage drop which increases with increased current.
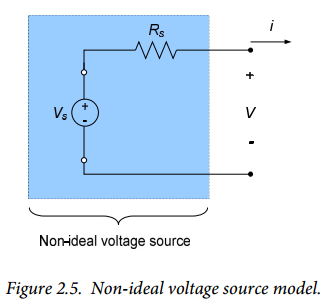
We will model a real or practical voltage source as a series connection of an ideal voltage source and an internal resistance. This model is depicted schematically in Fig. 2.5, in which the non-ideal voltage source contains an ideal voltage source providing voltage $V_s$ and an internal resistance $R_s$. The non-ideal voltage source delivers a voltage V and a current i, where:
$$V=V_s-i \cdot R_s \qquad (Eq. 2.24)$$
Equation (2.24) indicates that the voltage delivered by our non-ideal voltage source model decreases as the current out of the voltage source increases, which agrees with expectations.
Example 2.6
Consider the case in which we connect a resistive load to the non-ideal voltage source. The figure below provides a schematic of the overall system; $R_L$ is the load resistance, $V_L$ is the voltage delivered to the load, and $i_L$ is the current delivered to the load.
In the case above, the current delivered to the load is $i=\frac{V_s}{R_s+R_L}$ and the load voltage is $V_L=V_s \frac{R_L}{R_s+R_L}$. Thus, if the load resistance is infinite (the load is an open circuit), $V_L=V_S$, but the power supply delivers no current and hence no power to the load. If the load resistance is zero (the load is a short circuit), $V_L=0$ and the power supply delivers current $i_L=\frac{V_s}{R_s}$ to the load; the power delivered to the load, however, is still zero.
Example 2.7: Charging a Battery
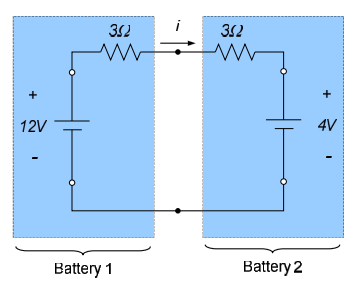
We have a “dead” car battery which is providing only 4V across its terminals. We want to charge the battery using a spare battery which is providing 12V across its terminals. To do this, we connect the two batteries as shown below:
If we attempt to analyze this circuit by applying KVL around the loop, we obtain 12V=4V. This is obviously incorrect and we cannot proceed with our analysis - our model disagrees with reality!
To resolve this issue, we will include the internal resistance of the batteries. Assuming a 3Ω internal resistance in each battery, we obtain the following model for the system:
Applying KVL around the loop, and using Ohm's law to write the voltages across the battery internal resistances in terms of the current between the batteries results in:
$$-12V+(3\Omega)i+(3\Omega)i+4V=0$$
Which can be solved for the current i to obtain:
$$i= \frac{12V-4V}{6\Omega}=1.33A$$
Notice that as the voltage of the “dead” battery increases during the charging process, the current delivered to the “dead” battery decreases.
Non-ideal Current Sources
An ideal current source was defined in section 1.2 as providing a specified current, regardless of the voltage difference across the device. This model suffers from the same basic drawback as our ideal voltage source model - the model can deliver infinite power, which is inconsistent with the capabilities of a real current source.
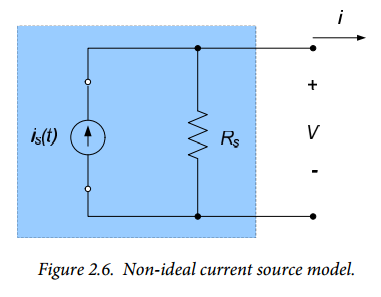
We will use the circuit shown schematically in Fig. 2.6 to model a non-ideal current source. The non-ideal model consists of an ideal current source, $i_s$, placed in parallel with an internal resistance, $R_s$. The source delivers a voltage V and current i. The output current is given by:
$$i=i_S-\frac{V}{R_S} (Eq. 2.25)$$
Equation (2.25) shows that the current delivered by the source decreases as the delivered voltage increases.
Example 2.8
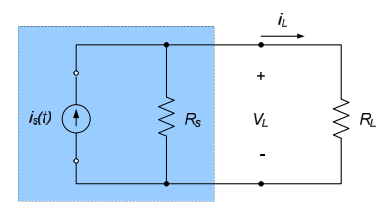
Consider the case in which we connect a resistive load to the non-ideal current source. The figure below provides a schematic of the overall system; $R_L$ is the load resistance, $V_L$ is the voltage delivered to the load, and $i_L$ is the current delivered to the load.
In the case above, the current delivered to the load can be determined from a current divider relation as $i_l=i_s \cdot \frac{R_s}{R_s+R_L}$ and the load voltage, by Ohm's law, is $V_L=i_L R_L = i_s \frac{R_S R_L}{R_s + R_L}$. If the load resistance is zero (the load is a short circuit), $i_L=i_s$, but the power supply delivers no voltage and hence no power to the load. In the case of infinite load resistance (the load is open circuit), $i_L = 0$. In this case, we can neglect $R_s$ in the denominator of the load voltage equation to obtain $V_L \approx i_s \frac{R_S R_L}{R_L}$ so that $V_L \approx i_s R_S$. Since the current is zero, however, the power delivered to the load is still zero.
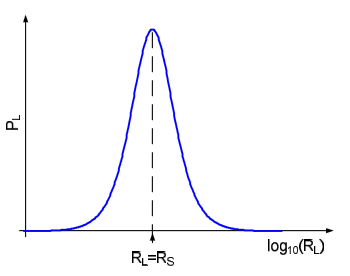
If we explicitly calculate the power delivered to the load, we obtain $V_L = i_{s}^{2} \frac{R_S R_L}{R_s + R_L} \cdot \frac{R_s}{R_s+R_L}$. A plot of the power delivered to the load as a function of the load resistance is shown below; a logarithmic scale is used on the horizontal axis to make the plot more readable. As expected, the power is zero for high and low load resistances. The peak of the curve occurs when the load resistance is equal to the source resistance, $R_L=R_s$.
Section Summary
- In many cases, power supplies can be modeled as ideal power supplies, as presented in section 1.2. However, in some cases representation as a power supply as ideal results in unacceptable errors. For example, ideal power supplies can deliver infinite power, which is obviously unrealistic.
- In this section, we present a simple model for a non-ideal power supply.
- Our non-ideal voltage source consists of an ideal voltage source in series with a resistance which is internal to the power supply.
- Our non-ideal current supply consists of an ideal current source in parallel with a resistance which is internal to the power supply.
- Voltage and current divider formulas allow us to easily quantify the effects of the internal resistances of the non-ideal power supplies. Our analysis indicates that the non-ideal effects are negligible, as long as the resistance of the load is large relative to the internal resistance of the power supply.
Exercises
1. A voltage source with an internal resistance of 2Ω as shown below is used to apply power to a 3Ω resistor. What voltage would you measure across the 3Ω resistor?
2. The voltage source of exercise 1 above is used to apply power to a 2kΩ resistor. What voltage would you measure across the 2kΩ resistor?
2.5 Practical Voltage and Current Measurement
The process of measuring a physical parameter will almost invariably change the parameter being measures. This effect is both undesirable and, in general, unavoidable. One goal of any measurement is to effect the parameter being measured as little as possible.
The above statement is true of voltage and current measurements. An ideal voltmeter, connected in parallel with some circuit element, will measure the voltage across the element without affecting the current flowing through the element. Unfortunately, any real or practical voltmeter will draw some current from the circuit it is connected to; this loading effect will change the circuit's operating conditions, causing some difference between the measured voltage and the corresponding voltage without the voltmeter present in the circuit. Likewise, an ideal ammeter, connected in series with some circuit element, will measure current without affecting the voltage in the circuit. A practical ammeter, like a practical voltmeter, will introduce loading effects which change the operation of the circuit on which the measurement is being made.
In this section, we introduce some effects of measuring voltages and currents with practical meters.
Voltmeter and Ammeter Models
We will model both voltmeters and ammeters as having some internal resistance and a method for displaying the measured voltage difference or current. Fig. 2.7 shows schematic representations of voltmeters and ammeters.
The ammeter in Fig. 2.7(a) has an internal resistance $R_M$; the current through the ammeter is $i_A$ and the voltage difference across the ammeter is $V_M$. The ammeter's voltage difference should be as small as possible - an ammeter, therefore, should have an extremely small internal resistance.
The voltmeter in Fig. 2.7(b) is also represented as having an internal resistance $R_M$; the current through the meter is $i_v$ and the voltage difference across the meter is $V_v$. The current through the voltmeter should be as small as possible - the voltmeter should have an extremely high internal resistance.
The effects of non-zero ammeter voltages and non-zero voltmeter currents are explored in more detail in the following subsections.
Voltage Measurement
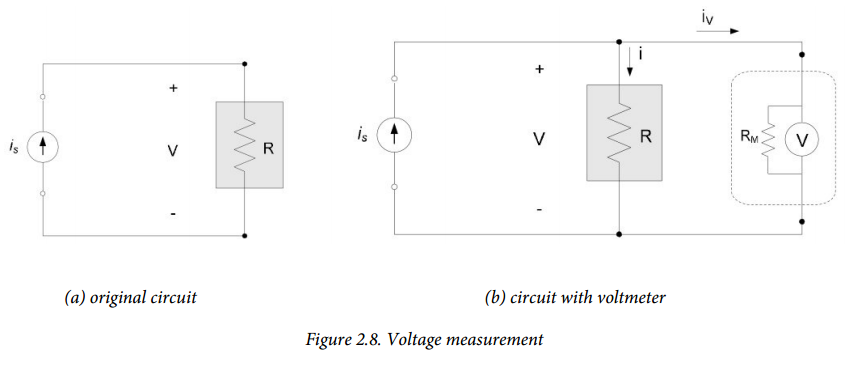
Consider the circuit shown in Fig. 2.8(a). A current source, $i_s$, provides current to a circuit element with resistance, R. We want to measure the voltage drop, V, across the circuit element. We do this by attaching a voltmeter across the circuit element as shown in Fig. 2.8(b).
In Fig. 2.8(b) the voltmeter resistance is in parallel to the circuit element we wish to measure the voltage across and the combination of the circuit element and the voltmeter becomes a current divider. The current through the resistor R then becomes:
$$i=i_s \frac{R_M}{R+R_M} \qquad (Eq. 2.26)$$
The voltage across the resistor R is then, by Ohm's law:
$$V=i_s \frac{R \cdot R_M}{R+R_M} \qquad (Eq. 2.27)$$
If $R_M >>R$, this expression simplifies to:
$$V \approx i_s \frac{R \cdot R_M}{R_M} = R \cdot i_s \qquad (Eq. 2.28)$$
And negligible error is introduced into the measurement - the measured voltage is approximately the same as the voltage without the voltmeter. If, however, the voltmeter resistance is comparable to the resistance R, the simplification of equation (2.28) is not appropriate and significant changes are made to the system by the presence of the voltmeter.
Current Measurement
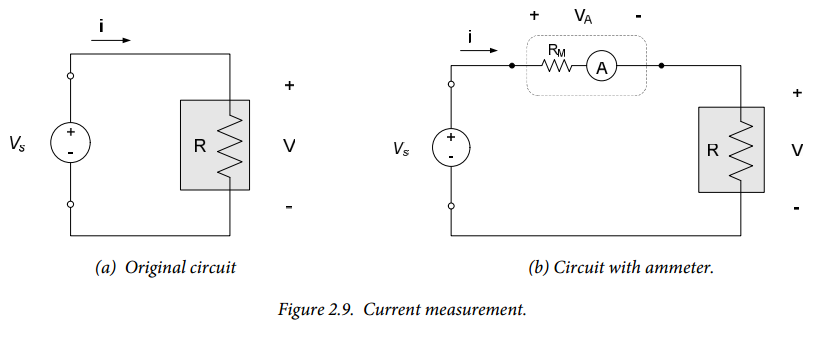
Consider the circuit shown in Fig. 2.9(a). A voltage source, $V_s$, provides power to a circuit element with resistance, R. We want to measure the current, $i$, through the circuit element. We do this by attaching an ammeter in series with the circuit element as shown in Fig. 2.9(b).
In Fig. 2.9(b) the series combination of the ammeter resistance and the circuit element whose current we wish to measure creates a voltage divider. KVL around the single circuit loop provides:
$$V_s=i(R_M+R) (Eq. 2.29)$$
Solving for the current results in:
$$i= \frac{V_s}{R_M+R} (Eq. 2.30)$$
If $R_M << R$, this simplifies to:
$$i \approx \frac{V_s}{R} (Eq. 2.31)$$
And the measured current is a good approximation to current in the circuit of Fig. 2.9(a). However, if the ammeter resistance is not small compared to the resistance R, the approximation of equation (2.31) is not appropriate and the measured current is no longer representative of the circuit's operation without the ammeter.
Caution
Incorrect connections of ammeters or voltmeters can cause damage to the meter. For example, consider the connection of an ammeter in parallel with a relatively large resistance, as shown below.
In this configuration the ammeter current, $i_M= \frac{V_S}{R_M}$. Since the ammeter resistance is typically very small, this can result in high currents being provided to the ammeter. This, in turn, may result in excessive power being provided to the ammeter and resulting damage to the device.
Ammeters are generally intended to be connected in series with the circuit element(s) whose current is being measured. Voltmeters are generally intended to be connected in parallel with the circuit element(s) whose voltage is being measured. Alternate connections can result in damage to the meter.
Section Summary
- Measurement of voltage and/or current in a circuit will always result in some effect on the circuit's behavior - that is, our measurement will always change the parameter being measured. One goal when measuring a voltage or current is to ensure that the measurement effects are negligible.
- In this section, we present simple models for voltmeters and ammeters (voltage and current measurement devices, respectively).
- Our non-ideal voltmeter consists of an ideal voltmeter (which had infinite resistance, and thus draws no current from the circuit) in parallel with a resistance which is internal to the voltmeter. This model replicates the finite current which is necessarily drawn from the circuit by a real voltmeter.
- Our non-ideal ammeter consists of an ideal ammeter (which has zero resistance, and thus introduces no voltage drop in the circuit) in series with a resistance which is internal to the ammeter. This resistance allows us to model the finite voltage drop which is introduced into the circuit by a real current measurement.
- Voltage and current divider formulas allow us to easily quantify the effects of the internal resistances of voltage and current meters. Our analysis indicates that the non-ideal effects are negligible, as long as:
- The resistance of the voltmeter is large relative to the resistance across which the voltage measurement is being made.
- The resistance of the ammeter is small compared to the overall circuit resistance.
Exercises
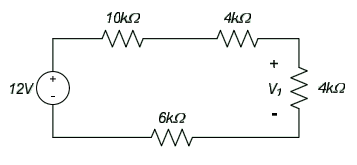
- A voltmeter with an internal resistance of 10MΩ is used to measure the voltage $v_{ab}$ in the circuit below. What is the measured voltage? What voltage measurement would you expect from an ideal voltmeter?


